Last updated on 02 July, 2025.

ATAC is a tier 9 USA light tank. It has poor armour and decent mobility for a LT, but its main features are its 2 burst-fire autoloader guns. One is a 3×2 with higher alpha and lower DPM, the other is a 4×3 with low alpha but higher DPM, both guns fire HESH shells.
- Armour
- 3×2 90mm Gun
- 4×3 90mm Gun
- Mobility
- Equipment, Consumables, & Provisions
- Gameplay advice
- Playing the 3×2 gun
- Playing the 4×3 gun
- Overall
- Is it worth getting?
- Most recently sold for:
- Legendary Camos:
Armour
(The ATAC in the images is using Improved Assembly)

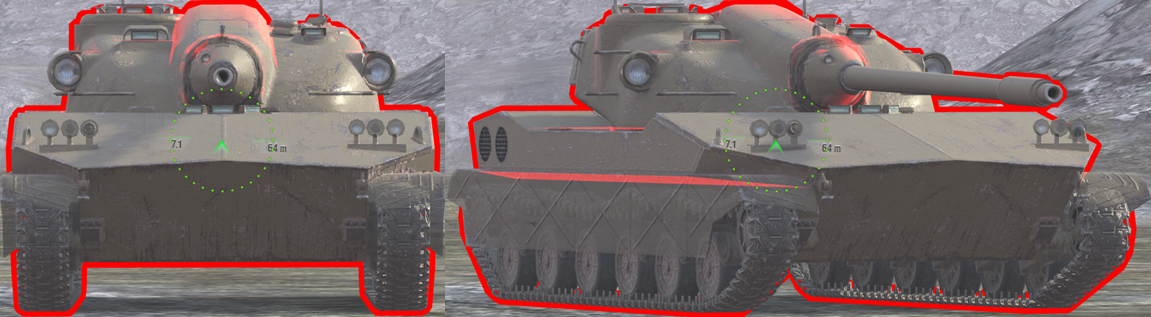
Drag slider right -> to view AP from 105mm gun (245mm penetration)
Drag slider <- left to view HEAT from 105mm gun (290mm penetration)
Notice how the upper plate is red to AP, this is due to a base thickness of 35mm, making any gun smaller than 105.1mm unable to penetrate it due to the auto-ricochet angle.
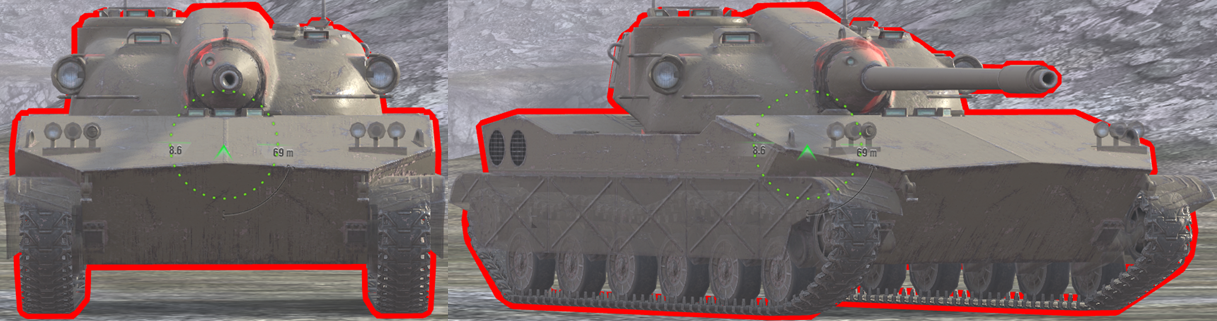
Drag slider right -> to view AP from 122mm gun (220mm penetration)
Drag slider <- left to view HE from 122mm gun (61mm penetration)
Armour when facing head on:
Upper plate 175mm (auto-ricochet to anything under 106mm caliber)
Lower plate 60mm
Turret cheeks 45-85mm
Gun mantlet 135mm+
Cupola 25mm
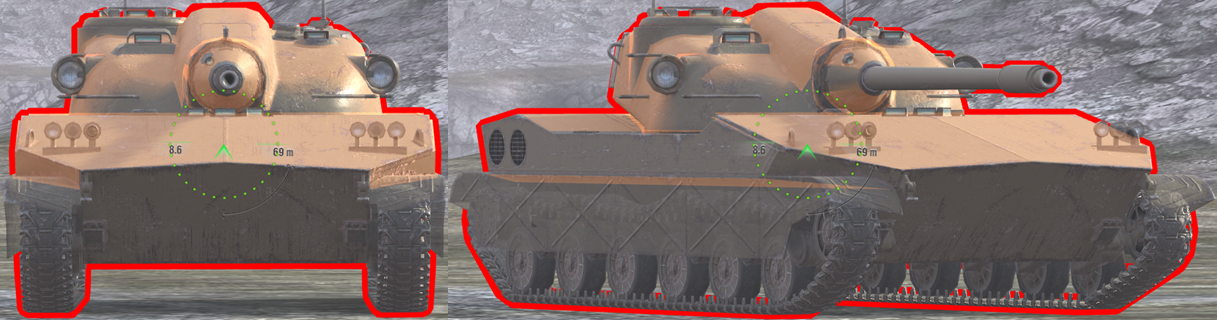
Side armour:
Side armour is 25mm, with no spaced armour protection at all.
Armour vs all tier 8-10 enemies:
The ATAC is generally lightly armoured and won’t bounce shots, the only exception is on the upper plate and turret top.
The upper plate is a 35mm thick auto-ricochet plate, meaning any guns that are 105mm or smaller will always bounce (if using AP or APCR).
The turret top is a 30mm thick auto-ricochet plate, so its able to bounce any gun thats 90mm or smaller.
Other than this, larger gun calibers will triple overmatch the upper plate and turret top, and the lower plate and sides are very weak to HE.
3×2 90mm Gun
The ATAC has a choice of two 90mm guns, the section below is regarding the 3×2 gun.
Firepower:
-Ammo: AP/HESH/HE.
-Penetration: 235/155/45mm.
-Alpha damage: 160/200/240.
-Reload time is 17.2s for a total of 2783 DPM on AP (or 3478 on HESH).
Burst fire:
-3 shots in the magazine.
-2 shells per shot/burst.
-0.67s intra-burst reload.
-1.40s intra-clip reload
-Damage per 1 burst: 320/400/480
-Total damage per magazine: 960/1200/1440
Handling:
–Estimated aim time is 2.6/2.8s
–Base aim time is 1.7, but it can get down to 1.31s
-Dispersion is 0.335/0.285
–Gun handling is 0.11/0.12/0.11, or 0.1/0.1/0.1 with Vertical Stabilizer.
-Dispersion after shot is 2.500
Usability:
-Shell velocities are 750/300/300 m/s.
-Gun depression is -7 over the front of the tank, -9 degrees everywhere else.
The thing with this gun is that the time between the 1st and 2nd shot of your burst is 0.67s, which is quick, but its a long enough period of time without firing to throw off your aim.
This gun requires you to get used to following enemies perfectly with your gun after firing, or risk missing/bouncing the 2nd shell.
Other than this there’s also the very low HESH penetration & shell velocity, making that ammo type very situational (ie, close range and against large flat armour plates).
Overall this is not a bad gun if you can get around the above-mentioned things. It has very high DPM, great burst potential (960 on AP or 1200 on HESH), great aim time, with good standard penetration & gun handling.
4×3 90mm Gun
The ATAC has a choice of two 90mm guns, the section below is regarding the 4×3 gun.
Firepower:
-Ammo: AP/HESH/HE.
-Penetration: 235/155/45mm.
-Alpha damage: 90/115/140.
-Reload time is 17.2s for a total of 2977 DPM (or 3803 on HESH).
Burst fire:
-4 shots in the magazine.
-3 shells per shot/burst.
-0.33s intra-burst reload.
-1.30s intra-clip reload
-Damage per 1 burst: 270/345/420
-Total damage per magazine: 1080/1380/1680
Handling:
–Estimated aim time is 2.6/2.8s
–Base aim time is 1.7, but it can get down to 1.31s
-Dispersion is 0.335/0.285
–Gun handling is 0.11/0.12/0.11, or 0.1/0.1/0.1 with Vertical Stabilizer.
-Dispersion after shot is 2.000.
Usability:
-Shell velocities are 750/300/300 m/s.
-Gun depression is -7 over the front of the tank, -9 degrees everywhere else.
This gun doesn’t suffer from the same issue as the 3×2 gun. The shells fire faster within the burst, meaning the time when you are “not firing” within the burst feels non-existent. Its easier to follow enemies while firing due to this constant fire.
This gun is overall great, it has insanely high DPM on HESH, with still among the best DPM of any tier 9 LT when using AP. It has the same great aim time & handling as the other gun, with the same downsides of terrible HESH shell velocity. Despite only 90 alpha on AP, which can be a bit awkward, this gun makes up for it by having more “chances at damage”, with a total of 12 shots.
Mobility
Raw stats:
-Forward speed is 65km/h.
-Reverse speed is -21km/h.
-Raw acceleration rate is 28.6 hp/t.
-Engine power is 684hp for its 24 ton weight.
Hard terrain mobility:
-Actual acceleration is 28.6 hp/t.
-Traverse speed is 64.7 deg/s.
Medium terrain mobility:
-Actual acceleration is 23.8 hp/t.
-Traverse speed is 53.9 deg/s.
Terrain resistance stats:
–Terrain resistances are 1/1.2/1.5
The mobility of the ATAC isn’t impressive for a light tank, however its not terrible. Its noticeable on medium terrain that ATAC isn’t as agile as other tier 9 LT, and the large size of the tank doesn’t help with that. However, the hard terrain mobility is good, and top speed of 65km is also good.
Equipment, Consumables, & Provisions
ATAC has access to the Reticle Calibration consumable, and a regular provision setup.
Reticle calibration isn’t mandatory on this tank, as the ATAC has already got great aim time and doesn’t struggle with accuracy.
However, its definitely worth using if you decide to equip Supercharger in the equipment choice, as you sacrifice a huge amount of aim time to balance out the tank’s terrible shell velocity.
Calibrated Shells
Calibrated shells is a must on both of the ATAC’s guns. Reasons being:
1- ATAC has no high-penetration premium ammo. The AP penetration it has is the best it gets, improving it is mandatory.
2- ATAC’s HESH has very low penetration, and is really only usable on very weak lower plates or side armour, so improving the penetration would enable you to use it more in battle.
Calibrated shells would increase the ATAC’s penetration on both guns, on AP from 235mm to 254mm, on HESH from 155mm to 167mm, and HE from 45mm to 49mm.
Improved Assembly:
ATAC is a light tank, it doesn’t have any armour to need enhancing, so use improved assembly to increase HP & survivability.
Improved assembly takes the ATAC’s 1550 base HP up to 1612 HP.
Supercharger:
This is needed due to ATAC’s low shell velocity on all shells, and it can sacrifice GLD since it has great base aim time.
750 m/s on AP is usable, but still on the low end for AP, and 300m/s is completely abysmal for the HESH & HE shells, it makes them almost impossible to use outside of close range fights.
Supercharger would increase AP shell velocity from 750m/s to 1013m/s, and from 300m/s to 405m/s on HESH & HE.
Vertical Stabilizer/Refined Gun:
Both of these can be good on the ATAC, you may decide to use different choices depending on what gun you use on this tank, and what playstyle you take with it.
ATAC has great gun handling & after-shot-dispersion, however it also shoots many shots very quickly, which vertical stabilizer would help to keep the gun accurate while firing.
Refined gun will help with the tank’s dispersion, helping to snap shots when you don’t have time to aim properly, which can be good with the burst fire guns that this tank has.
Gameplay advice
The ATAC is very much an ambush/opportunistic light. No matter which gun you use, the ATAC preys on opportunities to take advantage of isolated tanks and put in its massive magazine of damage.
General gameplay:
ATAC essentially plays like other ambush & autoloader light tanks, you have to try use mobility to get yourself into positions to deal damage, then use mobility to create time for yourself to reload and run away to reset your camo.
Watch out for the larger size of the ATAC, as its not as small as other light tanks, it has a long turret & hull, with abysmal side armour. Try to always use hard cover (buildings and such) to hide the tank, either to reload or reset your camo.
Also be aware that you aren’t quite as agile or mobile as other lights, especially on medium terrain. Your main strength lies in your gun’s damage output, so you have to try and mitigate the unimpressive mobility and size.
If an enemy has more HP than you have in your magazine damage, make sure the situation is right before going for them. For example, get your allies to push with you (since you do a massive chunk of their HP), or make sure you can run away after dumping your damage. Don’t rush into a 2v1 or even a 1v1 without a plan.
HESH use:
HESH on this tank isn’t like on most other tanks with premium HESH/HE shells. On most tanks the penetration is good enough that you can pre-load it in battle and essentially use it as your “standard ammo”.
For ATAC the penetration is too low to do so, and on top of this the shell velocity and the way the guns shoot make it impractical to be using HESH outside of specific situations, these being:
1 – Close range fights, the low shell velocity is still noticeable, but its workable, your shots hit enemies faster and they have less space to run from you.
2 – Large flat armour plates, its harder to miss large targets, and generally they don’t have spaced armour or tracks covering them (for example FV4005 turret, Leopard 1 hull)
3 – Non-moving enemies, even at long range, if they don’t move at all, then all your HESH can hit and penetrate. As soon as enemies start moving it becomes much harder to use.
Most of the time in battle you should use AP, however HESH gives you an insane damage boost, so use it when you can.
Using reticle calibration:
You may find that this consumable isn’t that useful in most situations in this tank. The main reason would be that the ATAC is most effective in close range, its burst fire guns, use of HESH, low shell velocity, all make it a tank that is less effective the further it gets from enemies.
You should still equip it on your tank, as the consumable is useful in situations where you are at long range, as the lowered dispersion will make the shell spread less. It would also help if you use supercharger equipment, which sacrifices aim time for better shell velocity.
Remember your damage:
Its important to know what kind of damage you can deal to an enemy, as it will help you decide whether or not you can completely kill an enemy.
Full burst damage (if you hit all shots):
3×2 AP: 960
3×2 HESH: 1200
3×2 HE: 1440
4×3 AP: 1080
4×3 HESH: 1380
4×3 HE: 1680
Also note, it takes 4.81s to shoot all shots on the 3×2 gun, and 6.54s to unload all shots on the 4×3 gun. If you are on low HP and the enemy has a fast reload, these damage unload times will be important.
Playing the 3×2 gun
The ATAC is very much an ambush/opportunistic light.
Follow the enemy:
While shooting (after you already clicked to shoot), follow the enemy using your reticle.
The 3×2 gun has a very odd/awkward feel due to only having 2 shots per burst, and a fairly slow 0.67s delay within each burst.
It means after you shoot the first shot, there’s a short but noticeable period where the gun isn’t firing, and you have to get used to keeping the aim reticle tracked on the enemy in this time, this way the 2nd shot of your burst also hits the target.
Predict enemy movement:
Doing this will help you to increase your shot effectiveness and decrease the amount of misses you get with this gun.
On moving targets, it should be fairly simple, if they are moving forward then give lead in front so both shots hit; if in reverse then its the same thing. If enemies suddenly turn then it can be hard to predict, you just need to try react quickly as possible.
2 examples below are a bit more specific to this gun.
Example 1:
Shooting a stationary enemy would either get you spotted, or let them know they are exposed, so they are likely to move. If you shoot them, the first shot hits, but they might already be moving away by the time your second shot is fired. If you aren’t ready to move the reticle, it could cause your 2nd shot to miss.
Example 2:
If an enemy is hulldown, moving back & fourth horizontally along a ridgeline, it can be very hard to make both shots in a magazine land.
Due to the enemy constantly reversing, moving forward, reversing, and repeating this, the delay between your shots makes it very hard to hit shots when you are constantly having to readjust your aim to account for the direction of enemy movement, especially if its a small target.
Long range shooting:
Due to the awkward delay between shots on this 3×2 gun, shooting at long range is much harder to get used to and do well at when compared to the 4×3 gun.
You have to follow the enemy with the awkward 0.67s delay, and using HESH is essentially impossible due to its poor shell velocity.
If shooting at long range, use AP, always follow the target when shooting, and try to aim for large and flat armour plates if you have a shot. HESH should only be used if the enemy is not moving.
Playing the 4×3 gun
The ATAC is very much an ambush/opportunistic light.
Follow the enemy:
Unlike the 3×2 gun, this isn’t so awkward on the 4×3 gun. Since you do 3 shells per shot, with a much faster 0.33s delay between shots, the time where you are not firing is not noticeable.
Following the enemy is much more “natural/instinct” with this gun, just due to the fact that your shots are constant and fast, with no awkward delay where you aren’t shooting.
(Note that the awkwardness of the 3×2 gun is mainly psychological, since it has a 0.67s delay between shots; however the 3 shots of the 4×3 gun have a total of 0.66s from the time you fire the first to the third shot (0.33s+0.33s).
Again, its caused by the awkward, short yet noticeable delay where you are “not shooting” in that 0.67s of the 3×2 gun, whereas the 4×3 has a shorter delay for more shells.)
Predict enemy movement:
Again, just like above, this is much less awkward on the 4×3 gun compared to the 3×2 gun, just due to the short and much faster delay between the first and second shot in your burst.
You do still need to try predict enemy movement to be more effective with the gun, but it should feel more natural and easy to do with the 4×3 gun. Do still note the low AP shell velocity if you don’t use supercharger, and give lead to enemy movement.
Long range shooting:
Due to the low alpha and many shells of the 4×3 gun, generally its less effective at longer ranges compared to the 3×2 gun. Generally the after-shot-dispersion makes hitting your 2nd/3rd shot in the burst more of a luck based shot; on top of this the lower alpha means its harder to rack up the damage if you do only hit 1-2 shots per burst.
This isn’t to say don’t shoot targets at long range, but if there is another enemy at closer range which you can deal damage to, you’re likely to be more shot-effective by going for that enemy.
If you have reticle calibration ready to use, activate that, as its benefits are really noticeable at long range for this gun especially.
Overall
Armour – 4/10
3×2 gun – 6/10
4×3 gun – 7/10
Mobility – 5/10
Speed – 6/10
ATAC is overall a good tank.
Armour is okay for a LT, auto-ricochet upper plate, hard to HE turret, and the lower plate can stand up to 50mm HE penetration. However it has terrible side/rear protection, and is fully penetrable everywhere to HESH shells.
3×2 gun is decent, great aim time, high DPM, good gun handling, and decent accuracy. Intra-burst reload can be awkward and cause misses if not practiced with the gun.
Gun depression is decent, shell velocities are terrible on HESH, but usable on AP.
4×3 gun is great, with same handling stats as the 3×2 but with much higher DPM and 1 extra shot in the magazine. Shooting is not as awkward due to a faster intra-burst reload. All other stats are same as 3×2.
Mobility is mediocre. For a LT its terrain resistances and acceleration on medium terrain are unimpressive, and its one of the slower tier 9 LT. Herd terrain performance is good.
Speed is good for a LT at 65km/h.
Is it worth getting?
The ATAC is worth getting if you want a fun tank or like light tank gameplay. Its very unique due to how its guns work, and the fact it has such high damage output for a LT.
This isn’t a tank for new or inexperienced players. The ATAC features many features which require good game knowledge to properly take advantage of, LT positioning & gameplay, autoloader gameplay, HESH use/low penetration, and the combination of large size and less impressive mobility than other LT.
While it can still be fun for any player, to really take advantage of the tank’s strengths fully, you need to know how to use it properly.
The ATAC is worth 12,000 gold. Its a fun tank to play purely due to how its gun fires. On top of this the damage output for a light tank is very high, making it a satisfying tank to drive.
Most recently sold for:
Release in crates – July 2025
Legendary Camos:

“Talon” camo, 3D, non-animated. Not currently available for gold.
