
BZ-166 is a tier 8 Chinese heavy tank. It features decent-all round stats, with a 122mm gun, good frontal armour, and decent mobility. It has an interesting choice for turrets, with each offering different advantages.
Click the table of contents below to access the section you want:
- Choose your turret
- Armour
- Playing against a BZ-166
- Gun
- Mobility
- Equipment, provisions, & consumables
- Gameplay advice
- Tank gameplay:
- Overall
- Is it worth keeping?
- Camo cost:
- Grind overview
Choose your turret
BZ-166’s two turrets offer different armour, HP, dispersion, & reload time/DPM stats.
You need a pretty convincing reason to even consider mounting a stock turret on a tech tree tank, but the BZ-166 is a tank where this is an option.
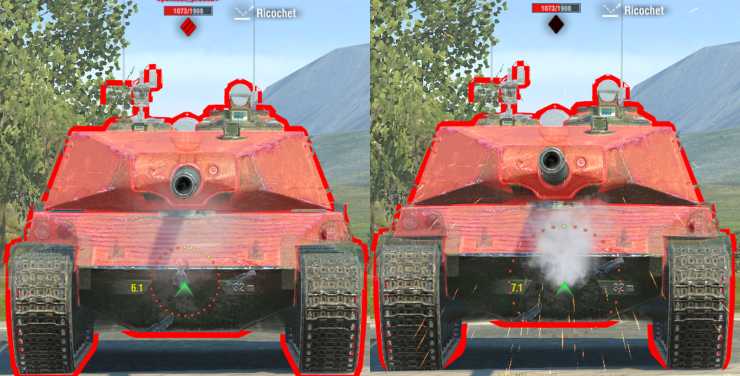
Notice the armour difference in the image below:
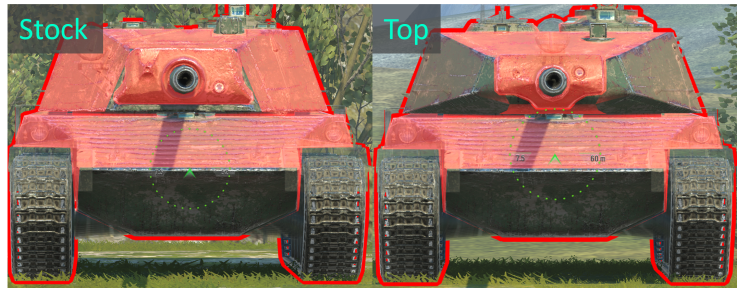
vs 265mm APCR penetration
The stock turret has impenetrable turret cheeks, with a large gun mantlet.
The top turret has turret cheeks which are penetrable (to tier 8 HT premium ammo in this case), and a smaller gun mantlet, and a cupola weakpoint.
So your choice is this-
Stock turret:
-Significantly stronger armour with no cupola (no hitbox).
-11.5s reload with 2081 DPM
-0.380 dispersion
-1700 HP (but you don’t need to use enhanced armour, so 1802 HP)
Top turret:
-Significantly weaker armour with cupola weakpoint.
-11.2s reload with 2143 DPM
-0.362 dispersion
-1800 HP (but your armour is weaker, so if you want to improve that, you’d need to use enhanced armour, which keeps your base HP at 1800.)
Both turret options will be covered in the review, as both options are competitive.
Armour
(The BZ-166 in the images is using Improved Assembly)


Drag slider right -> to view 225mm AP
Drag slider <- left to view 265mm APCR
This is the stock turret.
Armour when flat and facing head-on:
Upper plate 295-345mm
Lower plate 120-160mm
Turret cheeks 290-295mm
Turret face (around mantlet) 175mm
Gun mantlet 380-420mm
Cupola – Not modelled, no armour hitbox

vs 225mm AP (top image), 265mm APCR (bottom image)
Using -7 gun depression:
Upper plate 530-700mm+
Turret cheeks 320-325mm
Gun mantlet 325-410mm

Drag slider right -> to view 225mm AP
Drag slider <- left to view 265mm APCR
This is the top turret.
Armour on flat ground when not angled:
Upper plate 295-345mm (weakest points 240mm)
Lower plate 120-160mm
Turret cheeks 250-295mm
Gun mantlet 315mm
Turret roof 335mm
Cupola 80-135mm
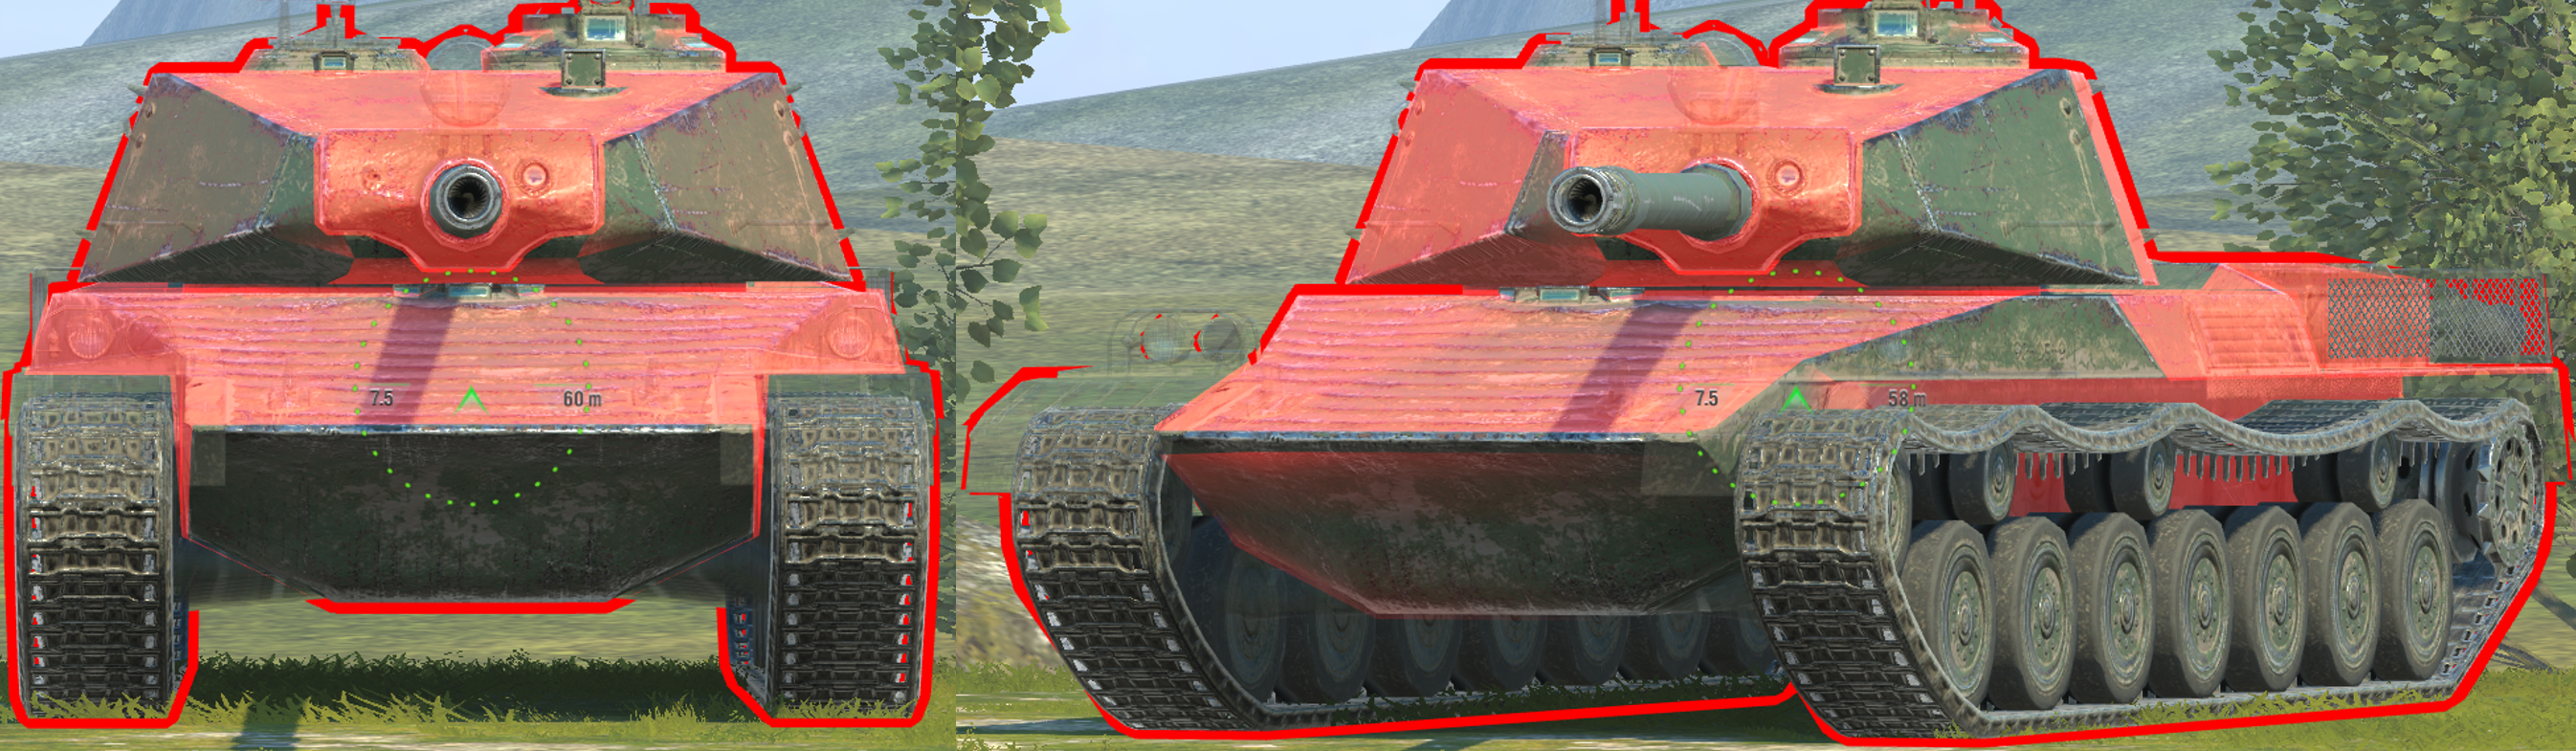
Side armour:
Side armour is 60mm thick. Its not usable in sidescraping as it has an angled side plate which is 60mm thick, its visible in above images, right above the track.
Important notes about armour:
-Both turrets rely heavily on their armour angling, not thickness. This means that even if you turn the turret slightly, it becomes immediately penetrable to all standard ammo
-The top turret actually has pretty decent armour if using enhanced armour. You can see this in the equipment part of the review. Note that despite this, the cheeks are still weak when turned, and it still has a cupola and 2 weakpoints right next to the mantlet.
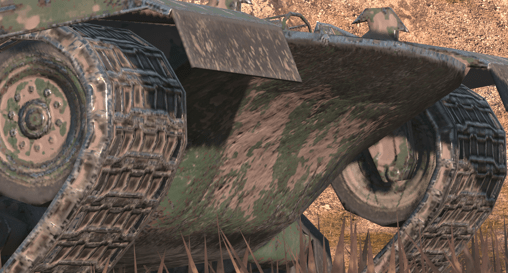
-The top turret has additional weakpoints under the gun when you use gun depression, shown below.
-The turret roofs of both turrets are weak when enemies aim down on them, since they are only an 80mm thick plate and rely heavily on angling, just like the turret cheeks.
vs 225mm AP (top image), 265mm APCR (bottom image)
Using -7 gun depression:
Upper plate 530-700mm+
Turret cheeks 295mm (weakest points 260mm)
Weakpoint under cheeks 215mm
Gun mantlet 340mm
Cupola 140mm
Side armour:
Side armour is 60mm thick. Its not usable in sidescraping as it has an angled side plate which is 60mm thick, its visible in above images, directly above the track.
60mm overall also just isn’t very strong, and many enemies can very easily penetrate right through the tracks due to this.
There’s essentially no spaced armour, so enemies with 60mm or higher penetration on HE can penetrate right through the side armour.
Armour vs tier 7 tanks:
Against tier 7 enemies, both turrets are extremely strong, and turret cheeks won’t be penetrable to any enemy, even using premium ammo.
However, the top turret has a cupola weakpoint, penetrable by all enemies, and its turret cheeks have a small weakpoint on each side of the mantlet (this is only penetrable by the highest penetration tier 7 HT & TDs).
The upper plate is completely impenetrable, but the lower plate is weak. There are troll angles on the lower plate to occasionally catch shots.
Armour vs tier 8 tanks:
If using the stock turret, the armour is essentially impervious to any tier 8 enemy you face, especially when using gun depression.
The top turret is penetrable on flat ground to most heavy tank premium ammo, and even to some high penetration mediums. The cupola is penetrable to all enemies.
When using gun depression, the turret cheeks become impenetrable, but the angled area under the gun becomes weak, and is penetrable to the majority of tier 8 premium ammo.
The hull is very strong, and upper plate will be impenetrable even to most tier 8 premium ammo.
Lower plate is weak to all enemies, but has troll angles to bounce.
Armour vs tier 9 tanks:
If using the stock turret, tier 9 enemies with good premium ammo can penetrate the turret cheeks on flat ground. When using gun depression, the turret is essentially fully impenetrable unless facing the highest penetration rounds (330mm+ HEAT0.
If using the top turret, the turret cheeks will be penetrable to all tanks’ premium ammo, and even some enemies with high standard penetration (such as IS-8 with 258mm AP).
The hull is still very strong and can bounce standard ammo from all non-TD enemies, but will be penetrable to many tier 9 heavy tanks’ premium ammo.
Playing against a BZ-166
Lower plate angles:
The BZ-166 has a very well angled areas on the top and bottom areas of its lower plate. It also becomes quite troll on the edges when the hull is turned.
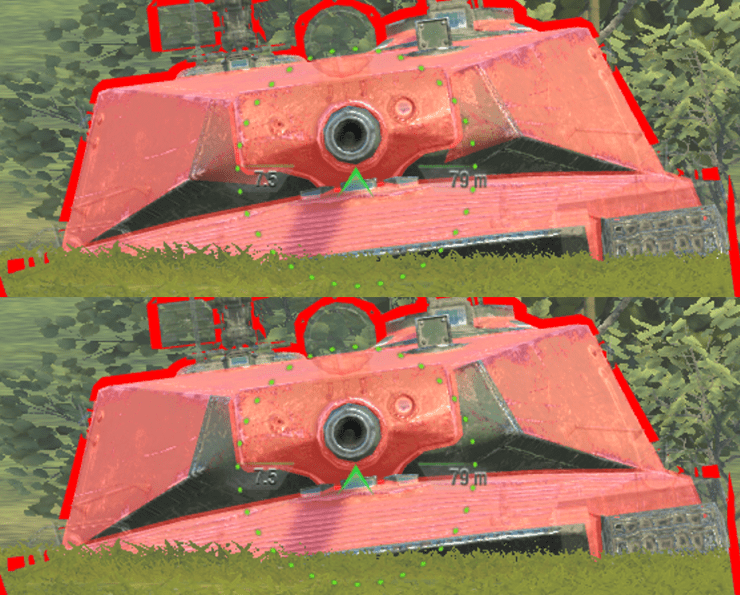
This is the BZ-166’s lower plate.
Notice the angle on the upper part, and on the lower part of the lower plate.

vs 225mm AP penetration
Note the red highlighting on the bottom part and left edge of the tank in these images, these are auto-ricochet angles.
vs 225mm AP penetration
When the hull is not angled at all, the edges and bottom aren’t troll, but the upper part is still an auto-ricochet angle, and will bounce shells easily.
Despite this, the lower plate armour isn’t reliable, just somewhat troll if not aiming well. try to aim towards the middle part of the lower plate when shooting this tank, not the top. If the tank is angled, then avoid shooting the far edge.
Note the enemy’s HP:
The enemy tank’s HP will immediately tell you what turret they’re mounting, and will let you know how good their DPM/accuracy/turret armour is.
If the enemy has 1700 or 1802 HP, then they are using the stock turret. This means that their turret armour is very strong and has no cupola weakpoint, but their gun is a bit less accurate with lower DPM than the upgraded version.
If the enemy has 1800 or 1908 HP, then they are using the top turret. This means that they have a cupola you can shoot, and the turret cheeks are much weaker. However the upgraded turret allows the gun to be more accurate and reload slightly quicker.
Gun
BZ-166 mounts a 122mm gun
If using the stock (better armoured) turret:
-Alpha damage is 400 on APCR, 360 on HEAT, and 500 on HE.
-The reload time is 11.5s, giving the tank 2081 DPM.
-Penetration is 215mm on APCR, 270mm on HEAT, and 60mm on HE.
–Estimated aim time is 3.5/3.8s
–Base aim time is 2.1s, but it can get down to 1.71s.
-Dispersion is 0.380/0.342
–Gun Handling is 0.2/0.2/0.18, or 0.17/0.17/0.15 with Vertical Stabilizer.
-Gun depression is -7 degrees.
If using the top (less armoured) turret:
-Alpha damage is 400 on APCR, 360 on HEAT, and 500 on HE.
-The reload time is 11.2s, giving the tank 2143 DPM.
-Penetration is 215mm on APCR, 270mm on HEAT, and 60mm on HE.
–Estimated aim time is 3.5/3.8s
–Base aim time is 2.1s, but it can get down to 1.71s.
-Dispersion is 0.362/0.326
–Gun Handling is 0.2/0.2/0.16, or 0.17/0.17/0.14 with Vertical Stabilizer.
-Gun depression is -7 degrees.
With the stock turret, this is a decent gun. Compared to other 122mm guns (such as IS-6 and similar tanks), the BZ-166 has great aim time, good gun handling, with average DPM & alpha. Its gun depression is good for this type of tank. For this stock turret, the accuracy isn’t much better than most 122mm guns.
With the top turret, this gun improves slightly, making its accuracy better, with slightly improved gun handling on turret traverse, and a marginal reload and DPM improvement.
For both turrets, the standard penetration is low (since its 215mm, and its APCR) and premium penetration is average. Gun handling is good, and aim time is significantly better than other 122mm guns.
Between both turrets, the difference in gun performance during gameplay is barely noticeable. For winning more and being more dominant in battle, the stock turret is better, just due to its stronger armour. This armour is noticeable in the tank’s performance.
As player preference, you may choose to sacrifice the armour to gain better slightly better gun performance.
Mobility
-Top speed is 40km/h, reverse is -15km/h.
-Traverse speed is 40.72 deg/s on hard terrain, and 29 deg/s on medium terrain.
-In game acceleration rate is shown as 14.5 hp/t, it has a fairly strong 714 horsepower engine for its 49 ton weight.
-Actual acceleration rate is 14.5 hp/t on hard terrain, and 10.3 hp/t on medium terrain.
–Ground resistances are 1/1.4/1.8
Overall this is good mobility, the top speed is great, with a good reverse speed. On hard terrain the tank is very mobile, with great traverse speed and acceleration; on medium terrain its noticeably less mobile, but still decent. The large difference in terrain resistance means there’s a very noticeable change in mobility when you go off-road.
Equipment, provisions, & consumables
BZ-166 has no special provisions or consumables.
Use adrenaline, multi-purpose restoration pack, and small repair kit.
Gun Rammer:
The BZ-166 has adequate penetration for a tier 8 heavy tank, and generally doesn’t struggle to penetrate enemies, especially with the 270mm HEAT ammo that it has. Gun rammer is generally a better choice, since the pretty good DPM the tank has for 400 alpha does give it a nice advantage over similar guns (for the top turret, for the stock turret it would have roughly the same reload).
Gun rammer would improve the reload time from 12.3s down to 11.5s, and the DPM from 1948 to 2081, this is on the stock turret.
Gun rammer would improve the reload time from 12.0s down to 11.2s, and the DPM from 2000 to 2143, this is with the top turret.
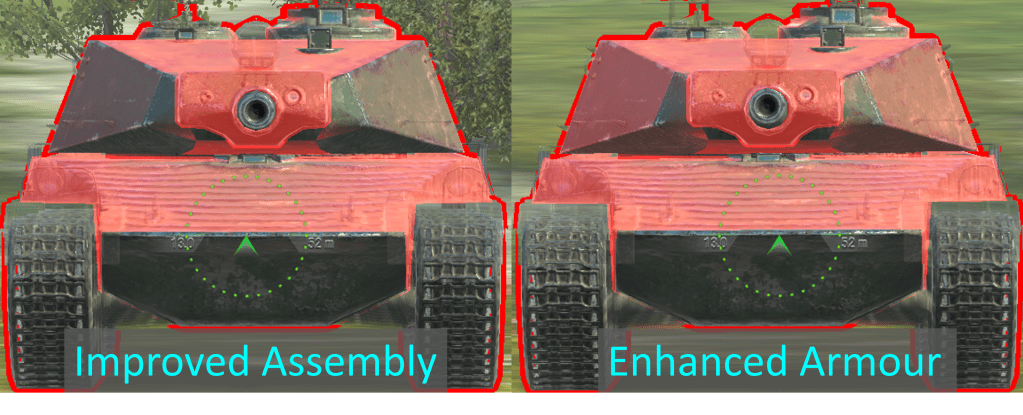
Enhanced armour/Improved Assembly:
For the stock turret, use improved assembly. The stock turret already has very strong armour with no cupola weakpoint, however it sacrifices 100 HP compared to most other heavy tanks at tier 8. Improved assembly would take its fairly low base HP of 1700, up to 1802.
For the top turret, either enhanced armour or improved assembly can work.
Improved assembly would give the tank better HP, from 1800 up to 1908; but enhanced armour would make the turret cheeks harder to penetrate for tier 8 premium ammo,
Enhanced armour would improve (for top turret):
-Turret cheeks from 270mm to 281mm
-Upper plate from 295mm to 307mm
Other armour areas don’t benefit noticeably from enhanced armour. Its best use is making those turret cheeks harder for premium ammo to penetrate.
Notice the difference this equipment makes with the below image, this is facing against 265mm APCR.
Vertical Stabilizer:
Since the BZ-166 is a frontline heavy tank, it benefits more from having improved gun handling than it does from improved dispersion. Vertical stabilizer is the better choice due to this, and since the BZ already has better dispersion (on both turrets) than most similar 122mm guns.
Vertical stabilizer helps to improve gun consistency on tanks which are constantly making movements, turning the tank or turret, or just playing a fairly active role where you don’t get the time to sit still and fully aim in (ie: heavy tank gameplay).
Gameplay advice
BZ-166 has a fairly standard heavy tank playstyle. Other than a few armour caveats, it can just play like any usual heavy would, using the same positions and tactics in battle.
General gameplay:
Take the BZ-166 to the heavy tank. Its fairly mobile on hard terrain, but not enough to the point where it should always play a heavium role. It has great upper plate armour and a strong turret (if stock) to be able to effectively use hulldown positions on the HT side of the map.
Try to avoid exposing the tank on flat ground, since its lower plate is easily penetrable, even though it has a few troll parts on the edges. Also avoid angling the tank at all, as it has extremely weak side armour and will get penetrated easily through its tracks and lower sides.
Be prepared to use HEAT against enemies you may not expect would need it. 215mm penetration isn’t high for a tier 8 heavy, however since this is APCR, its one of the lowest penetration heavies in tier 8 (on standard ammo). This means you’ll need to use HEAT against some targets which other heavies (such as IS-3 or 53TP with 225mm AP) would be able to penetrate with standard ammo.
Go hulldown & use gun depression:
If using the stock turret, going hulldown makes your tank essentially impenetrable to standard ammo from all tanks, and from nearly all tier 7-8 premium ammo. The lower plate is the only weakpoint when using the stock turret, and going hulldown hides this.
Using gun depression causes the stock turret to be fully impenetrable, even to most tier 9 premium ammo, since the turret increases to around 320mm in effective thickness.
For the top turret, you have to be more careful in such positions. This turret has a fairly large cupola, much smaller gun mantlet, and much weaker turret cheeks. Try to not fully rely on bounces when hulldown or using gun depression with this turret, since your armour is so much less reliable.
With the top turret, just poke out, shoot, then retreat immediately. If you stay exposed for long then it gives enemies time to find and aim in on your weakpoints, an issue which the stock turret just doesn’t experience.
Facehugging:
Don’t facehug enemies, since the hull is very reliant on its angling to bounce shots, and is actually a very thin 80mm armour plate.
In a facehug, enemies can look down on your armour, which causes the BZ-166 to be very weak, even if using its best armoured turret, since enemies can just shoot the hull.
Sidescraping:
Look at the below image, the thin 60mm side armour is shown being very easily penetrated by 225mm AP, and you can clearly see the hull shoulder weakpoint.
The tank below is using the stock turret, so it has no cupola, but if using the top turret, then there would also be this weakpoint available to shoot.
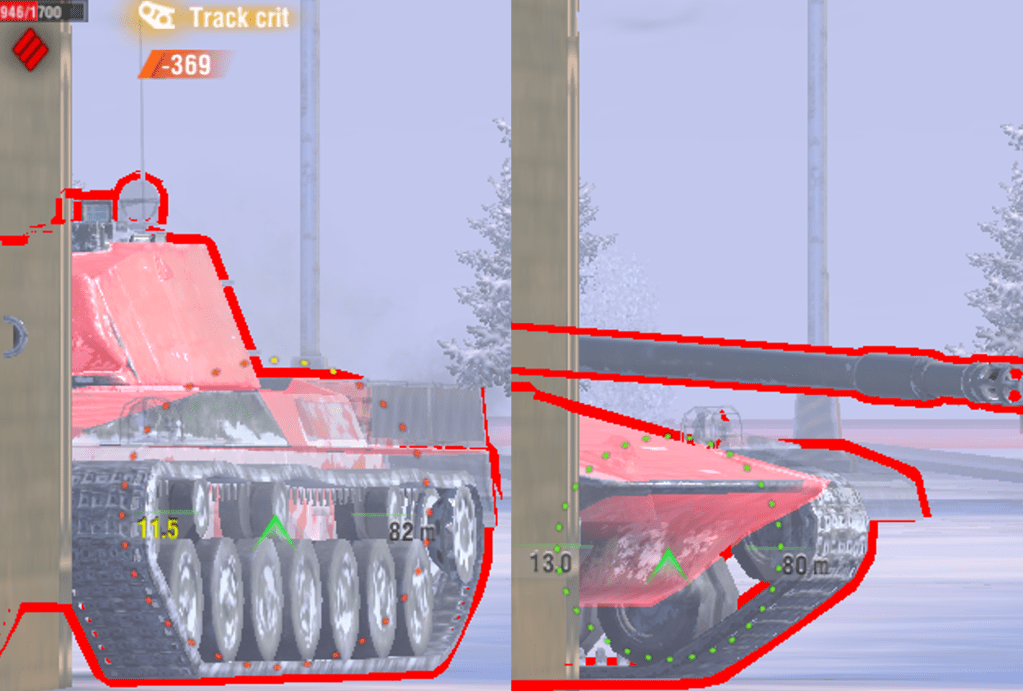
Note the right image, while not perfectly red, and still penetrable on some spots, the lower plate can be angled around a corner to bait shots.
Since the tank can’t sidescrape at all, this is the most practical way of trying to use your hull to bait a shot from the enemies.
With the stock turret, the BZ-166’s gameplay is perfectly generic. Its a frontline heavy tank with very strong upper plate and turret armour which is very good hulldown, and can use its 400 alpha to trade on the heavy flank.
With the top turret, the BZ-166 still plays similarly, but can’t be as reliant on its turret armour due to its weaknesses; though does have a slightly more effective gun. No matter which turret you use, the armour is frontal only, and cannot be angled.
Tank gameplay:
Stock turret gameplay:
Top turret gameplay: (soon)
Overall
Armour – (stock turret) 5.5/10, (top turret) 4/10
Gun (stock turret) – 5.5/10, (top turret) 6/10
Mobility – 5/10
Speed – 7/10
BZ-166 is overall a decent tank.
Armour is compared to similar tanks (the IS-series), the stock turret has very strong armour with no weakpoints, but only frontally, and it falters to tier 9 premium ammo. The top turret has mediocre armour for a heavy tank, being easily penetrated by most tier 8 premium ammo, and with a cupola weakness.
Gun is decent. DPM & gun handling are decent, penetration & alpha damage are good. Accuracy & aim time are poor, gun depression is mediocre at -6 degrees.
Mobility is good on hard terrain, with quick acceleration and traverse. However on medium terrain its mediocre, with much more average acceleration and traverse speed, due to its poor terrain resistances. Reverse speed is average.
Speed is good at 40km/h.
Is it worth keeping?
If you really like 122mm tanks (IS-6 or IS-3 type of tank), or just enjoy the BZ-166 while grinding, then sure its worth keeping.
Some players may really like the more reliable 122mm gun of the BZ-166, combined with decent speed and mobility and the choice of turret.
However, if you don’t enjoy it then there’s no point in keeping it. In tier 8 there are other tanks which are more enjoyable and perform a similar or same role, for example the 53TP Markowskiego, also featuring better than average accuracy and aim time, but it has a much more reliable armour and mobility profile, with an overall better gun than the BZ-166.
Camo cost:
Currently the BZ-166 has no special camouflages.
Grind overview
The BZ-166 leads on from the BZ-58, it costs 120,000 XP to unlock. No modules are unlocked from other tanks in the Chinese tech tree.
Turret:
The stock turret armour was already discussed in the above armour section, since its actually a fairly competitive option.
The stock turret is much stronger than the top turret, with no weakpoints other than the very small area around the mantlet.
This makes grinding fairly easy, at least in terms of when you need to go hulldown or use turret armour.
Gun:
The BZ-166 only has 1 gun, so you don’t have to research anything, you get the “top” gun right from unlocking this tank.
Mobility:
Just as with the BZ-58, the BZ-166’s engine upgrade doesn’t really offer much of a horsepower upgrade, only adding 30 horsepower to this 49 ton tank.
While the stock mobility will feel slow on medium terrain, this is caused more by the tracks, and less so by the engine power.
The stock tracks cause the BZ-166 to have worse terrain resistance difference (1/1.5/1.9, compared to 1/1.4/1.8 on upgraded tracks), worse traverse speed, and worse gun handling (0.22/0.22, compared to 0.2/0.2 on upgraded tracks).
Stock tracks mean the tank’s gun to be much worse in terms of overall handling, but also causes the tank to be much less mobile.
Research path:
Since the BZ-166 actually has stronger armour on the stock turret, and only has 1 gun, the research path should be to get tracks first, then the engine. The top turret should be the last thing you get, since its actually a big armour downgrade, despite being a gun upgrade.
Unlocking the top tracks will improve your mobility, but also overall gun performance. Getting the engine will make the tank more mobile and easier to maneuver in battle. The top turret is something you should mount if you want to have some improved gun stats (not by a huge amount, but it does make a difference), but its in exchange to have worse turret armour, and a cupola weakpoint on top (the stock turret doesn’t have one).
