Page last updated 28 December, 2024.

BZ-176 is a tier 9 Chinese heavy tank. It features good hull armour but a weak turret, with decent mobility but slow hull traverse. The tank mounts a 160mm gun with a 2-shell autoloader, able to do 1120 damage in 8 seconds, it has good aim time but slow shell velocity.
- Armour
- Gun
- Mobility
- Equipment & provision setup
- Gameplay advice
- Overall
- Is it worth getting?
- Most recently sold for:
- Camo cost:
Armour
(The BZ-176 in the images is using Enhanced Armour)
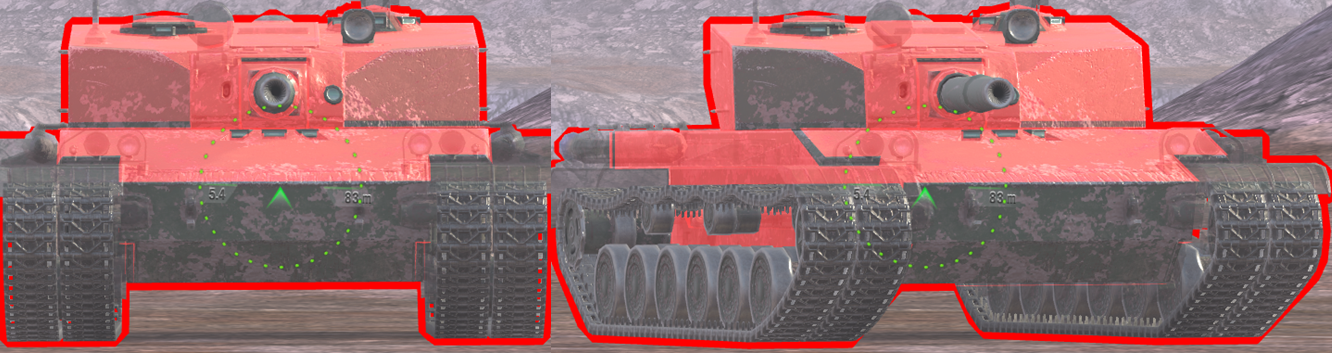
Drag slider right -> to view 240mm AP
Drag slider <- left to view 300mm HEAT
Armour when flat and facing head-on:
Upper plate 325-340mm (auto-ricochet to all guns)
Lower plate 160mm
Lower-lower plate 170mm
Turret cheeks 255-270mm
Gun mount area 310-500mm
Left cupola 165-190mm
Right cupola 205-350mm
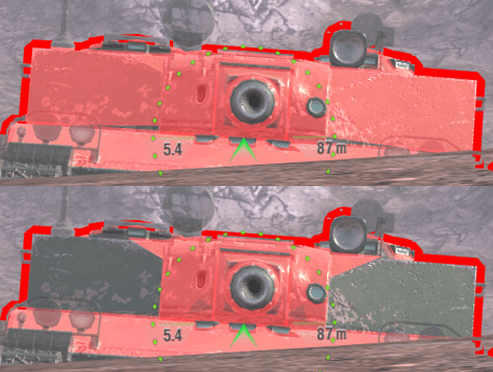
Side armour:
BZ-176’s side armour is 90mm thick, which makes it actually pretty decent for sidescraping and angling the hull (however due to how well-angled the upper plate is, you don’t need to angle the hull).
Unfortunately the main issue with sidescraping is the tank’s turret cheek armour, which is the main weakpoint.
vs 240mm AP (top image), 300mm HEAT (bottom image)
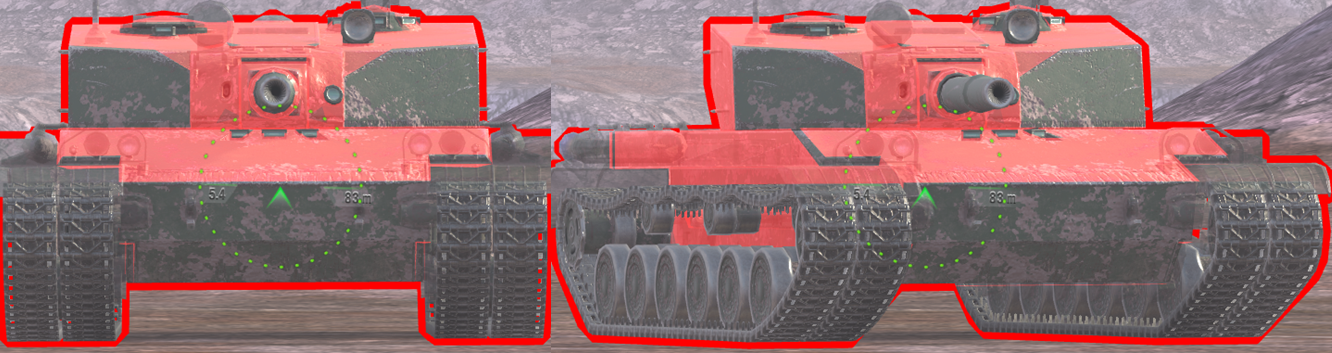
Using -6 gun depression:
Upper plate 450-470mm
Turret cheeks 265-280mm
Gun mount area 310-500mm
Left cupola 165-190mm
Right cupola 230-350mm
Armour vs tier 8:
Facing tier 8 tanks, the BZ-176 has good armour.
The upper plate is fully impenetrable to all enemies you face, and the turret front is strong enough to withstand most standard ammo in tier 8 (except from TDs, T34, & M6A2E1 EXP). Premium ammo from nearly all tier 8 tanks will be able to cut right through the turret cheeks.
The lower plate is decently thick, but not good enough to be angled or to bounce shells. The cupolas are fairly strong & small, so will be troll for enemy tanks to go for.
Armour vs tier 9-10:
Against tier 9-10 enemies, the upper plate is similarly effective, able to bounce all standard ammo from any enemy, and all premium AP/APCR shells. Premium HEAT is able to penetrate if it has around 330mm of penetration.
The turret is weak, and most tier 9-10 enemy heavy tanks can go through it with standard ammo, only lower penetration tanks or tanks which use standard APCR will occasionally bounce off the turret cheeks.
The lower plate will be penetrable to all enemies, but angling the hull can stop lower penetration HESH shells from going through.
Gun
The BZ-176 mounts a 160mm gun.
-Alpha damage is 560 on AP, 490 on HEAT, and 690 on HE.
-It has 2 shells in the magazine, with an 8.00s intra-clip reload, so in 8s it can burst out 1120 damage.
-It has an 23.6s magazine reload, giving it 2130 DPM.
-Penetration on AP is 240mm, HEAT is 305mm, and HE is 62mm.
–Estimated aim time is 3.9/4.1s
–Base aim time is 2.4s, but it can get down to 1.85s.
-Dispersion is 0.408/0.346
–Gun handling is 0.23/0.21/0.14, or 0.21/0.18/0.12 with Vertical Stabilizer.
-Gun depression is -6 degrees.
-Shell velocity is 600/550/450 m/s on AP/HEAT/HE.
Overall this is a decent gun. Despite a long magazine reload, the DPM is decent for the alpha damage that it has. Intra-clip isn’t fast but is still enough to be able to put in multiple shots in many situations. Penetration is quite low for a heavy tank, with unimpressive gun depression, dispersion, & gun handling.
What is very noticeably good on this gun is the aim time, which is quite impressive for the good 560 alpha damage.
Another good aspect is the 160mm caliber of the gun, which gives it very good module damage (210, best in tier 9 along with the T30 & T95), and allows it to overmatch 53mm plates, which isn’t as noticeable but still helps in some cases.
Mobility
-Top speed is 33km/h forwards, and -14km/h in reverse.
-Traverse speed is 31.2 deg/s on hard terrain, and 22.3 deg/s on medium terrain.
-In game acceleration rate is shown as 15 hp/t, it has a decent 1047 horsepower engine for its 70 ton weight.
-Actual acceleration rate is 15 hp/t on hard terrain, and 10.7 hp/t on medium terrain.
–Terrain resistances are 1/1.4/1.8
Overall this is a decent level of mobility. The main issue is traverse speed on medium terrain, which is among the slower ones in tier 9. Other than this, it has good acceleration on hard terrain, decent on medium terrain, with decent hard terrain traverse speed. Top speeds are both decent but not impressive.
Terrain resistance difference from hard to medium terrain is poor, so its best to try stay on hard terrain, especially for the sake of traverse speed.
Equipment & provision setup
The BZ-176 has improved gunpowder, the only special provision/consumable it has access to.
Improved gunpower?
This does help the tank immensely on shell velocity, as the base 600/550/450 m/s is slow and is the worst in tier 9; improved gunpowder increases the velocity up to 780/715/585 m/s
This provision is worth using if you enjoy having decent shell velocity, or notice that a lot of shots you make are missing purely due to that low velocity. Alternatively if you’re a newer player, you may find this provision very useful for hitting shots more consistently.
The BZ-176 fights in close range a lot of the time, so you may find that you can work with the 600m/s velocity just fine, though you will definitely need to lead some shots.
Calibrated Shells:
The BZ-176 doesn’t benefit from vents for a few reasons:
-Its an autoloader, so vents doesn’t improve its intra-clip reload, and doesn’t reduce magazine reload by a massively significant amount.
-Its an alpha damage tank, not a DPM/RoF tank, penetrating shots is most important.
-The gun has low penetration on standard ammo.
-Base aim time stats aren’t abysmal, so gun handling improvements from vents aren’t needed.
Calibrated shells are a far better choice, as you rely on alpha damage a lot in battle, penetrating your shots with AP especially is a lot more important than the small amounts of many stats you get from vents for this tank.
Calibrated shells would increase penetration on AP from 240mm to 259mm, on HEAT from 305mm to 345mm, on HE from 62mm to 67mm.
Enhanced Armour:
Due to having a weak turret, enhanced armour is needed.
The base turret cheek armour is 255mm effective armour, but if you factor in AP normalization, this reduces down to 238mm, which means nearly all enemies you face will be able to penetrate the turret front with standard ammo.
Enhanced armour increases this up to 245mm, which helps the turret to bounce more enemy tanks which use APCR standard ammo, and lower penetration enemies with 235-245mm penetration (which there are many in tier 8-10, such as Kpfpz 70, WZ-111 1-4, tier 10 MTs, and tier 8 HT using calibrated shells).
Vertical Stabilizer/Refined Gun:
Both are good options for this tank, since vertical stabilizer would min-max on the tank’s good aim time, and refined gun would balance out the tank’s poor dispersion. The choice depends on your preference and playstyle in the tank.
If you play in close range with the tank most of the time, vertical stabilizer is better since it improves the effective aim time and the gun handling of the tank, and the poor dispersion matters much less due to being at a closer range to the enemy tanks.
If you play a bit more passively on the frontlines, use 2nd line positions, or just prefer to fully aim your shots when playing, then refined gun will be better, since it makes the gun more accurate when you give it the time to fully aim, and is especially noticeable in mid to long ranges.
Gameplay advice
Overall gameplay of the BZ-176 is a bit slower and more cautious than other heavies, due to its long magazine reload, poor accuracy, and poor turret armour. The tank needs to time its reload as its one of the longest in tier 9.
General gameplay:
The BZ-176 is a tank with at best, average mobility; a weak turret, and a gun that needs a fair bit of downtime to reload. This results in the tank being unable to play as aggressively as other heavy tanks, and a bit more team reliant.
Play the BZ on the heavy flank, this works much better than going with mediums, as heavies have slower paced gameplay, making it more forgiving in your magazine reload, and your low shell velocity.
Try to keep with allies who can help you while you reload. Despite having pretty decent DPM for a 560 alpha gun, your reload time is still long, just under 24s for the full magazine. Its important to try keep with an ally who can cover you and stop enemies from pushing while you reload.
Try to properly aim your shots and not rush them, as one missed shot is 50% of your magazine wasted, and with your high alpha damage, it is worthwhile to try make sure you don’t miss your shots. The aim time of the BZ-176 is actually pretty good for its 560 damage, so you won’t have to wait ages to aim.
Try to avoid relying on the armour, since the turret is quite weak and is always exposed when you shoot. Playing with a peek-a-boo playstyle works well since you have a turret to set up shots, and you’ve got good alpha to trade with.
Using the autoloader:
Don’t feel pressured to put out your 2nd shot on-reload, or even at all. Some situations just aren’t worth exposing yourself for that damage, especially as your armour can’t forgive mistakes. 560 alpha damage is already significant, so if there’s no targets, or the damage trade isn’t worth it, then just go on reload.
Also don’t be afraid to reload immediately after your first shot, sometimes there will be a situation where you’ll only put out one shot, and you can immediately tell that no more opportunities for damage are immediately available. Reloading immediately will save you 8s, rather than having to first reload the intra-clip, then realize you can’t get damage, then reload.
Give lead to shots:
Due to its very low shell velocity on all 3 shells, you often need to give lead to your shots, especially on moving targets if they are at mid range. Long range moving targets are very hard to hit, and if you aren’t using improved gunpowder, sometimes the long range shots just aren’t worth taking.
Use overmatch:
Due to having the 3rd largest gun by caliber in the game, the BZ-176 is able to overmatch quite a lot of thinner armour plates. With a 160mm gun, and access to AP shells, any armour plate up to 53.3mm will be penetrable to this tank, no matter what angle its at.
Some notably overmatchable armour plates:
-Projet Murat’s upper plate & hull side armour.
-Super Conqueror & FV215b’s turret roofs & hull decks.
-T95’s hull side.
-50TP Tyszkiewicza & M103’s turret roofs.
-T57 Heavy’s auto-ricochet angles on turret rear.
-Kpz 07 P (E)’s lower plate.
Use gun depression:
The BZ-176 doesn’t have much gun depression, only -6 degrees, however due to how weak its turret cheek armour is, using gun depression is needed to have a chance of bouncing tier 9-10 heavy tank standard ammo.
When you use full gun depression (and have the turret pointed facing the enemy), you’ll be able to bounce standard ammo of tier 9-10 HT much more reliably than on flat ground, where its almost a guaranteed penetration into the turret cheeks.
Bait the enemy:
Enemies may not know that the BZ-176 is an autoloader, so sometimes you can bait them with how the gun works.
After shooting an enemy, often enemies may retreat further if you continue to try push them and put in your 2nd shot. Your 2nd shot also takes a fairly slow 8 seconds to reload, and pushing would often expose you to enemies.
If you retreat immediately after shooting an enemy, sometimes the enemy will get confident, as you have high alpha and they expect a 13-15s reload for that, so they push forward. This gives you enough time to reload as shoot them as they push you, and you cause the enemy to expose themselves more to your team.
This is just an example and won’t happen against every enemy, however it does happen more than with other tanks just due to how the BZ’s gun works. Its up to you it judge what situations and what enemies it is ideal to try this against.
Don’t turn the turret:
When trying to bounce a shot, don’t turn the turret away from the enemy. Due to how its angled, the best possible armour effectiveness is achieved when your gun points directly at the enemy, turning it at all (even just 1-2 degrees) makes it a very easy penetration.
The only time when you can turn the turret is in the situation below, where you can hide half of the turret by sidescraping behind cover, similar to how a Groundtank would angle its turret outwards when sidescraping.
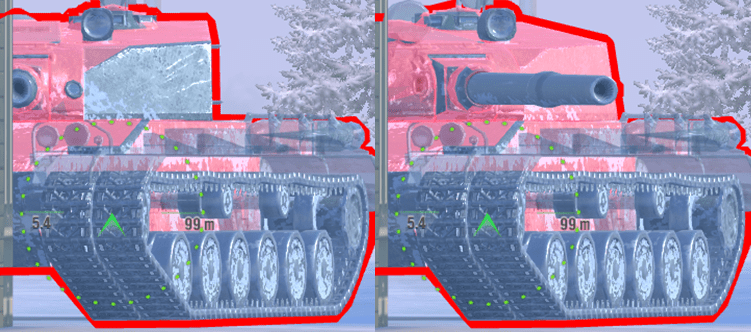
Here is an example of the turret angling (facing 300mm HEAT), in a sidescraping position.
Turning the turret outwards is beneficial when you can hide the other half.
Use different ammo:
With calibrated shells equipped, your AP is sufficient for most situations, as 259mm combined with 5 degrees of AP normalization make it a “high” penetration round, even among tier 10 heavies. This ammo will be used the most as it is easy to deal with spaced armour and the majority of battle situations.
HEAT should be used for strong armour when you don’t have time to aim, or against hulldown enemies. With 345mm of penetration, generally you won’t struggle to penetrate enemies, just be careful of its lower shell velocity than AP (550m/s, or 715m/s if using improved gunpowder).
HE is good for dealing extra damage to the rear armour of enemy tanks, or the side armour of lightly armoured enemies. It doesn’t have the best penetration (67mm), but it still does a good damage increase from AP (roughly 25% extra, 690 damage). Again, be careful with the low velocity of this, with 450m/s (or 585m/s with gunpowder), its almost unusable unless you are in close range, or give perfect lead.
Stay on hard terrain:
Mainly due to the very poor medium terrain traverse speed (only 22 degrees/s), you should try to stay on hard terrain as much as possible, where the tank’s mobility is pretty good.
Hard terrain are roads, concrete/paved areas, and paths. Any off-road areas are medium terrain, which will make your traverse speed very slow.
The BZ-176’s gameplay is quite unique, as its the only heavy tank with an autoloading “high alpha” gun. Its not a usual autoloader, so you can’t do damage in bursts, and have to stay around allies due to the magazine’s long reload time.
Overall
Armour – 4/10
Gun – 5/10
Mobility – 5/10
Speed – 4/10
BZ-176 is overall a decent tank.
Armour is overall poor. On all areas except the turret, armour is strong. A great upper plate, decent enough lower plate, good side armour, and good HE protection. Turret cheeks are very weak, and protection from HESH shells is average.
Gun has below-average penetration & gun handling, poor dispersion, -6 gun depression, and slow shell velocity. Good aim time saves the gun from being terrible, along with decent DPM and good 560 alpha damage.
Mobility is decent, medium terrain traverse is very slow, but acceleration on both terrain types and traverse on hard terrain are all decent to good. Reverse speed is average at -14km/h.
Speed is slightly below average, at 33km/h.
Is it worth getting?
The BZ-176 is not worth getting. Despite being pretty fun to play, its not all that great due to not having amazing mobility, having a weak turret, and while its gun is decent, there aren’t enough good stats on it to make the tank worth it.
If you want a heavy tank with high alpha damage, there are other options. The Kpfpz 70 has a more accurate gun with the same 560 alpha, better turret armour, and better mobility.
The BZ-68 in the tech tree has a similar 530 alpha gun, though it lacks a premium HEAT/APCR round, it has better armour, gun handling, and mobility.
The BZ-176 is worth 10,000 gold. Its not the best tank, and at best its just “decent/usable”, however, its gun is quite interesting to play, and its a pretty fun vehicle just due to having fairly high single-shot damage.
Most recently sold for:
Afterparty event release – December 2024
Camo cost:

The BZ-176 currently does not have any special camouflages.
