
The Chieftain Mk.6 is a British tier 10 heavy tank. It has a high DPM gun with HESH shells, and features a strong turret and good upper plate, along with good mobility. Its armour is weak when the hull is exposed.
- Armour
- Gun
- Mobility
- Equipment, provisions, & consumables
- Gameplay advice
- Overall
- Is it worth getting?
- Most recently sold for:
- Historical Note:
Armour
(The Chieftain Mk.6 in the images is using Improved Assembly)
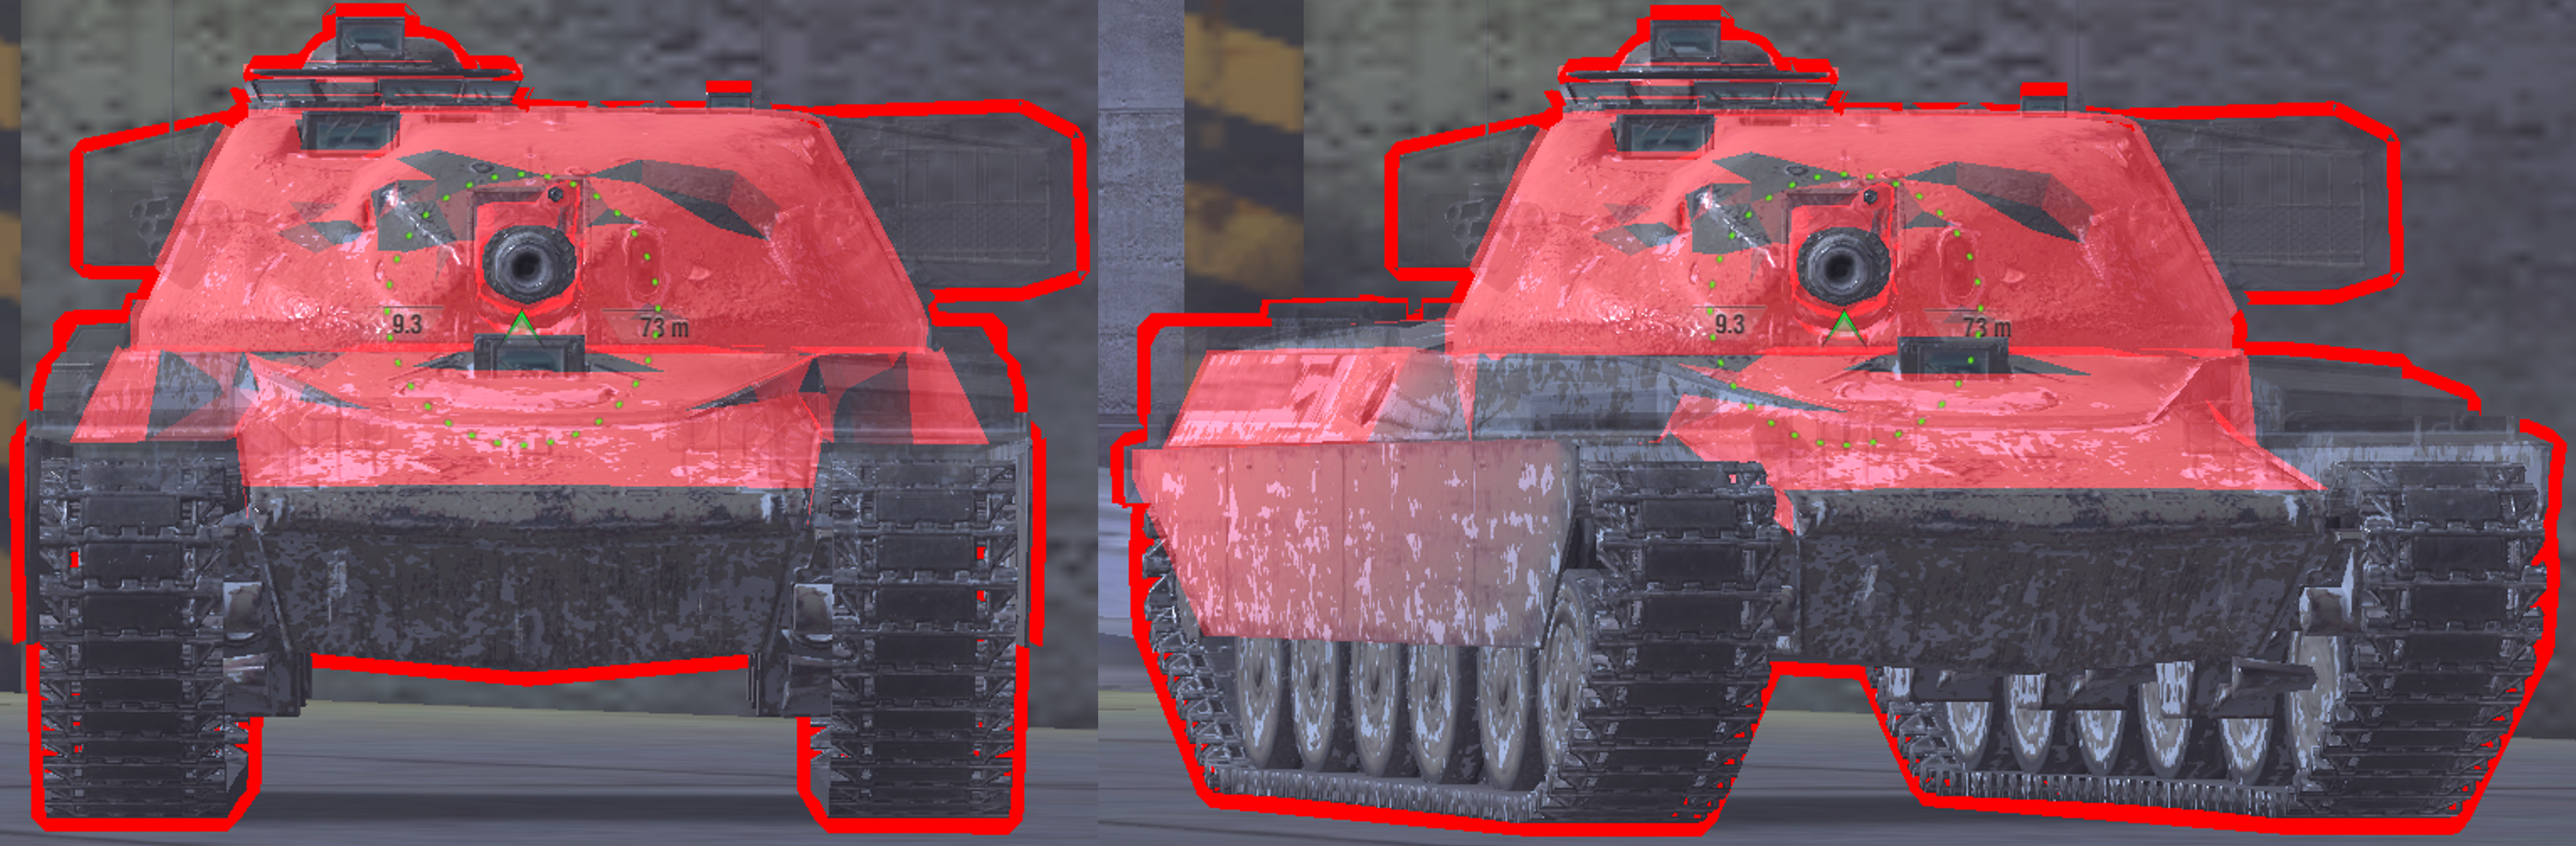
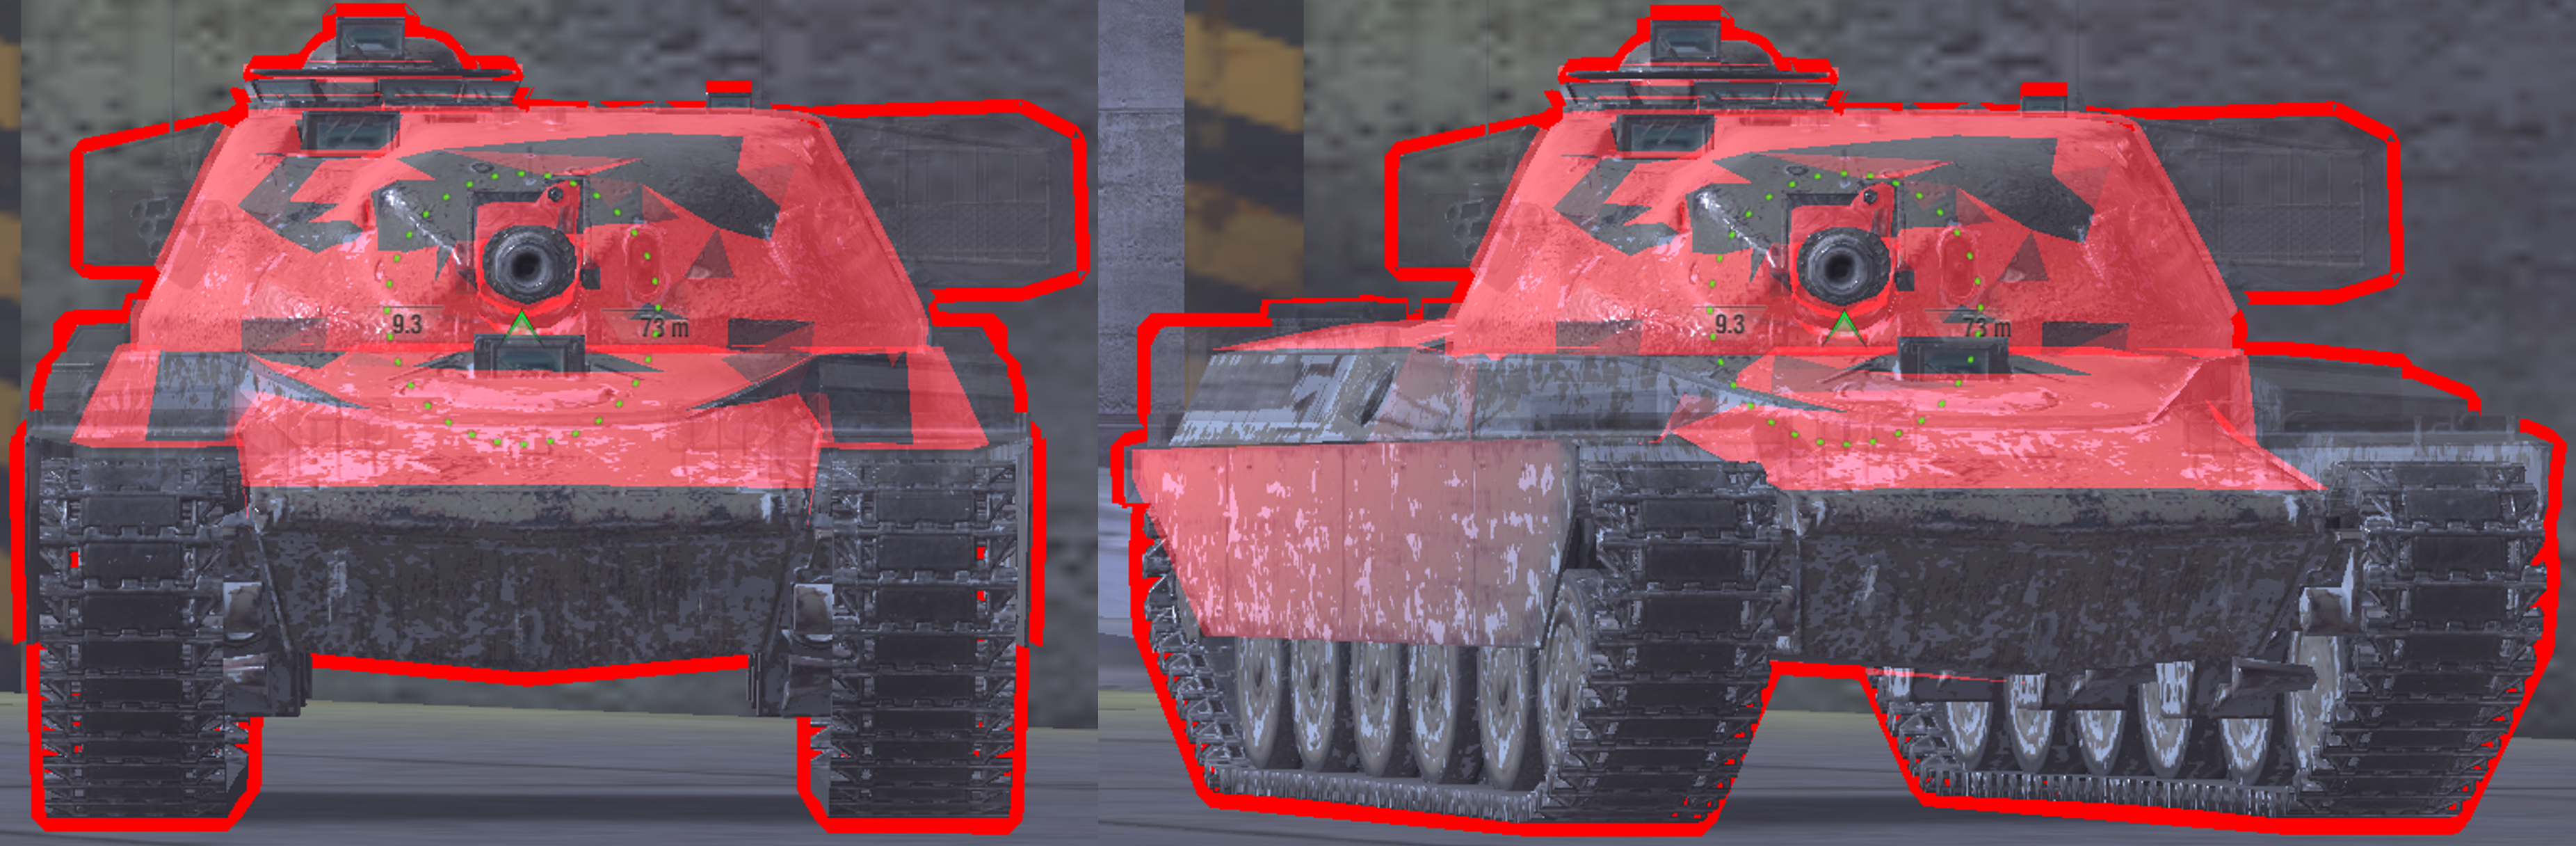
Drag slider right -> to view 255mm AP
Drag slider <- left to view 330m HEAT
When flat and facing head-on:
Upper plate 340-590mm
Driver hatch weakpoint 230-240mm
Mid bar 130-190mm
Lower plate 125mm
Hull shoulders 290-320mm
Turret 270-600mm+
Weak areas above gun 255-275mm
Cupola 90mm

vs 255mm AP (top image), 330mm HEAT (bottom image)
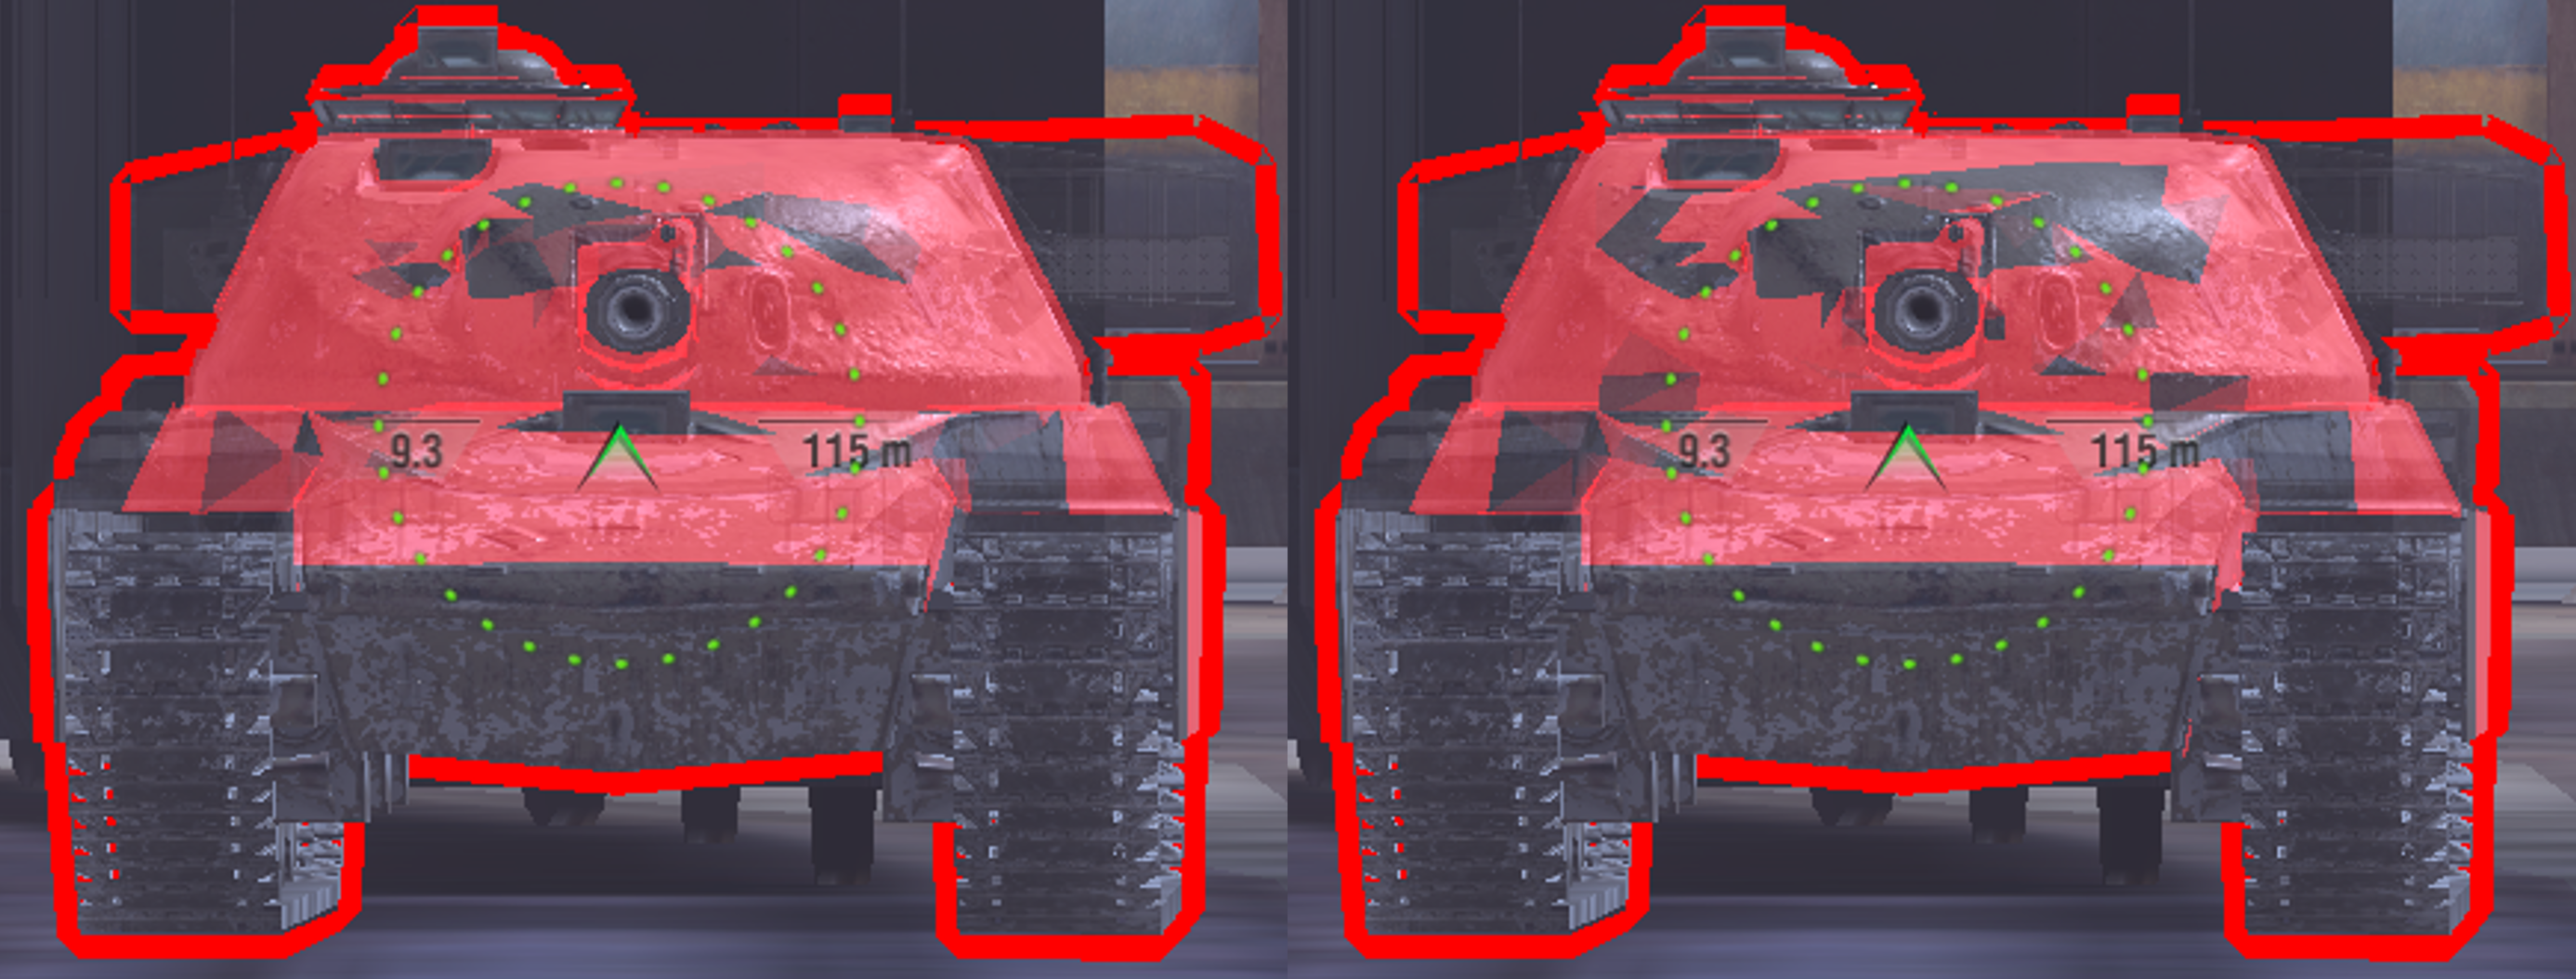
Using -10 gun depression
Upper plate 680mm+ auto-ricochet
Driver hatch weakpoint 290-310mm auto-ricochet
Turret 350-750mm+
Weak areas above/around gun 275-320mm
Cupola 90mm
VS both tier 9 & 10 tanks:
The Chieftain’s armour performs roughly the same against any enemy it faces.
Upper plate:
This is very well angled, at 67 degrees. Its not quite an auto-ricochet, so AP and APCR can still penetrate the lower areas, but they will need roughly 320mm+ penetration to go through.
Against HEAT ammo, the effective thickness is higher (due to normalization), and only HEAT with 340mm+ has a chance of penetration.
The upper plate will bounce standard ammo from pretty much any enemy you face due to its very high thickness. The driver’s hatch is a weakpoint, but its very small and hard to hit, its only really a weakpoint in a facehug situation.
Hull shoulders:
This section of armour is the part that extends out over the tracks, just under the turret ring.
This area isn’t a reliable penetration, even to premium ammo, and even though it shows up as being penetrable.
This area is also quite hard to hit on a moving target, and can very easily be angled to an impenetrable point.
Lower plate & mid bar:
These areas are weak and easily penetrable to any enemy’s standard ammo.
Premium HESH rounds also easily penetrate these areas (also the cheap HESH rounds from the Conqueror and FV215b).
Turret:
The turret is overall very resilient against standard ammo types.
There are a few weakpoints above the gun, but these are hard to hit in a live battle situation, and are only really exploitable with premium ammo or in close range.
The large viewport below the cupola isn’t a reliable penetration point, a few shots may penetrate, but most of the time they will bounce, don’t risk shooting here as an enemy tank.
The cupola is somewhat large and very weak, but isn’t HE penetrable (this is due to the vision blocks being modules, and hence stop HE penetrations).
Using gun depression:
While using gun depression, the turret is pretty much impenetrable, except for the cupola.
Enemies can hit the weakpoints that are around the gun, and there are many of them, but they are all very small and easy to miss, even when fully aimed in on a non-moving Chieftain.
The cupola is small and hard to hit on a moving target, but its still a viable weakpoint, and the most reliable one to go for when this tank is hulldown.
The small driver hatch on the hull isn’t a reliable weakpoint, just due to how narrow and thin it is.
Side armour:
Chieftain’s sides are 38.1mm base, with 25mm tracks, and a 6mm sideskirt.
The upper sides are 50.8mm.
This side armour is extremely weak, and any angling or sidescraping will result in an easy penetration, due to enemy shell’s receiving double overmatch on both the tracks and the 38.1mm side plate.
Also, all guns that are over 114.3mm in caliber will be able to triple overmatch the Chieftain’s side armour if its turned at all.
Gun
The Chieftain Mk.6 mounts a 120mm gun
AP:
-Alpha damage is 400.
-Penetration is 255mm, or 275mm with calibrated shells.
-DPM is 3099, or 2944 with calibrated shells.
-Reload time is 7.7s, or 8.2s with calibrated shells.
–Shell velocity is 1372m/s.
Premium HESH:
-Alpha damage is 470.
-Penetration is 200mm, or 216mm with calibrated shells.
-DPM is 3642, or 3460 with calibrated shells.
-Reload time is 7.7s, or 8.2s with calibrated shells.
–Shell velocity is 1350m/s.
Standard HESH:
-Alpha damage is 515.
-Penetration is 80mm, or 86mm with calibrated shells.
-DPM is 3990, or 3791 with calibrated shells.
-Reload time is 7.7s, or 8.2s with calibrated shells.
–Shell velocity is 671m/s.
Other gun stats:
–Estimated aim time is 3.4/3.6s
–Base aim time is 2.31s, but it can get down to 1.78s.
-Dispersion is 0.308/0.277
–Gun handling is 0.15/0.15/0.12, or 0.13/0.13/0.1 with Vertical Stabilizer.
-Gun depression is -10 degrees
The Chieftain’s gun is very good. It has great handling, amazing accuracy, very comfortable gun depression with high DPM. Aim time is mediocre.
What this gun lacks is penetration potential. Its fine on standard ammo, has good premium HESH penetration, and standard HESH is also decent. What’s lacking is a high-penetration premium round, which means you struggle to penetrate enemies where other tanks would just use premium ammo.
However, despite this the tank does do amazingly at dealing high damage quickly against enemy lower plates, side armour, weak cupolas, or any HESH exploitable areas.
Mobility
Base mobility stats when equipped:
-Top speed is 42km/h forwards, and -15km/h in reverse,
-Traverse speed is 35.3 deg/s on hard terrain, and 32.6 deg/s on medium terrain.
-In game acceleration rate is shown as 15.7 hp/t, it has strong 863hp engine for its 55 ton weight.
-Actual acceleration rate is 13.1 hp/t on hard terrain, and 12.1 hp/t on medium terrain.
–Terrain resistances are 1.2/1.3/1.8
Mobility stats with 6% Gear Oil installed:
-Top speed is 46km/h forwards, and -19km/h in reverse.
-Traverse speed is 36.7 deg/s on hard terrain, and 33.9 deg/s on medium terrain.
-In game acceleration rate is shown as 16.5 hp/t, it has a strong 908 horsepower engine for its 55 ton weight.
-Actual acceleration rate is 13.8 hp/t on hard terrain, and 12.7 hp/t on medium terrain.
Overall this is a good mobility profile for a heavy tank. Its top forward and reverse speeds are both decent, and the strong engine allows the tank to quite easily maintain a good speed.
Effective acceleration rates are also very good, with decent traverse speed.
Equipment, provisions, & consumables
Chieftain Mk.6 has reactive armour for special provisions/consumables.
Consumable choice:
–Adrenaline is essential on this tank, as one of its biggest strengths is its great DPM.
–Multi purpose restoration pack is also essential, as this can repair/heal any module or crew on your tank, and put out fires.
–Tungsten shells will help greatly to increase the damage capability and trading capacity of this tank, making your shells do on average 460/541/592 damage.
Gun Rammer:
Despite being a tank with premium HESH, and lacking a premium round, calibrated shells actually isn’t the best choice.
Gun rammer focuses on what the Chieftain is good at, which is high DPM. Its penetration on AP will be 255mm, which is fine as with how tier 10 is balanced, armour plates are balanced around the numbers 250mm for standard ammo, and 300-330mm for premium. This means that despite calibrated shells increasing AP penetration from 255mm to 275mm, the amount of armour the tank can go through doesn’t actually change.
The main reason to use calibrated shells is for higher HESH penetration, as it increases from 200mm to 216mm.
The best thing to do is just try both, as gun rammer is a choice you wouldn’t expect on a tank with premium HESH, but it does work well.
Improved Assembly:
Enhanced armour on this tank only really benefits the turret, and doesn’t benefit it by a large amount. The effect of enhanced armour can be seen with the below image slider.
Improved assembly is generally more useful, since the Chieftain’s upper plate and turret are already strong without enhancing. Its armour also really only works when hulldown, so in most other situations, improved assembly is a better choice, as it lets the tank take more hits. Improved assembly increases the HP of the Chieftain from 2350 up to 2491.

Slide <- left to view Enhanced Armour.
Vertical Stabilizer:
As the Chieftain has already got very impressive dispersion of 0.308, there isn’t any need to use refined gun. This tank isn’t a sniper, and plays fairly actively, it will constantly be moving about during the battle, and generally won’t have time to fully aim each shot, especially due to unimpressive aim time.
Due to this, the vertical stabilizer is a more useful equipment choice, as it makes hitting shots a lot easier in an active playstyle, and especially as the Chieftain uses the finicky HESH round a lot in gameplay.
Gameplay advice
Due to the Chieftain’s fragile armour (if the hull is exposed), it can’t play a standard heavy tank role. Its more of a support heavy tank, which helps cover allies with supporting fire, and takes advantage of distracted enemies.
This tank can also play the role of a more armoured heavium, due to its strong upper plate and turret, and good mobility. However this role is harder to play than the support heavy role.
General gameplay:
At the beginning of a battle, choose a flank to play on. Check the enemy tank lineup and look at their heavies and mediums, then compare it to your own team’s lineup.
The Chieftain is an in-between point between regular heavies (such as T110E5) and full blooded heaviums (such as T95E6), so it can be flexible in where it goes on the map, and which enemies it “counters” on the enemy team.
Based on what heavies, heaviums, and mediums are on your and the enemy’s team, you can either choose to help your allied MT on the medium side of the map, or support the allied HT on the heavy side of the map.
If going to the HT flank, its best to not aggressively push to the front to capture bases or take a dominant positions. The Chieftain doesn’t have the holding ability to really use such positions well, as its lack of premium APCR or HEAT makes it hard to deal with other enemies if they get hulldown or hide their weakpoints.
Once you get into position, don’t just push forward impatiently. Let allies spot enemies and get intel on where the enemies are. Once you know where enemies are, then you can start taking actions to try win the battle. If you push out before you know where enemies are, its likely that you’ll lose most of your HP, since the Chieftain’s armour won’t work well when its out in the open.
Use the strong turret, and great gun and mobility to out-DPM or trade damage with enemies, flank and relocate, or hold hulldown positions and grind down the enemy’s’ HP.
Use gun depression and ridgelines:
The only time where the Chieftain’s armour will ever work well is when it can use its gun depression and hide its hull behind a ridge. If you find yourself in a position where you can go hulldown, make sure to utilize it.
Note that often enemy tanks will also be hulldown against you in such positions. With your limited penetration levels, you may need to aim for smaller weakpoints, or just not expose the tank at all for really well armoured enemies.
Use ammo right:
Make sure to try utilize both HESH ammo types in battle, as they are very good for increasing the damage you deal.
Premium HESH:
Load premium HESH by default in battle. Doing this lets you immediately know what armour you can’t penetrate, without the need to switch from AP to HESH then back to AP.
Premium HESH offers the best damage/penetration combination, having much higher penetration than standard HESH, but doing significantly more damage than AP. This will generally be used best on lower plates, turret/hull side armour, or other thin weakpoints.
AP:
AP will still likely be the ammo type you use most in battle, but don’t load it by default. AP is most useful for penetrating armour which HESH can’t deal with, such as stronger armoured lower plates, some MT upper plates, or tanks which are well-protected by spaced armour (such as WZ-132-1 or CS-63).
Standard HESH:
This is best to only use in closer ranges due to its very low 671m/s shell velocity. It does great damage with a good 80mm penetration, so can be used against the side armour of lighter armoured medium & heavy tanks, and the rear armour of most tanks. Its also useful against tanks such as FV4005 or Grille 15.
Armour caveats:
When using gun depression, try to use as much gun depression as possible, as this really benefits the weakpoints that are above and around the gun.
When in hulldown or using gun depression, try to not expose too much of the hull, as the weak mid bar may become a exposed if you push over a ridge too far.
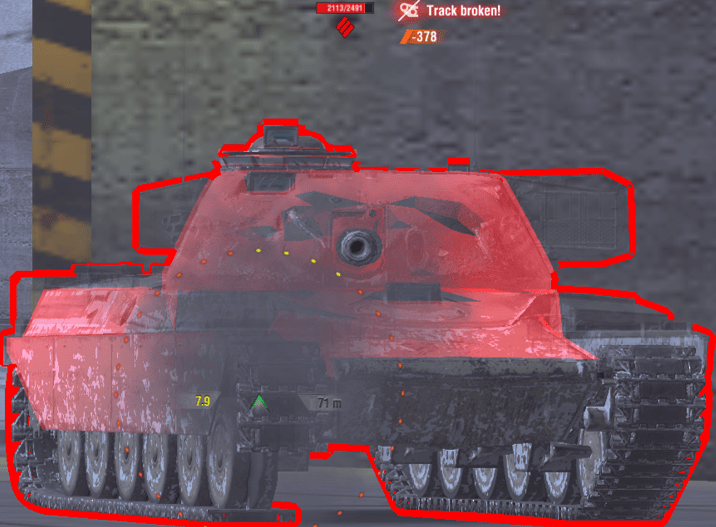
Do not ever angle the tank:
Chieftain has the weakest side armour of any tier 10 HT. 38mm sides mean it gets overmatched by anything with a gun thats larger than 114mm in caliber.
The tank shooting the Chieftain in the image has a 120mm gun, it will always be able to penetrate the side armour, no matter what angle its at.
The Chieftain’s gameplay revolves around its gun and turret armour. In battle, your main goal should just be putting these two aspects to use. Find good positions to use the turret armour, and try to maximize your use of the gun by using the right ammo and taking advantage of the DPM.
Try to play it like it has no armour on flat ground, because it really doesn’t. The only bounces you get on flat ground will be from players who don’t aim well.
Overall
Armour – 6/10
Gun – 6.5/10
Mobility – 8/10
Speed – 8.5/10
Chieftain Mk.6 is overall a good tank.
Armour while hulldown and using gun depression is great, but weak in all other aspects. HE protection is decent on front and sides, but not rear. Armour on flat ground is decent, but lower plate is weak.
Gun is good, great accuracy, gun handling, high DPM, great HESH damage & great gun depression. Aim time is mediocre, with low penetration potential due to premium HE-type ammo.
Mobility is good, with a strong engine, good acceleration, and good traverse speed. Reverse speed is just average at -15km/h, but can get to -19km/h which is amazing.
Speed is good, 42km/h base but up to 46km/h with provisions.
Is it worth getting?
The Chieftain is worth getting, but only for certain players. This tank is a unique blend of mobility, hulldown armour, and an amazing gun. No other tank in tier 10 really able to offer a similar gameplay experience to the Chieftain Mk. 6.
Its an extremely effective tank when its played right and played to its strengths, but only a fairly experienced player will be able to properly mitigate its weaknesses.
Less experienced players are likely to really struggle in this tank, as its lower penetration makes it more difficult to penetrate well armoured tanks, and its armour isn’t great when outside of hulldown.
The biggest aspects that make the Chieftain hard to play are its poor armour when not hulldown, and having to use HESH, which you need good knowledge of positioning to use, and of enemy armour plates.
This tank is worth it for experienced players, but not for newer or less experienced players, due to the complexity of its gameplay and its weak armour (compared to conventional heavies) on flat ground.
The Chieftain Mk.6 is worth 19,000 gold. Its a good tank when played to its strengths, and its really enjoyable with such an amazing gun and reliable hulldown armour, with good mobility. Its not easy to play though, and to really perform well in the Chieftain, you have to be quite well practiced with a hulldown-only tank.
Most recently sold for:
20,000 gold (Full bundle), 17,500 gold (Tank only) – April 2023
15,000 gold (Tank & equipment) – Blitz Birthday event, June 2023
20,000 gold (Full bundle), 17,500 gold (Tank only) – October 2023
“Royal” camo: 2D, costs 2,550 gold.

“Dystopia” camo: 3D, costs 6,500 gold.
For the Megadeth collaboration with WG.
Historical Note:
The Chieftain was the successor of the Centurion and the FV4202. It was Britain’s primary MBT between the 1960s and 1990s, when it was replaced by the Challenger 1.
The “mark 6” is actually just a Chieftain mark 2, but upgraded to the standard of the Chieftain mark 5. The mark 5 was the final production version of the Chieftain, all marks that came after it were just improvements on the marks 2-4, and the mark 5 itself.
