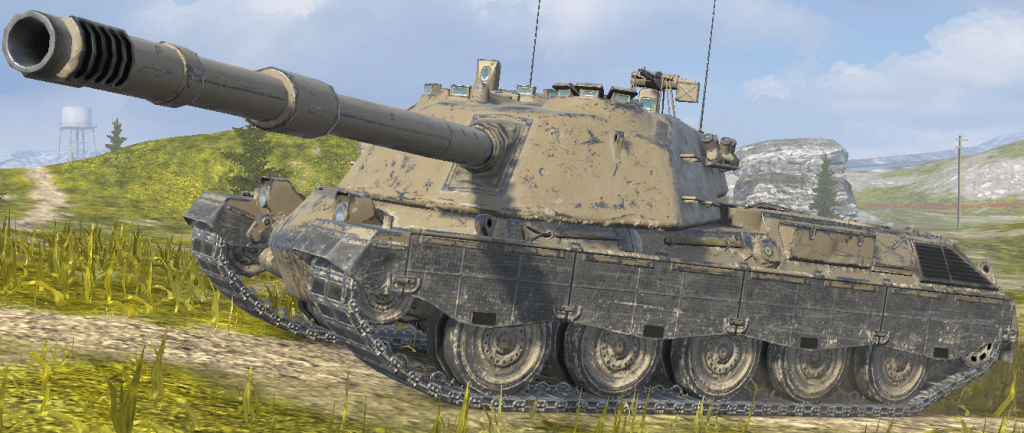
Minotauro is the top tier Italian tank destroyer. Its strong frontal armour, great gun depression, and poor accuracy means this tank plays the role of a frontline assault TD, more similar to a heavy tank.
Click the table of contents below to access the section you want:
- Armour
- Gun
- Mobility
- Equipment, provisions, & consumables
- Gameplay advice
- Overall
- Is it worth grinding?
- Camo cost:
- Tech tree overview
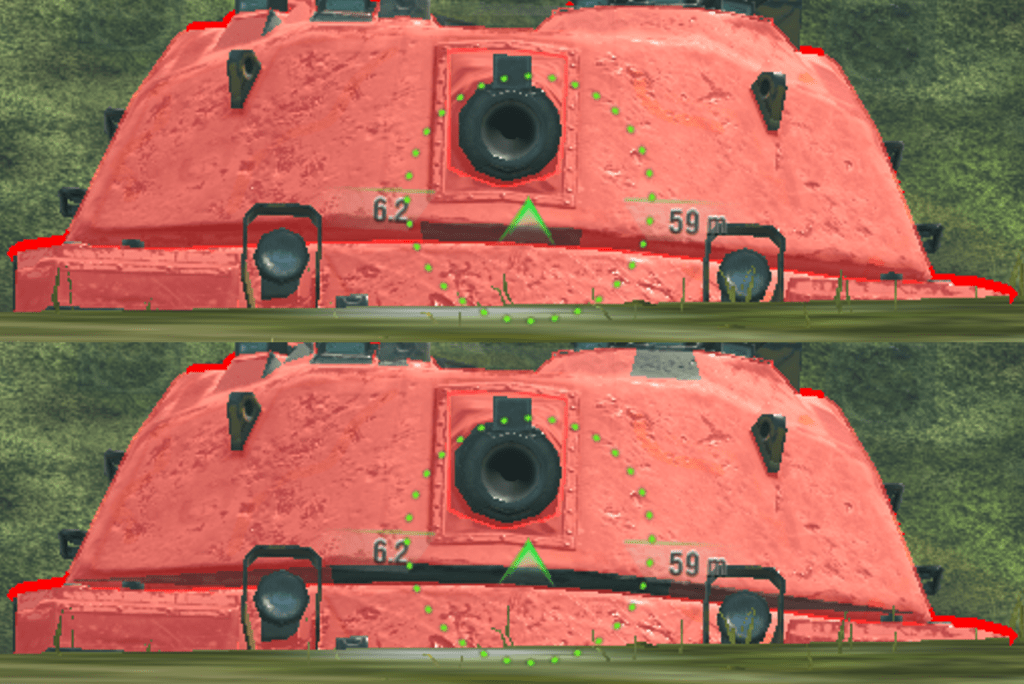
Armour
(The Minotauro in the images is using Enhanced Armour)


Drag slider right -> to view 252mm AP
Drag slider <- left to view 330mm HEAT
Flat ground:
Upper plate 350-420mm
Middle bar 272-335mm
Lower plate 260-285mm
Wheel connection bars 210-220mm (strongest point 400mm)
Turret front (around gun) 320-335mm
Turret cheeks 365-380mm
Right cupola 290-305mm (weakest point 262mm)
Notes about armour:
-The tank shown is using enhanced armour, which makes most its upper plate & turret about 15mm stronger in effective thickness (compared to the numbers shown).
-The turret plates are thinner than the hull in base thickness. They are 240mm thick, but angled better. This means they are easier to penetrate to any ammo type, especially if they lose angling (such as when the turret is turned away from the target).
-The hull is rounded, so angling it doesn’t increase its effective thickness, but also doesn’t really decrease it. Its base thickness is 270mm, and is at a worse angle than the turret, so its overall more challenging to penetrate, since normalization has a smaller effect on it.
Side armour:
The base side hull armour is 100mm, the spaced sideskirts are 10mm, and the tracks (module armour) are 20mm.
Overall the sides are fairly thin and easy to penetrate (especially at the track wheel), you should rely solely on the frontal armour of this tank, and not its sides.
vs 255mm AP (top image), 330mm HEAT (bottom image)
Using -10 gun depression
Upper plate 410-485mm
Area under gun 250-320mm
Turret front (around gun) 373-390mm
Turret cheeks 390-450mm
Right cupola 340-540mm (weakest point 302mm)
Armour vs all tier 9-10 tanks:
The Minotauro’s armour is very strong, and only a few penetration levels can actually reliable get through its armour.
Tier 9-10 mediums, lights, and some heavy tanks (below 330mm premium penetration) will be unable to penetrate the turret, & upper plate.
These tanks will have to aim for the cupola, or the mid armoured bar (where the upper and lower plate connect), and will have to use premium ammo to penetrate.
Tanks with 330mm or higher premium penetration the areas around the gun on the turret (if the Minotauro doesn’t use enhanced armour).
If the Minotauro is using gun depression, then the only weakpoint on the tank is the cupola. The small area below the gun just isn’t a reliable spot to shoot as its so small.
The lower plate can be troll due to its fairly good thickness, but most tanks can penetrate the center area. The only tanks which will really struggle are low penetration tier 9 mediums or low
Gun
The Minotauro mounts a 130mm “regular” auto-reloader gun.
The more it fires, the longer the reload of each shell is. It also has a “reserve shell“, the last shell you shoot out from the magazine has an extremely long reload.
All auto-reloaders have 3 firing modes (you won’t notice in battle, but it helps to understand the gun better).
Single shot mode:
(Where you shoot one shell, reload, shoot….)
-The best DPM in “single shot mode” is on shell 1*
-Shell 1* has an 11.7s reload, giving the tank 2517 DPM in this mode.
Autoloader mode:
(Where you just unload 2 shells then reload back to full, DON’T shoot the 3rd shell)
-Reload time from having 1 (reserve) shell in the clip to having 3 shells in the clip takes 20.73s.
-Intra clip is 3.53s with 2 x 490, giving the tank 2424 DPM if it shoots like an autoloader would (as in: fires 2 shells, reloads fully, then fires 2 shells, etc).
Auto-reloader mode:
(A combination of the first two. Only shooting until you need, and then reloading one-by-one.)
-Reload time for each shell is:
Shell 1* – 21.73s
Shell 2* – 9.05s (+ 3.53s) = 12.58s
Shell 3* – 8.15s (+ 3.53s) = 11.68s
Gun stats:
-Alpha damage is 490 on APCR, 410 on HEAT, and 630 on HE
-Intra-clip reload is 3.53s, the Minotauro has 2 “shootable” shells, so in 3.53s it can deal 980 damage. Don’t fire the 3rd shell, its a reserve shell.
-Penetration on APCR is 275mm, HEAT is 340mm, and HE is 65mm.
–Estimated aim time is 4.3/4.6s
–Base aim time is 2.65s, but it can get down to 2.16s.
-Dispersion is 0.398/0.359
–Gun handling is 0.21/0.19/0.15, or 0.18/0.16/0.13 with Vertical Stabilizer.
-Gun depression is -10 degrees
-Gun arc left/right is +45/-45 degrees
*Shell 3 is the first shell you shoot when the magazine is fully loaded. Its the last shell that gets loaded into the magazine. Shell 1 is the reserve shell.
Overall the Minotauro’s gun is decent. The reload is long (11.7s for a single shot), but alpha damage is very nice. Gun depression and penetration are both very good.
Gun handling is decent but not great, and both aim time and accuracy are quite poor.
In gameplay this gun doesn’t feel as inaccurate as it looks. You do have to properly aim to hit shots, but its perfectly usable if you use it right and don’t rush shots.
Mobility
-Top speed is 34km/h, reverse is -12km/h.
-Traverse speed is 34.6 deg/s on hard terrain, and 28.28 deg/s on medium terrain.
-In game acceleration rate is shown as 14.7 hp/t, it has a fairly strong 842 horsepower engine for its 57 ton weight.
-Actual acceleration rate is 10.9 hp/t on hard terrain, and 8.9 hp/t on medium terrain.
–Ground resistances are 1.4/1.7/2.1
Considering the strong frontal armour of the Minotauro, this is good mobility. The top speed is decent, and the acceleration rate is enough to reach it fairly easily. Traverse speed is also decent, especially when coupled with the semi-traversable turret. Overall the Minotauro doesn’t feel slow, it just feels like fairly mediocre heavy tank mobility.
Equipment, provisions, & consumables
Minotauro has no special consumables/provisions.
Improved Ventilation/Calibrated Shells:
Either choice can work well on this tank.
Improved ventilation will help with the reload rate of each shell, and slightly improve accuracy and aim time. Minotauro is able to use vents without issue, as its penetration is already good, and you may want to focus on slightly improving your shot efficiency with vents.
Calibrated shells also work well. Instead of slightly improved crew stats, you’ll be able to penetrate more enemies on more areas of their armour. Calibrated shells would increase APCR penetration from 275mm up to 289mm, HEAT from 340mm to 384mm, and HE from 65mm to 70mm.
Enhanced Armour:
Minotauro has a huge focus on its frontal armour, both in gameplay and in statistics. Improving the armour would be taking advantage of one of the tank’s biggest strengths, and also 1 extra bounced shot is worth far more than the benefit of improved assembly (which is an extra 120 HP).
Enhanced armour would improve:
-Upper plate from 350mm to 364mm
-Middle bar from 272mm to 283mm
-Lower plate from 260mm to 267mm
-Turret front from 320mm to 333mm
-Turret cheeks from 365mm to 380mm
-Cupola from 262mm to 273mm
Vertical Stabilizer/Refined Gun:
There are 2 approaches you can take to this gun due to its poor aim time and dispersion.
The first option is vertical stabilizer, you improve its gun handling and thus aim in your shots slightly faster, and retain better accuracy in mid to close range fights. This is good for brawls and for any situation where you can’t sit still and aim for long.
The second option is refined gun, it improves your dispersion very significantly (from 0.398 to 0.339), allowing you to always be more accurate as your maximum possible dispersion and minimum possible dispersion are both reduced. You aim in slower, but are more accurate. This is good for situations where you have time to aim, such as sitting hulldown (which this tank does a lot of), it also helps a lot with snap shotting.
Gameplay advice
The Minotauro plays as a heavy tank. This tank should never be played in a way that other TDs play.
The gameplay of the Minotauro is very unique in tier 10, as no other tier 10 turreted tank has quite as reliable overall frontal armour with a high alpha gun.
General gameplay:
Take the Minotauro to the heavy tank side of the map. Its fairly slow traverse, weak side armour, and limited turret traverse make it hard to deal with fast medium and light tanks who can easily circle you. The gameplay on the MT side of the map is also just too fast paced for the Minotauro to keep up with, especially with a reload of over 12s on the shell with the best DPM.
Go to the heavy side of the map, and use the good armour in city environments or gun depression positions. Try to avoid being in the open, as the tank’s sides are weak. In a city environment, you can use buildings to hide the side armour as you show the front of the hull and shoot enemies. Gun depression positions let you increase the armour of the tank to a point where even the highest penetration tanks can’t penetrate.
Hold shots:
Try to keep as many shells in the magazine as possible, don’t burst damage. Keeping the full 3 shells in the magazine gives the Minotauro its best possible DPM, which is 2517.
The hardest thing to do if you’ve never played an regular (not inverse) autoloader before, is holding your shots. Even if you have the opportunity to take a 2nd shot and get damage, you have to hold it and not shoot. Unless its absolutely necessary to take that 2nd shot, you should usually only shoot 1 shell at a time, then fully reload, since this maintains the best DPM.
Holding your shots and keeping a fully reloaded magazine also gives you flexibility, since when you do encounter a situation where you need multiple shells, you won’t have to worry about waiting to reload, since your magazine is already full.
When to shoot 2 shots:
Shooting the 2nd shot in the magazine lowers the DPM from 2517 down to 2337 (if you only use this 2nd shell), and it would take you 20.7s to reload back to having 3 shells (full magazine).
Its easy to get “stuck” on this lower DPM shell if you do unload 2 shots, which is why its generally best to try only shoot 1 shell and then fully reload.
You should only use 2 shots:
-If you think there will be a “dead” period of the battle where you won’t be under pressure to immediately shoot an enemy, and will have the time to fully reload for 20.7s.
-If the enemy is just about to pull back into cover, and is not likely to come out and shoot you again, or if you can easily get into cover and just reload there.
Basically, if using 2 shots, you want to always ensure that you can actually reload and get your DPM back.
When to use the reserve shell:
Since the reserve shell takes so long to reload, you should NEVER use it in a normal battle situation, You should only use it in very exceptional situations, such as:
-You need it to kill an enemy, and if you don’t kill this enemy, it could cause your team to lose the game.
-You know the enemy you are fighting is about to reload and has enough alpha/penetration to kill you, and killing the enemy by using the reserve shell would save you.
-The battle is ending, and you don’t think you’ll be able to get in more damage anyway.
-Securing a kill in a close Supremacy game to reduce enemy cap points and stop them from winning.
-If you are in an isolated 1v1. Its just you and 1 other enemy, there’s no one to help you, and the other enemies aren’t close enough to attack you. In 7.06s, if you burst the full magazine, you can deal 1470 damage, which is a big advantage to have in a 1v1 situation; but you then need around 48s to fully reload.
The reserve shell should not be used in any other situation than these, as it just cripples your tank and causes you to be defenseless against enemies.
Don’t turn the hull:
Always keep the hull and turret turned towards the enemy that’s shooting you. Both the hull and the turret become weaker if they aren’t facing the enemy, as the angling becomes worse (this is similar to the Kranvagn’s turret, but the Minotauro’s turret cheeks are just bigger).
The most optimal angling for your armour, is to not angle. The there are so few weakpoints (ones that are actually weak to standard ammo) on the tank’s front, that you don’t have to worry about complicated armour use, just try hide the lower plate and don’t turn the turret away from the enemies.
Use gun depression:
Using gun depression significantly increases the armour of the Minotauro, so its still best to do so, even though the tank already has very strong armour.
When on flat ground, high penetration enemies can use premium ammo and go through the lower plate or the flatter turret areas around the gun; however if you use gun depression, this becomes impossible, and the only weakpoint on the tank will be the small and well armoured right side cupola.
When in a gun depression position, you don’t have to move back and fourth to troll enemies, as the armour is already reliable. Its better to just stop and aim properly to ensure you hit your shot, then just immediately pull back into cover.
Overall the Minotauro has a simple playstyle, which is:
-Show frontal armour only.
-Go hulldown & use gun depression.
-Use the tank as a single-shot tank in most situations.
-Play like a heavy tank.
Its armour is fairly fool proof and the gun has great gun depression, making this a very easy tank to use, as long as you don’t start unloading the whole magazine.
Overall
Armour – 7/10
Gun – 6.5/10
Mobility – 5/10
Speed – 5/10
Minotauro is overall a great tank.
Armour is very strong on the front, with no weakpoints to standard ammo, other than the small right cupola. HE protection is very good, HESH protection is fairly poor. Not usable in sidescrape or angling.
Gun is decent (by standards of HT), with high alpha, great -10 gun depression, high penetration, and decent gun handling. Accuracy is poor, aim time is mediocre, and single shot reload is slow (though, single-shot DPM isn’t bad).
Mobility is pretty good for the armour, with an decent acceleration rate and traverse speed. Reverse speed is fairly slow. Gun angles are comfortable and easy to use.
Speed is average for a heavy-type tank, with 34km/h.
Is it worth grinding?
The Minotauro is worth getting. Even though it doesn’t look that special, its gameplay is quite different to other tier 10 tanks. The strong overall frontal armour is so different to any other tier 10 turreted tank, and that 490 alpha with -10 gun depression do feel very nice, even though the reload is long.
There isn’t anything particularly un-enjoyable about this tank, however you may find it frustrating due to the slow reload or non-ideal accuracy. Its a good tank, largely due to its great armour, gun and mobility flexibility, and ability to have a 490 alpha auto-reloader when it needs it.
Veteran players may find this tank boring due to its slower paced gameplay and stats (slower level heavy tank mobility and low DPM/ slow aiming; but it is different, so if you’re bored of other tanks and think it might be interesting, then the Minotauro is worth getting.
Newer players will do well in this tank due to its great armour and gun depression, but will have to learn how to properly use the gun (holding shells) to really do great in it.
Camo cost:

“Moderno” camo: 3D, costs 5,500 gold
Tech tree overview
To get to the Minotauro, You have to grind through the tier 1-4 EU mediums & lights, then switch to the Semovente line from the Lago.
The tier 1-6 tanks have stock grinds which are easy to use and are playable, but the tier 7-9 tanks all have terrible stock grinds which cause the tanks to be slow, inaccurate, and have terrible DPM.
-Tiers 1-4 are low tier medium and light tanks. All have good guns and mobility but very weak armour. Quick and easy to grind though, none have bad stock grinds.
-Tier 5 is the Semovente M41 da 75/18, quite similar to the StuG III in its playstyle and characteristics. It has decent armour, mobility, and a good 75mm gun. Stock grind is fine.
-Tier 6 is the Semovente M43 105/25 Bassotto. Its similar to the previous tank, with decent armour and mobility, however with a high alpha 105mm gun. This tank is less suited to sniping due to its fairly mediocre aim time and DPM, however is very good when played as a support tank.
Again, the stock grind of this tank is fine. The stock gun has 160 alpha but good DPM, and the middle gun has 225 alpha with similar DPM. Both have good penetration/accuracy/aim time and are perfectly grindable, same for the engines and tracks.
-Tier 7 is the Semovente Controcarro 1956, its more like a heavy tank than a TD, due to its very strong armour and semi-traversable turret. The lower plate is fairly weak, but the decent mobility means there’s no issue getting into hulldown positions. There are 2 gun choices, an auto-reloader 90mm with 240 alpha, or a single shot 105mm with 310 alpha. The 310 alpha gun is generally better, as you can trade damage more effectively, and have sustained DPM.
The stock grind is quite painful, as the tank is very slow, can’t turn well, and has a very low DPM and inaccurate stock gun. Its best to upgrade the engine first, then either the gun or tracks. Finally get the top turret and 105mm gun.
The stock turret has good armour, and the same HP as the top turret, so upgrading it is not urgent.
-Tier 8 is the Semovente Controcarro 1964 (better known as “Vipera” on WoT PC). This tank is one of the most broken overpowered tanks in tier 8, having good mobility and speed, extremely strong frontal armour, 11 degrees of gun depression, and almost 3k DPM with a 410 alpha gun.
This tank technically has 2 top guns, but the 120mm gun with 410 alpha is the real top gun, as its just so much better than the 105mm auto-reloader.
The stock grind of this tank is painful, just like with the previous tank. When stock, its very slow, has poor accuracy and extremely low DPM. Again, upgrade the engine first, after that choose either the tracks or the top 105mm gun. Get the turret and 120mm gun last.
The stock turret has very strong armour, but has 100 less HP than the top turret.
-Tier 9 is the Controcarro 1 Mark 2. This is most similar to the Minotauro, with good alpha damage, a 3 shell auto-reloader as its only gun choice, and very strong turret armour. The upper plate is strong but flat, and the lower plate is decent but not impenetrable. This tank also gets -13 degrees of gun depression, making it one of the best tank to have on a hill.
The stock grind of this tank is essentially unplayable. The tank is very slow, has terrible turning speed, terrible accuracy, terrible DPM, and its alpha damage is just 400. Its probably best to grind the stock version of this tank when there are fun modes available.
Upgrade the tracks first, then get the top turret and gun. The engine upgrade on this tank gives very little and isn’t worth getting until the very end.
-Tier 10 is the Contocarro 3 Minotauro. Compared to the rest of the tanks, this has the best overall frontal armour, but also has the most turret roof weakpoints. Minotauro is a nice upgrade over the previous tank as it maintains most of the aspects but improves on them. The gun has higher alpha, better reload, better penetration, & gun handling. The armour is just all-round better, and the mobility is improved due to better traverse.
