
The FV215b 183 is one of the top tier British tank destroyers. It has the highest single shot damage in game, with great standard and HESH penetration. Other than this it has decent mobility, a surprisingly decent performing gun, though poor accuracy and quite weak armour.
Click the table of contents below to access the section you want:
- Armour
- Gun
- Mobility
- Ammo loadout
- Equipment, provisions, & consumables
- Gameplay advice
- Tank gameplay:
- Overall
- Is it worth grinding?
- Camo cost:
- Tech tree overview
Armour
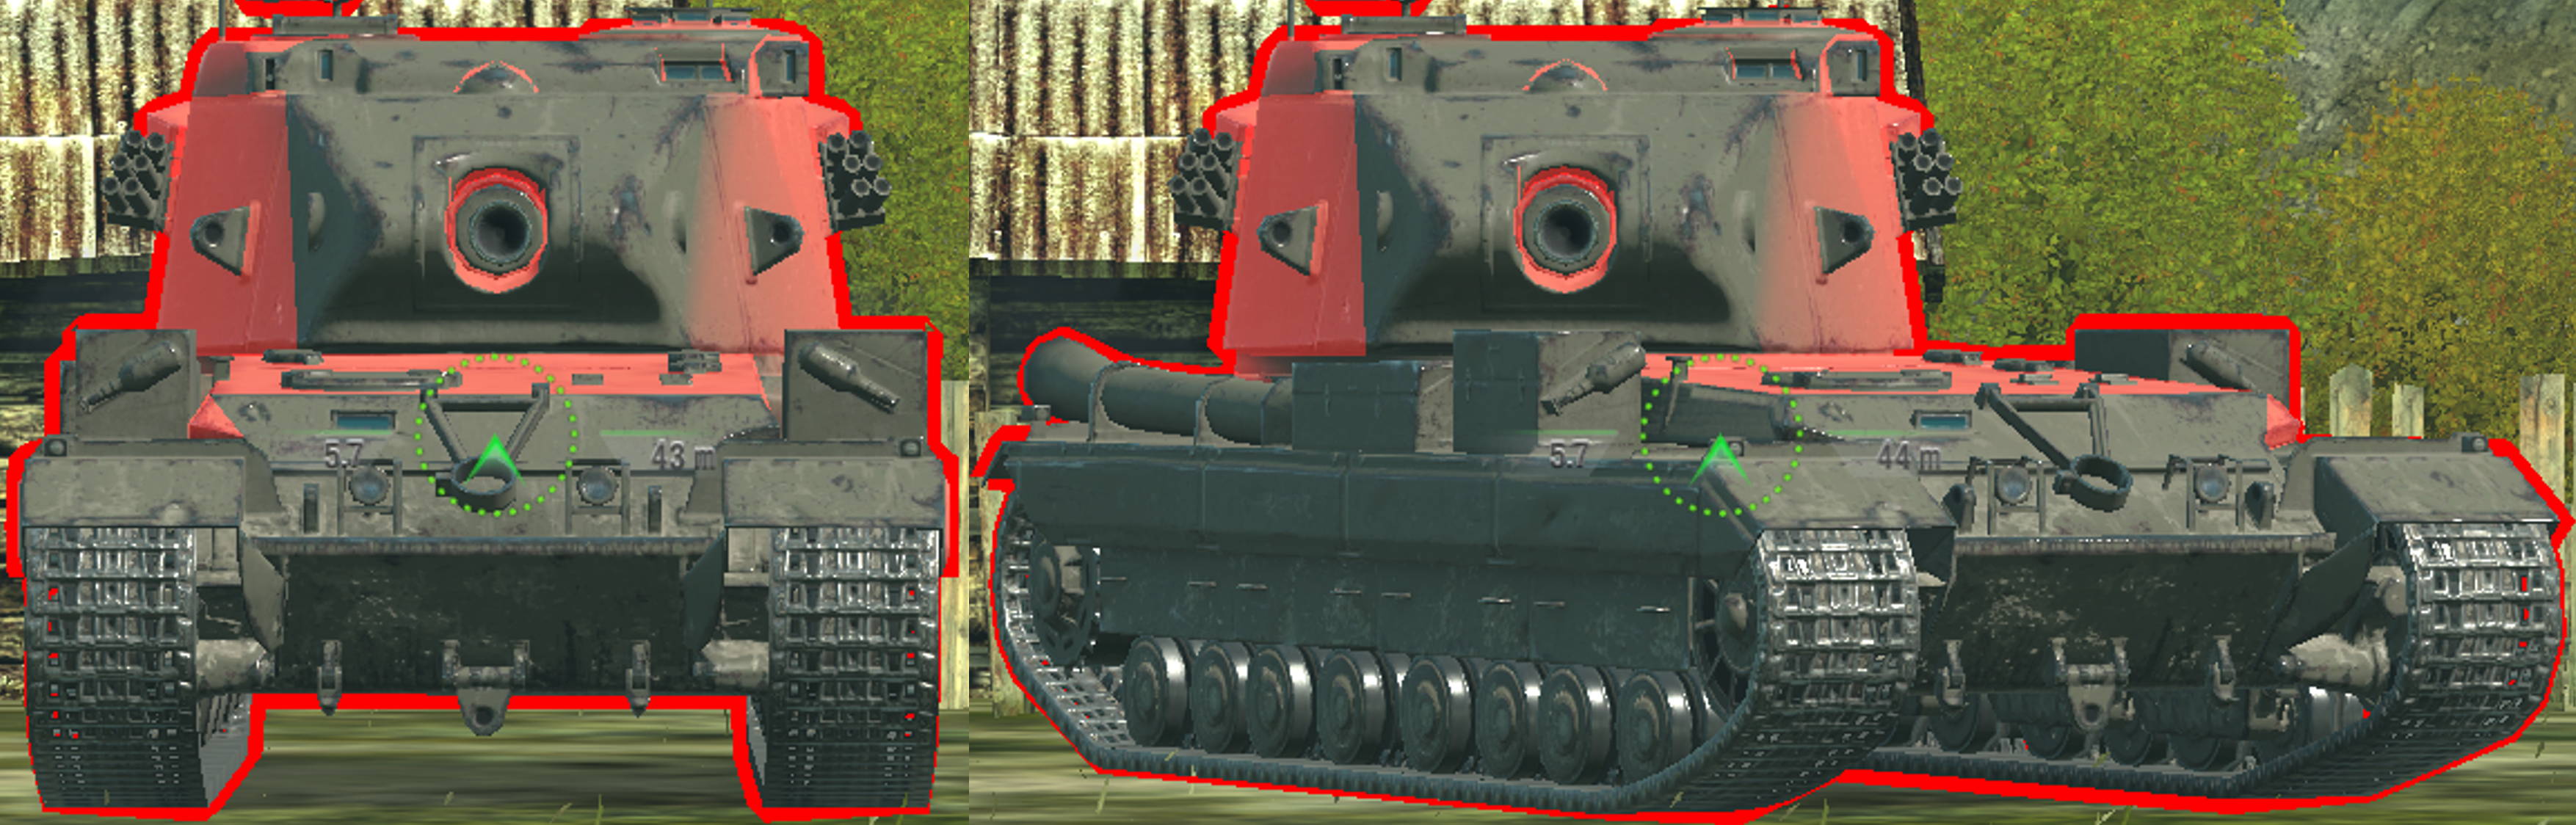
(The FV 183 in the images is using Improved Assembly)

Drag slider right -> to view 245mm AP
Drag slider <- left to view 300mm HEAT
Armour when flat and facing head-on:
Upper plate 245mm
Lower plate 160mm
Turret 135-250mm (up to 310mm on outer cheeks)
Roof area 105-200mm

vs 255mm AP
Angling/Sidescraping:
The FV 183 has weak side armour at 51mm, its also mostly covered in 6mm spaced armour.
The spaced armour is very helpful for stopping HE and HESH (otherwise the 183 would be an easy target), but against AP its useless.
At the angle shown in the picture, any area of the 183’s side armour can be penetrated, even though it shows up as red.
Armour vs tier both tier 9 & 10 tanks:
The FV 183 has weak armour and a large profile, its easily penetrable by standard ammo from all enemies.
The only areas where enemies may bounce off, are the turret roof, the turret cheek edges, or the upper plate when its over-angled.
To penetrate HE on the 183, you have to shoot right under the turret ring on the side of the tank (basically just shoot where the exhaust is). All other areas of the side armour are covered in spaced armour.
The hull rear is 82mm thick, so only tanks with 150mm+ guns will be able to utilize HE against the rear of the FV 183.
Gun
The FV215b 183 mounts a 183mm gun
-Alpha damage is 950 on AP, 1210 on HESH, and 1390 on HE
-It has an 18.5s reload, giving it 3077 DPM on AP, and 3919 DPM on HESH, and 4502 HE
-Penetration on AP is 300mm, HESH is 220mm, and HE is 80mm.
-If you decide to use Calibrated Shells, the DPM on AP drops to 2862, DPM on HESH drops to 3645, and HE will drop to 4187.
-The reload time will go up to 19.9s, and AP penetration will be 315mm, HESH penetration will be 242mm, and HE penetration will be 88mm.
–Estimated aim time is 4.2/4.6s
–Base aim time is 2.6s, but can get down to 2.12s.
-Dispersion is 0.407/0.367
–Gun handling is 0.2/0.2/0.2, or 0.17/0.17/0.17 with Vertical Stabilizer.
-Gun depression is -5 degrees
-Turret traverse arc is 45 degrees to the left and 45 degrees to the right.
Overall this is actually a great gun. For its alpha, its got good DPM, its got great standard penetration, and high HESH penetration, the gun handling is actually pretty good for such high alpha, and its base aim time is great for its alpha.
The only real bad stats here are the gun depression and the accuracy. The 183 is a large and tall tank, and the -5 gun depression really limits the 183 to only flat ground. The accuracy is poor, and if you don’t aim well then it will cause you to miss; though the other gun stats do somewhat make up for the poor dispersion.
Mobility
-Top speed is 38km/h forwards, and -11km/h in reverse
-Traverse speed is 34.6 deg/s on hard terrain, and 31.1 deg/s on medium terrain.
-In game acceleration rate is shown as 16.6 hp/t, it has strong 995 horsepower engine for its 60 ton weight.
-Actual acceleration rate is 9.2 hp/t on hard terrain, and 8.3 hp/t on medium terrain.
–Terrain resistances are poor, having 1.8/2/2.5
In the garage, the mobility looks great; in its actual effective stats, the mobility looks terrible. In gameplay feel, its somewhat in-between.
The acceleration of the 183 is decent. Due to its very poor terrain resistances, it doesn’t feel like 15.6hp/t; however, as its engine is quite strong, the acceleration doesn’t feel quite as bad as 9.2 or 8.3 hp/t.
When you play the tank it feels like an in-between, it seems to accelerate quite quickly, but if it encounters any hill or terrain irregularity, the tank quickly slows down.
The traverse speed is good for a TD, especially considering that the 183 has a turret. The top speeds are also both decent.
Overall the mobility of the 183 feels comfortable, and its what could be considered “average heavy tank mobility”.
Ammo loadout
The 183 only carries 21 shells, it rarely ever runs low on ammo due to its slow reload, but ammo loadout is important.
Take 8 AP shells, no matter what kind of player you are, AP is by far the most versatile and useful ammo type which you should default to when faced with spaced armour, map obstacles, strong armour, guaranteed kill shots, etc. This shell type is ALWAYS useful.
Take 8 HESH shells, this should be your primary ammo in battle, it deals the most damage and also has high penetration for a HE-type shell.
Take 5 HE shells, these are actually a useful shell in battle, causing an extra 180 damage than HESH, its very useful for shooting the rears of enemy tanks, or if you can catch the sides of certain enemies. HE is also very good for dealing big splash damage on enemies which you can’t penetrate with the other shells.
Equipment, provisions, & consumables
FV215b 183 has no special provisions or consumables.
Note that most of these below equipment choices will depend on your playstyle of the tank. One of the playstyles of the 183 is as an active support tank, the other is as a sniper support tank.
Gun Rammer/Calibrated Shells:
Just like with the Caliban, both are valid equipment choices on this tank.
For sniping gameplay, use calibrated shells; if you want to play a more active role in battle, you should try both pieces of equipment extensively to see which one suits your playstyle the best.
Just as with any tank setup recommendation, don’t only listen to what other players tell you is good on the tank, try it yourself.
-Calibrated shells should always be used if playing the tank passively or as a sniper. Since you play the tank far from the enemies, usually unspotted and sniping from a bush, you have the time to aim in fully, and there will be fewer situations where your shot is forced (ie: you don’t have time to aim your AP or HESH properly and just have to splash HESH/HE).
Since the battle is happening quite far from your sniping position, there is also no pressure on your tank to reload quickly, and since the 183 is a high-impact single shot tank, the increased penetration (especially on HESH) will be far more useful for delivering that huge damage effectively. Reloading fast is not as important when you aren’t on the frontline or 2nd line.
-Gun rammer can work very well if you want to play more actively. You will play closer to the enemies, and thus having that quick reload will come in very helpful. Since you aren’t sniping, there’s much more pressure on reloading quickly, as the frontline situations change fast, and ideally you want to always be ready to react.
You will also move around much more, and sometimes just have to splash HESH/HE on an enemy without aiming. Again the quick reload from using gun rammer will be very helpful in these situations, as your “decreased alpha” from only dealing splash damage is compensated by that quicker reload.
Camouflage net:
The FV 183 has one of the lowest camouflage ratings in tier 10 TDs, its even lower than some heavy tanks.
Even if you play this tank in the more active playstyle, you will still never need to be the one spotting, so don’t use improved optics. Use camo net instead as you want to try keep the tank hidden as much as possible in battle. (If you get spotted, you are a huge target and very easy to penetrate. Without the camo net, the FV183 has the camo rating of a well-camouflaged heavy tank, which isn’t very good).
With a level 7 camouflage crew skill, the camo rating of the FV 183 is 43% when stationary, 34% when moving, and 2% after a shot. This is still poor camo rating for a TD, but its far better than the 29/27/1 it has without the camo net.
Improved Assembly:
As the 183 has no notable armour, so its not worth enhancing. The tank will still be very easily penetrated by all standard ammo from any enemies, enhanced armour doesn’t make a difference on the 183.
Its better to use improved assembly, which will allow your tank to survive longer and trade more in battle. Improved assembly will increase the tank’s decent base HP from 1800 up to 1908.
Vertical Stabilizer/Refined gun:
Both are good choices to use on this tank depending on playstyle.
-Refined gun is by far the best choice for a sniping playstyle, considering that your tank is far from the enemies and usually hidden, you have the time to fully aim in to your minimum dispersion. At long range, the difference between having 0.389 dispersion and 0.350 dispersion is especially noticeable.
Refined gun is also highly effective in the more active support playstyle of the 183. Since its gun handling is actually pretty decent for its alpha, the 183 can still be very effective without using vertical stabilizer. In the support playstyle, refined gun does allow your tank to be consistent with its shots, just due to your aiming reticle being smaller; however, you will have to aim for a bit longer than if using vertical stabilizer (but with this tank you ideally should be fully aiming every shot anyway).
Vertical stabilizer should only be used if you want to play the tank actively. Don’t use this if you’re going to snipe, as it just won’t help the 183. This will allow the tank to move around the battle actively, turn its hull/turret, push forward, etc, and still be fairly consistent.
Though your aim circle is larger, it won’t bloom out as much when you move, so vertical stabilizer is very useful for when you don’t have time to fully aim in.
(Personal note: I find Refined Gun to be best. Stabilizer does have its uses, especially for playing actively; but the FV 183 does usually have to start the battle by sniping/setting up an ambush shot. Since each shot is so impactful, often its worth it to stop and aim longer so your tank can be accurate. Snapping in “clutch shots” is not something the 183 should do often, often its far better to have that 0.367 accuracy as it does work in any situation for the FV 183 in particular.)
Gameplay advice
The FV 183 has some of the most awkward gameplay in tier 10, to really play it effectively, you have to combine sniping gameplay with 2nd line gameplay, in a tank with a very awkward and clunky gun platform.
This section will go over how to play the tank more actively. The sniping gameplay of this tank doesn’t need much explanation.
Only playing as a sniper will not give you big damage games, sure it will sometimes work out, but if you only snipe for a whole battle, you will generally find it hard to break 3k damage.
General gameplay:
Start the battle by sniping. Yes the most effective way to play is by being active, but at the beginning of the battle you can’t play that role. Find a position to snipe, ideally somewhere where enemies will cross in the open or be unexpectedly spotted. Note that enemy tanks may also set up ambush shots on early and typical crossing positions, and for that same reason the 183 should never push out early in the battle.
If there are no sniping spots, or its a city map, you can also start the battle by following allied heavy tanks and supporting them. Try to keep in cover and stay behind buildings, since generally enemies will prioritize shooting the 183 over any heavy tank.
When you see the battle either progressing or slowing down (stalemate), you can push forward and play as a 2nd line support tank.
As a support tank, you should never be on the frontlines, never be a meatshield for allies, try to stay on flat ground. You need to watch your enemies, if they shoot then its a chance for you to get your shot in without taking damage. Try to always have allies HT or MT with you, so they can support you on reload, and to take hits for you. (Of course don’t do this in a toxic way, but you should try to conserve your HP in this tank, as it doesn’t have the armour to block hits, but your allies generally will).
Your main focus in this tank when playing support is to make each shot penetrate. That is the best possible support you can give to your team, and the only way you can do this is by staying alive, saving your HP, and working with allies who have better armour/HP/reload time.
You should play behind your allies, not in front of them on the frontline, but in a good position slightly further back which can ambush enemies if they rush your frontline allies. Alternatively play around buildings and cover, so that after you shoot you can immediately get into cover and reload.
Avoid predictable positions:
Both when sniping and when playing support, unusual positions are more effective than the usual predictable positions. This doesn’t mean using predictable positions is a bad play, it can still be effective; but unpredicted positions are better for ambush shots.
Enemy tanks know where the usual sniping spot are on a map, and if you haven’t yet been spotted by the enemy, they will expect that you are in that usual sniping spot.
Since the 183 dwells on ambush shots and unexpected angles (to penetrate its HESH), being in an unexpected position often gives you more opportunities where enemies don’t face their armour to you, or push out and expose themselves.
Being in a predictable sniping/supporting positions will let you catch bad players out, being in an unusual position can let you catch good players out.
(For example on Dead Rail or Yamato Harbour, there are obvious and dedicated sniping positions on the map. Often enemy tanks will do their best to avoid being in the line of fire to that position.)
Ammunition use:
-Your primary shell is HESH, when you get into battle, this is the shell you should always load first. This shell is most useful for when enemies are not focused on shooting at you, and they are turned away, exposing their side armour.
-Don’t be afraid of using AP. Yes it does 260 less damage than HESH, but its a lot more consistent. View AP shells as “improved accuracy and penetration”.
Due to AP’s ability to normalize, go through spaced armour, and go through modules, you don’t have to aim for as long at an enemy tank (thus being more accurate). HESH has to be aimed carefully, as it can’t deal with thick armour, spaced armour, or modules.
For example, you go around a corner and there’s an enemy T110E5 with his side faced to you, note that because you were moving, your reticle is bloomed out. If you wait for the reticle to aim in, the E5 may turn his turret to you.
1- You could shoot HESH, it can easily penetrate the turret sides of the E5; however if it hits the front part of the turret, or the hull sides (the tracks and spaced armour), your HESH won’t penetrate.
2- You should shoot AP, which can penetrate ANY area of the E5’s side armour, including the front side of the turret, though the tracks, and through any spaced armour.
-HE should be used to splash enemy tanks which you can’t penetrate (such as a fully hulldown IS-7), and against thinly armoured enemies (such as the rear of a T110E4 or the side of an AMX 50 B).
Utilize overmatch:
The 183mm is the largest gun in the game, and because it has an AP shell, it can overmatch up to 60.9mm armour plates. You should utilize this in battle, as many tanks will have roof plates, engine deck plates, or even side armour which your AP can overmatch easily.
Don’t rush shots:
The 183 should never snap shot. If you want to rush a shot, load HE or HESH and just splash the enemy tank, and only do this when you don’t have time to properly aim in or you really can’t penetrate the enemy.
However, if you want the shot to actually penetrate, always fully aim in, or at least aim in to the point where you are certain the shell will hit the area that you want. Every one of your shots is roughly 30% of your tank’s DPM, and since they deal such big damage (and can change the outcome of a battle), making sure your shot is fully aimed is definitely worth doing.
To be the most effective in this tank, you have to play it cautiously. You must know the limitations of the tank, and position yourself and plan your game accordingly.
Your tank has terrible camo rating, large size, its not fast, it has poor gun depression, weak armour, and poor accuracy. Thus, don’t go to gun depression positions, try to drive the furthest line so you don’t get spotted, don’t immediately start losing HP to enemies, and don’t take chancy shots and hope to hit.
Start the battle as an ambush or sniper tank, but push up to the 2nd line and support your allies when you see them needing help or you notice the battle situation changing.
Tank gameplay:
Overall
Overall the 183 is an ok tank. Its not terrible, but it is hard to do well in due to limitations on the vehicle, and often doing extremely high damage battles (5-7k) are highly reliant on good RNG and being in the right place at the right time.
The FV 183 has good DPM, quite good handling for a TD, good penetration, and decent estimated aim time; however it has terrible accuracy. The armour is weak to standard rounds, but hard penetrate with HE; and the mobility is decent, roughly on the same level as an “average” heavy tank.
The main issues that make the tank hard to play are down to the fact that the 183 doesn’t excel in a “class stat” (ie: HT have armour and HP, LT have mobility, MT have a bit of everything, and TDs generally have camo and firepower).
The 183 doesn’t excel in mobility, it doesn’t excel in armour or HP, and it has very poor camo rating. Add to this, its very large, has poor gun depression, and a heavy reliance on hitting every shot (30% of your DPM is in each shot).
All these cause the tank to have an awkward and high-skill playstyle, which is very much a case of “high risk, high reward”.
Is it worth grinding?
The FV215b 183 is not worth grinding for new players, or for any players who hate inconsistent tanks/gameplay.
While the tier 1-9 tanks in the tech tree are fairly new player friendly, the FV 183 itself definitely is not, and is arguably the hardest tank in tier 10 to consistently be able to do well in.
The tank also has extremely inconsistent damage output and general performance due to its ammunition types, long reload, poor accuracy, and limited gun depression; so avoid this tank if you don’t like any of those factors.
The 183 is worth grinding if you just want to have a bit of fun occasionally. It has quite a unique feel, considering its one of the few turreted TDs in tier 10, but mainly for the fact its the only tier 10 TD with proper HESH, and the only tank in game that has a high penetration shell that deals over 1k damage in a single shot.
Camo cost:

“Hammer” camo: 2D, costs 2,550 gold

“Starburst” camo: 3D, animated, with effects, costs 6,500gold
Ambient effects from antennae glow and engine booster glow, & firing animation effect
Tech tree overview
To get to the FV 183, you have to grind up the low tier British cruisers, and then switch to the TD line at tier 4
Note: Starting from tier 4, every single tank in the line has a very easy stock grind. There is no turret upgrade (as the tanks don’t have turrets), the stock guns are all very good, and the armour is already at its best.
Starting from tier 5, all tanks are are very slow in acceleration and traverse when they are stock. These tanks are also limited with a low top speed, but generally all have decent acceleration and traverse (once fully upgraded).
Tiers 1-3 are an easy grind, all 3 tanks are 2 shot autoloaders with great penetration, damage, and gun depression. These are really enjoyable tanks and are some of the best tech tree tanks in the low tiers.
Tier 4 is the Alecto, the only quick TD in this line. It has no armour at all, but it has great mobility and the best camo rating in game. It has a high alpha howitzer gun with great DPM.
This tank has an easy stock grind, as its not slow even with stock engine and tracks, and it has a good stock gun.
Tier 5 is the AT 2, a tier 5 tank with tier 7 armour. This has amazing armour with a great gun, even though its alpha is low, it has high DPM and penetration, but the tank is quite slow even when fully upgraded.
The stock grind is alright, as the stock gun is very good, but the engine is quite weak and the tank is extremely slow.
Tier 6 is the AT 8, a tier 6 tank with tier 7 armour, its very well armoured, has an amazing gun, and decent enough mobility with decent traverse speeds.
The stock grind of the AT-8 is the worst in this line, it has a very low alpha stock gun, but that’s its only issue, the other stats of this stock gun are good. The stock engine is also very slow, but the stock traverse speed is not the worst.
Tier 7 is the AT 7, which has good armour for its tier. The armour is amazing against tier 6 tanks, and still troll against tier 8 tanks. It has an amazing gun, and amazing traverse speed for its armour.
The stock grind of the AT 7 is enjoyable. The stock gun is amazing, the armour is good, and the stock traverse is actually decent. Acceleration is a bit slow, but you only have to research 1 engine.
Tier 8 is the AT 15, its armour is decent but its the least impressive out of all these tanks from tier 5-9. It can’t bounce many higher tier tanks, but its strong against most same tier tanks. The acceleration is decent and traverse is relatively good, but the main selling point is the gun. The AT 15 has 2 competitive top guns, both with insane DPM and great accuracy, but lacking alpha and penetration (for a TD).
The stock grind is ok, considering the stock gun is amazing, however the stock tracks and engine make it extremely slow.
Tier 9 is the Tortoise (AT 16). It has strong armour against all tanks it faces, extremely high DPM, great accuracy, and it gets access to HESH. The Tortoise also has tier 10 levels of HP, and very high traverse speed for its armour.
The stock Tortoise is not too challenging. It has an amazing stock gun (but low alpha for tier 9), it has decent traverse speed, but its acceleration is slow. The important thing is that its very well armoured, much stronger than the AT 7 and AT 15 for its tier.
Tier 10 is the FV 183, a complete twist in the line, just like the Alecto. It has a turret, its not nearly as slow as the AT tanks, and it has a long reload and high alpha, again its completely different to the tier 5-9 tanks you had to grind to get here.
This tank may feel very odd, as its much larger than the AT tanks; it has lost all armour and can’t bounce anything; its HP isn’t above average (which all AT tanks are), its not accurate (all AT tanks are), and its much faster and has a turret. It also has poor gun depression, a stark contrast to the AT 15 and Tortoise (which you grind for a long time before unlocking the 183).
