
The FV4005 is one of the top tier British tank destroyers. It has a semi-traversable turret, great gun depression, and a 2 shell autoloader with huge alpha. It also features good mobility and decent hull armour, but a very weak turret and terrible reverse speed.
Click the table of contents below to access the section you want:
- Armour
- Gun
- Mobility
- Provision & Consumable Loadout
- Equipment loadout
- Gameplay advice
- Overall
- Is it worth grinding?
- Camo cost:
- Tech tree overview
Armour
(The FV4005 in the images is using Improved Assembly)

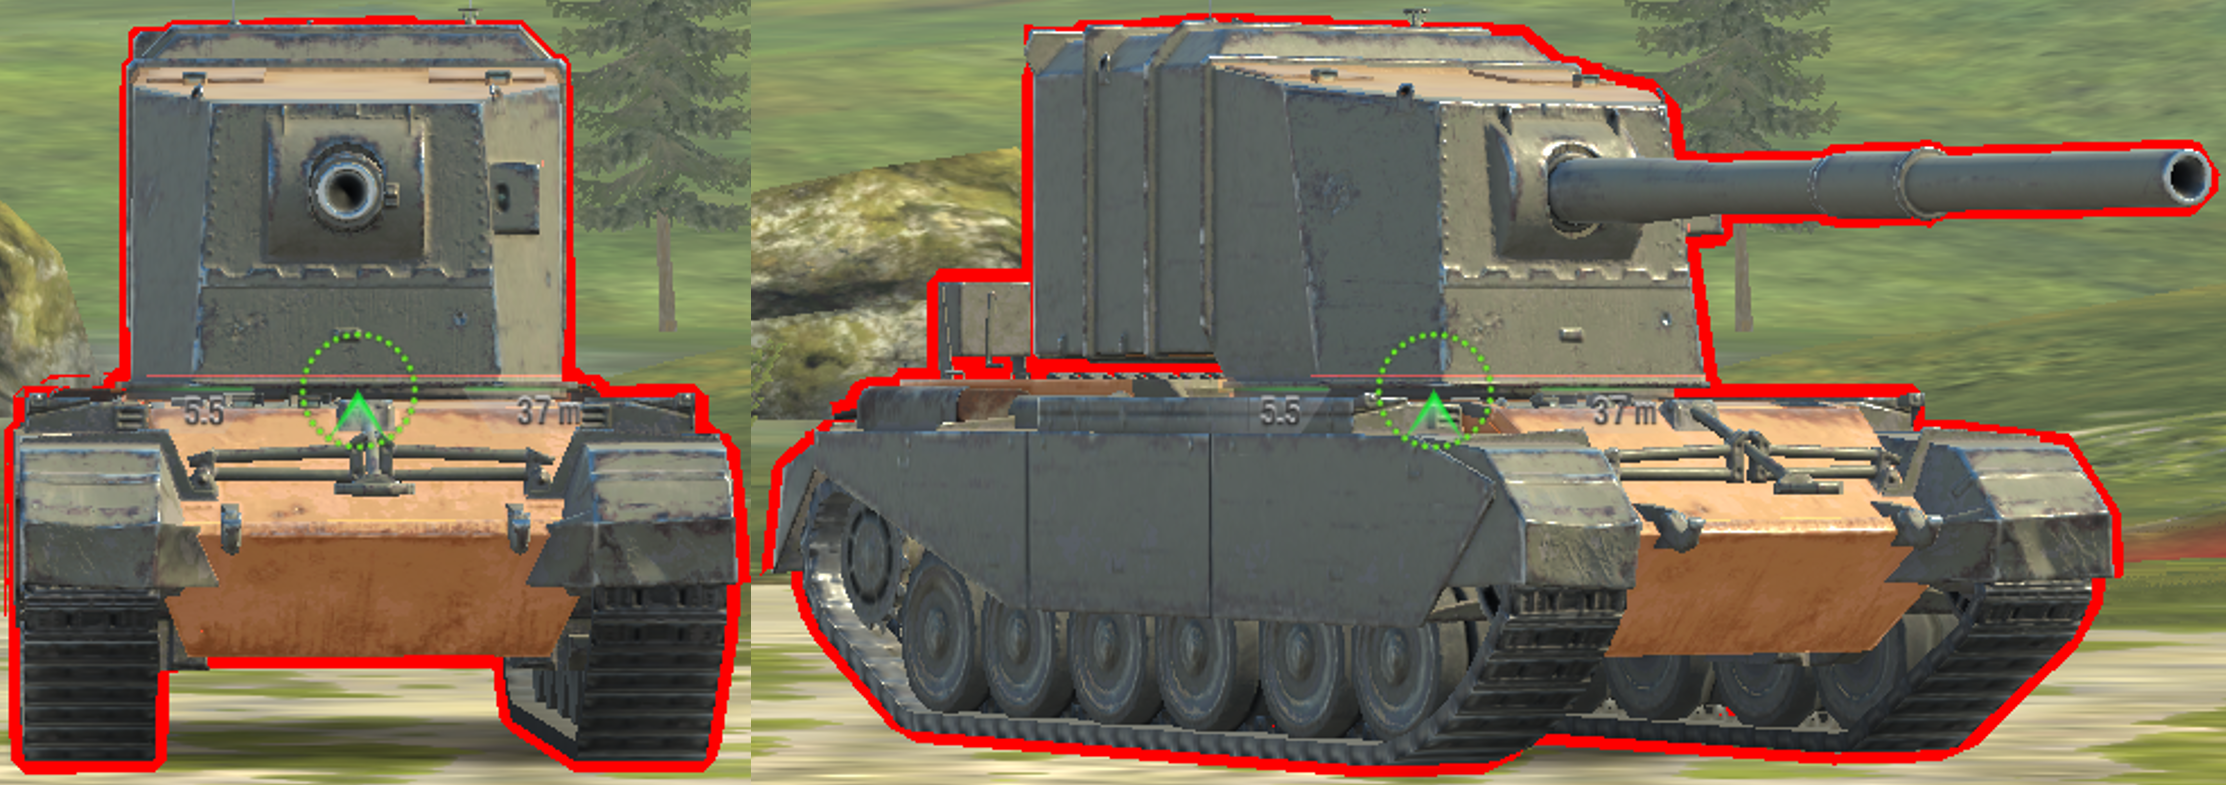
Drag slider right -> to view 252mm AP
Drag slider <- left to view 50mm HE
Flat ground:
Upper plate 130mm
Lower plate 115mm
Turret face 14mm
Armour vs all tier 9-10 tanks:
Due to the very weak armour, the FV4005 faces the same situation against any enemy that shoots it.
The turret is extremely weak and very large, most enemies who aim at you will shoot HE here, and all enemies will be able to penetrate HE on the turret.
The hull front is decent as its a Centurion hull, it can’t be frontally HE’d by any gun, however special HE shells such as HESH or HEP will be able to penetrate.
Note that the hull sides are fairly difficult to HE, they are 51mm thick, and slightly sloped inwards. The sides are also covered in large sideskirts, which will stop any HE shell from penetrating. The raised shovel blade on the rear also counts as spaced armour.
If an enemy wants to penetrate HE, the best area to shoot is on the turret.

vs 50mm HE
Note the large size of the FV4005’s turret sides.
Also note that the side armour of the hull is 51mm, hence it shows up as yellow to this ammunition.
Gun
The FV4005 mounts a 150mm autoloader.
Firepower:
-Ammo: APCR/HEAT/HE.
-Penetration: 290/360/80mm.
-Alpha damage: 650/550/930
-Reload time: 20.4s
-Intra-clip: 4.00s
-DPM: 3201
-Burst damage: 1300
Handling:
–Estimated aim time is 3.4/3.6s
–Base aim time is 2.3s, but it can be improved to 1.76s.
-Dispersion is 0.344/0.292
–Gun handling is 0.2/0.2/0.14, or 0.18/0.18/0.12 with Vertical Stabilizer.
Usability:
-Gun arc is +90/-90 degrees.
-Shell velocities are 1320/890/800 m/s
-Gun depression is -10 degrees.
-Gun elevation is +8 degrees.
Overall this gun is great. Though not too impressively accurate for a tank destroyer, especially with its “low” alpha, the FV4005 makes up for this with flexibility and pure damage output, for which its unrivalled in tier 10.
The aim time is great, dispersion is decent but not too special, and gun handling is fairly average. Penetration is amazing, as most TDs are, and the alpha damage, reload, intra-clip, and DPM, are all quite impressive.
The real impressive traits of this gun are the burst damage, and its flexibility. The burst damage of 1640 in 7.5s is unrivalled in tier 10, and can make a huge impact on the battle if all shells connect. This combined with the amazing flexibility of the FV4005 just make it so easy to get shots into enemies, as it has great gun depression, speed, and a semi-traversing turret.
Along with all this, the tank also gets some extremely powerful consumables, mentioned below.
Mobility
-Top speed is 40km/h, reverse is -10km/h
-Traverse speed is 48.4 deg/s on hard terrain, and 37.2 deg/s on medium terrain.
-In game acceleration rate is shown as 23 hp/t, it has an extremely strong 1112 horsepower engine for its 48 ton weight.
-Actual acceleration rate is 23.0 hp/t on hard terrain, and 17.7 hp/t on medium terrain.
–Ground resistances are 1/1.3/1.9
Overall this is great mobility. The tank is very easily able to reach its top speed on any terrain type due to having such a strong engine, and it can maintain its speed very well due to good traverse speeds.
The biggest downside here is just an abysmal reverse speed, making it very easy to over-extend and difficult to quickly reverse into cover.
Provision & Consumable Loadout
Reticle calibration:
Improves base on the FV4005 aim time to 0.93/1.12s, and dispersion to 0.191/0.160, for 20-26s
Improved engine power boost:
Increases engine power to 1556, top speeds to 45/-25 km/h, hard terrain acceleration to 32.1 hp/t, and medium terrain acceleration to 24.7 hp/t. Traverse speed also increases significantly.
Spall liner:
Reduces damage from HE, HEP, and HESH shells by 20%.
Consumable loadout:
The multi purpose restoration pack is mandatory, and you MUST use this in your loadout so that you can repair the tank during battle, especially due to its very poor turret armour.
Improved engine power boost + Shell reload boost:
This gives your tank the ability to be extremely fast and easily run away or get into a position. Its quite helpful if you want to play actively and closer to the front lines. You will also be able to unload shells quickly, making it more effective for trading/dumping a whole clip and retreating quickly.
Provision loadout:
Provisions on this tank should be 10% food, as it gives all-round tank performance boosts; 10% fuel, which increases the mobility of the tank greatly; and spall liner, which greatly increases the durability of this tank, and its lifetime in the battle.
Spall liner is especially useful, as the FV4005 has one of the largest, tallest, and flattest turret profiles, both from the front and side, at tier 10. Its also an extremely weak turret, 14mm base armour; and this tank faces loads of tanks with high damage HE (VK 72, Obj.268, FV183, T110E3, E100, etc.)
An alternative to this setup is to drop 10% fuel, and use 3% food, since the FV4005 is really all about delivering its magazine, and its mobility isn’t at all lacking. That extra 3% will help the tank to just be slightly more accurate and aim slightly faster. Its not noticeable in battle but it will make a small difference.
Equipment loadout
Improved Ventilation/Calibrated Shells:
The FV4005 can use either of these and it would still perform extremely well.
The FV4005 has proper TD levels of penetration, so it doesn’t struggle to penetrate any enemy, especially not with APCR. It also has extremely low penetration loss at distance, so retains most of its penetration, even while very far from its target. Hence calibrated shells are not mandatory on this tank.
Calibrated shells would improve penetration from 290/370/65mm, up to 305/388/72mm.
FV4005 also doesn’t lack DPM, nor have particularly poor accuracy or reload time, hence ventilation is also not mandatory on this tank.
Try both equipment pieces and take the choice that fits your playstyle or preference.
Camouflage Net:
This is needed as the FV4005 is not meant to spot enemies for itself. Even if you did mount Improved Optics, the FV4005’s maximum view range is only 279.4m, which isn’t enough to scout medium and light tanks, and they will easily be able to scout you, as you would lack a camo net.
Camo net is the best option on this tank, as it does have to snipe at the beginning of the battle, and often stays on the 2nd line, where its camouflage rating is still relevant and may keep the tank unspotted for longer.
When using the camo net, and with a level 7 camouflage crew skill, plus camouflage paint, the FV4005 can get up to 58% camo while stationary, 47% while moving, and 11% while firing, which is actually very good when you consider the enormous profile of this tank.
Improved Assembly:
The FV4005 has terrible armour against AP, and an extremely large and weak turret against HE. There is no notable armour on this tank to enhance, so you should use Improved Assembly.
Improved Assembly would increase the HP of this tank from 1750 base HP up to 1855 HP. Combined with the spall liner, it will help the tank survive for much longer in battle.
Vertical Stabilizer:
The main reason to use vertical stabilizer is to reduce after-shot-bloom/dispersion.
This factor is a very important stat on autoloaders, since they have to shoot out one shot after another, in very quick succession. Having this reduced bloom greatly increases the tank’s accuracy while unloading a clip.
Note how the FV4005 has a 2.5s intra clip reload, so it only gets 2.5s to aim after each shot (if you want to fire “on reload”). The increased bloom from not using a stabilizer means you’ll have to wait longer between each shot if you want to become accurate.
The FV4005 also has fairly average TD gun handling, meaning it blooms out quite a lot when moving, and the vertical stabilizer helps to improve this. This is helpful as the FV4005 can take up quite an active role as a 2nd line support or flanking tank.
(Average TD handling is bad. One of the “class stats” of TDs is that they are meant to be accurate only when not moving, hence they don’t have great handling.)
Refined gun just isn’t useful on this tank, as even if you take a sniping role, you won’t be able to utilize the 4 shell magazine of this gun well, since refined gun means you will have to aim for longer after every shot; and due to sniping at longer distance, you’ll also need to let the aim circle shrink more. Its better to use vertical stabilizer.
Consumable Delivery System (CDS):
CDS increases the number of times that you can use consumables during a battle. Compared to HEC, which increases the duration, but decreases the number of times that you can use consumables.
Its far more useful on the FV4005 to use CDS, as the duration of the consumables doesn’t matter. Even if you had a longer duration on your consumables, they would only be useful for 1 clip’s unloading duration (5.52-7.5s). The 22s reload of the magazine just wastes the rest of the consumable duration, so there’s no use in increasing it.
The only consumable which would benefit from a longer duration is the improved engine power boost, however this also doesn’t need HEC. This consumable is most useful for very quickly getting your tank up to top speed, rather than remaining at to speed for a long while. Its very rarely the case where you need that speed for a full 19s, and 19s is only 4s longer than the duration with CDS (which is 15s).
Gameplay advice
The FV4005 has an extremely unique playstyle, as there are no other tanks like it in the game. Its the only tank destroyer with a turret, a 4 shell magazine, great gun depression, and a high level of mobility.
General gameplay:
The FV4005 should start the battle by sniping. This isn’t the most effective playstyle to use for the whole battle, but its definitely the best when its the start of a battle.
You don’t have the HP, armour, or view range to be rushing up to the front or even the 2nd line, and if you did then your tank would just get shredded apart. Let your allied MT, LT, and HT go to the front lines, spot enemies, and get information on where enemies are. In a good sniping position, you can provide allies with early ambush shots and covering fire against enemies who expose their tanks.
Later in the battle, after the initial stand offs, the battle will become more progressive. Your team may start killing some tanks and winning a flank, and the enemies may also start doing the same to your team. At this point you should move up with allied tanks who are pushing forward, follow them and dump your clip into enemies, and your allies can finish them off. Alternatively, you can take a defensive position if your team isn’t pushing, and try to take advantage of over-confident enemies. 1640 damage is almost the full HP of most MT, LT, and TD in tier 10, and putting this into an enemy can turn the game in your team’s favour.
Use allies as armour:
Try to stay behind your allies through out the battle. Not only are your allied MT, HT and even other TDs more suited to taking hits than your tank (due to their heavier armour and higher HP), they also have much better view range, which will extend much further than yours.
Positioning yourself behind allies (as in a support role, not a sniper position), generally makes them the priority target for enemies, since they are closer. It will let you avoid damage, but still support your team by shooting the tanks that your allies spot or distract. You never want to be the frontline tank, ad your armour is so weak and size is so large.
Positioning:
The FV4005 needs to use 2nd line positions when playing its more active role. Try to keep hard cover close by, so that you can easily pull back and reload safely. Buildings are the best option, as often rocks and other forms of hard cover are far to small to hide the large size of the FV4005.
Also use bushes whenever possible. Though the FV4005 is large, its camo rating good, and it still benefits greatly from shooting behind a bush. If you get spotted, often you’ll be a priority target since enemies can shoot HE, and you’re so easy to hit compared to other tanks.
Take note of any opportunities where you may be able to flank with your allies and get around to the sides or rears of the enemy team. These situations are best for unloading the full clip into a single enemy, and there may even be opportunities to use the full 2000 damage HESH magazine.
Just don’t over extend, as -10km/h isn’t quick enough to retreat easily, and will cause you to take hits.
Avoid pointing the tank downwards:
Due to very poor gun elevation angles, the FV4005 really struggles to aim upwards. Its best to try avoid stopping to shoot on downward slopes (like on hills or bridges), and being below an elevated tank (such as when below the hill on Mines or Normandy).
Aim every shot:
Due to the FV4005 having quite mediocre gun handling, and large after-shot-bloom (with many shells), make sure to aim in every shot you take.
Just because the intra-clip of 2.5s has finished doesn’t mean you have to rush your shot, its better to let the great aim time work and fully aim in. The FV4005 can easily miss 2 or even 3 shots of the magazine if not properly aiming after the previous shot, especially at longer ranges.
Its really worth aiming since your tank’s reload is so long (around 22s), and the whole point of the FV4005 is to effectively put out its magazine (not to miss half of the shots).
Don’t chase damage:
Due to very weak armour and a large size profile, its essential to stay focussed and not tunnel vision on one enemy or try to dump a full magazine.
If you over-extend into the enemies’ line of fire, you will be punished very hard with a huge loss of HP, since this tank is very easy to hit, but also very easy to HE.
If an enemy pulls back into cover, but you still have a few shells left, its best to avoid chasing them. Often it will lead to you over-exposing the tank to the enemy’s allies, allowing them to easily hit you and cause you to lose a lot of HP.
(Of course if you are on an isolated area of the map where the enemy has no support, and you can finish them with your remaining shells, then you should finish them off before they reload.)
Don’t try to focus only 1 enemy:
Same situation as above, tunnelling and only trying to put ALL shells into a single enemy is a bad idea.
This is fine to do if the enemy is out in the open, and getting shots into them is easy. Focus fire onto one enemy can really cripple them due to your clip damage. However, if the enemy you were focussing retreats, don’t be hell-bent on continuing to shoot them. Just select another target to finish unloading the damage on, or wait a bit and then reload.
Same as above, if you focus that one enemy and chase them, you may be baited into an area where the enemy’s allies can shoot you.
Use consumables:
The consumables on your tank will give you a huge advantage in many situations, and you should not hesitate to use them. There’s really no point to save them for a “clutch situation” as those usually only happen at the very end of a battle, and your consumables can make a big impact in earlier stages of the battle.
Use the engine boost for running away from situations, it greatly boosts traverse speed, acceleration, and top speed, so its very easy to just turn around and run away if the flank you’re supporting is losing, or if you want to quickly relocate. Its also boosts reverse speed to 20km/h, which is just extremely helpful for when you don’t get the chance to turn your tank around.
Shell reload boost is just for situations where you want to quickly output damage and then retreat. It reduces the total unload time from 7.5s down to 5.25s, which is a big difference, and makes it very hard for enemies to avoid being hit by all of your shells.
Reloading the clip:
If you don’t have shots on an enemy, and you don’t think an enemy will appear in the next 5-8 seconds, then you should reload.
There’s no point holding 1-2 shots in your magazine for a long time during a battle, as that time could be spent reloading so that you’re prepared to take on higher HP enemies. Being fully reloaded gives you the best chance of winning against an enemy and taking advantage of situations where you can just dump out all shells.
Note that all situations are different, this is just a rough guide for how some situations may play out. Sometimes an enemy will appear just after you start reloading, sometimes there’s nothing you can do to anticipate this.
The best way to judge such situations is to try keep track of where enemies were/are on the map, and then start your reload when you are quite sure you will have the time and the cover to be fully loaded before you have to fight an enemy.
Be aware of positioning:
Due to only having 10km/h reverse speed, be wary of your position. Think of things such as
-Will I get spotted for shooting now/from this position?
-How much damage might I take if I get spotted?
-Is that damage really worth taking just to get a shot off?
In some situations, its best not to push out and shoot enemies, since the reverse speed is so bad, you can’t pull back into cover. This is amplified by the enormous size of the tank and also the weak armour.
If you do get caught out, use the improved engine power boost, which doubles your reverse speed and can save you a lot of HP in some situations.
The FV4005’s playstyle is most comparable to that of a very large and fragile medium tank. It can snipe form a distance if it has to, but its most effective in 2nd line and supporting positions, where it can easily support frontline allies while still having cover.
Playing the FV4005 is very “high risk, high reward”. Knowing when and how to use consumables, positioning, when to reload, and how to “use” your team are what will make this tank really perform. Its not an easy tank to play and will definitely take some practice if you’re not used to it.
Overall
Armour – 0/10
Gun – 6/10
Mobility – 5/10
Speed – 4.5/10
Groundtank is overall a good tank.
Armour is non-existent. A tier 1 tank could penetrate HE on the turret of the FV4005, and the turret is one of the largest in tier 10. The hull also doesn’t have armour but it has good HE protection.
Gun has great penetration and -10 gun depression, with good accuracy, aim time, burst damage, DPM, and intra-clip reload. Gun handling is poor for its low alpha of 410, magazine reload time is long.
Mobility is held back by the abysmal -10km/h reverse speed. This stops the tank from being flexible despite very strong engine power, great acceleration, and great traverse speeds.
Speed is decent at 40km/h.
Note that while many aspects of this tank are good, just 1 or 2 aspects hold them back.
-On the gun, despite good aim time and dispersion, often the gun will miss shots due to its after-shot-bloom, the fact it has 4 shells, or its mediocre handling for only 410 alpha damage.
-Despite great overall mobility while driving forwards, the tank can’t reverse well at all. Reversing is a very important trait for TDs to have due to their lower HP, and the FV4005 with its terrible armour.
Is it worth grinding?
The FV4005 is a tank that’s worth grinding, as what it offers in gameplay and its characteristics are unique, which no other tank can offer in the game. In tier 10, its among the most flexible and agile tank destroyers, which is a trait many players will be able to appreciate; however its reverse speed is notably very poor.
This tank isn’t easy to play, and to do really well in it, it requires a good level of skill. The autoloader and large size make it more difficult to position and deal damage effectively, and a purely sniping playstyle won’t be as rewarding compared to the more difficult active role of the tank.
Camo cost:
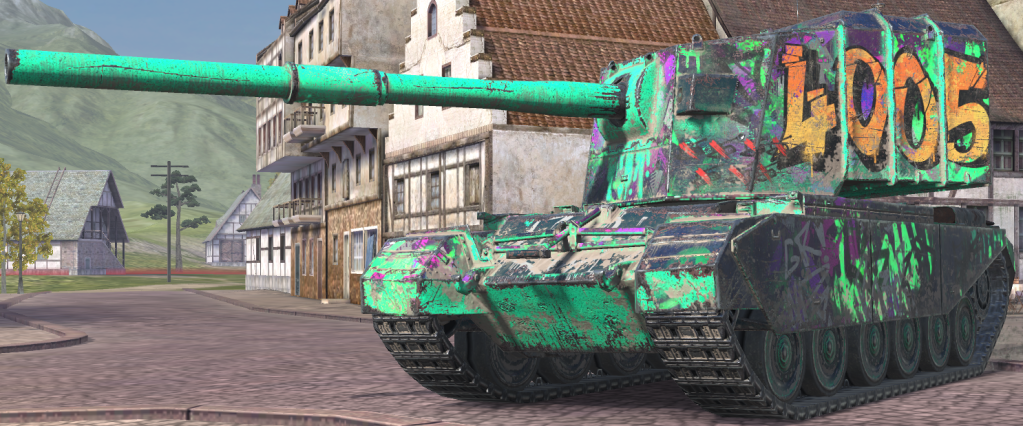
“Overkill” camo: 2D, costs 2,550 gold

Glow effect of the camo

“Royal Treatment” attachment, adds 3 3D elements to the tank.
Tech tree overview
To research the FV4005, you’ll have to grind through a few very different tanks from tiers 1-5, and then switch onto the FV4005 line at tier 6. All tanks in this line have fully turning turrets, except the FV4005.
All tanks in this line (other than then the Firefly) have good stock grinds. They are easy to get through and enjoyable to play (for a stock tank).
-Tiers 1-3 are Cruisers, they have no armour, accurate 2 shell autoloaders, great gun depression, and good mobility. These are some of the best tanks in their tiers and are no problem to grind through.
-Tier 4 is the Matilda, which arguably the most overpowered tank in tier 4. It has very good armour, its strong on the hull and essentially impenetrable on the turret. The tank also has incredible DPM and reload time, with decent alpha, amazing accuracy, and high penetration. The tank isn’t too fast, but its mobile, with a decent 28km top speed, decent acceleration, and incredible traverse speed.
The stock version of this tank is fine to grind. Its slow, but still has amazing armour on both the hull and the turret, and the stock gun still has great accuracy, penetration, reload, and DPM.
-Tier 5 is another Cruiser tank, the Crusader. Just like the previous Cruisers, this has similar features. Its fast, has poor armour, a 2 shot autoloader, great accuracy, and high penetration. This tank also has quite good DPM. The gun depression is only -7 degrees on the front of the tank, but gets to -12 on the sides.
The stock grind of this tank is also fine. It has a non-autoloader gun with a quick reload and amazing penetration. Its accuracy is still great, and the stock turret only lacks a little HP, as the top turret doesn’t improve armour. The stock engine is also barely weaker than the top engine, and the tank is still able to utilize its speed.
-Tier 6 is the Sherman Firefly, a great tank with an insane gun for a medium tank, decent mobility, but poor armour. This tank’s gun depression is only -6 degrees.
The gun is the highlight of this tank, its penetration is extremely high, better than even many tank destroyers; it also has amazing gun handling, amazing dispersion, good aim time, and high DPM. It plays less of a medium role, its more similar to a support tank or an active tank destroyer.
The stock grind of this tank is fine in every regard except for the tracks. The gun is still amazing, with great penetration, accuracy, handling, and DPM; and the stock engine is only 20 horsepower weaker than the top engine.
The biggest issue is the tracks, which have atrocious terrain resistances. The stock tracks have 1.5 medium terrain resistance, which make it an unbelievably slow tank. Upgrading to the top tracks improves this to a factor of 1 on medium terrain.
The tracks should be the first thing you upgrade on this tank.
-Tier 7 is A30 Challenger, an amazing tank with is very similar to just a fast medium with a big gun. It has amazing mobility, with high top speed and acceleration, with good traverse speed. It has a fully turning turret with -10 gun depression; and an amazing gun with comfortable alpha, good DPM, great penetration, and great aim time and dispersion, however its gun handling is poor. Armour is weak, but it can resist some HE.
There is an alternative gun, which is smaller and more accurate. It has a quicker reload and much higher DPM, however its standard penetration is worse, and its alpha is only 200 (compared to 300 on the big gun).
The stock tank is fine. The biggest difference to the upgraded version will be the acceleration rate and traverse speed, however these are not terrible. The stock gun is the smaller gun choice, so it still has great penetration, DPM, accuracy, and aim time, but the gun handling will be worse due to the stock tracks.
This is the first tank in this line to get special consumables, which will definitely help in the stock grind.
-Tier 8 is the Charioteer, another amazing tank, very similar to the Challenger. It has a top gun with good alpha, decent DPM, good penetration, and great accuracy. This gun gets access to HESH, which boosts the DPM and alpha up. The mobility is amazing, with great top speed and acceleration, though its traverse isn’t the most impressive. Armour is weak, being HE-able on the turret.
There’s an alternative smaller gun, with much higher DPM, quicker reload, better accuracy, but lower alpha (225 compared to 350, or 440 with HESH). This gun has AP and APCR, so its maximum penetration is better (258 compared to 248), though it loses access to HESH.
The stock tank is just fine, having that amazing lower alpha gun which is mentioned above. There is no stock turret, and the stock engine gains very little horsepower (though this is a very lightweight tank). The tracks are important as they give a fairly significant boost to the traverse speed and ground resistances.
The Charioteer’s stock gun is quite insane in fun modes (especially Burning Games) due to its quick reload and high HE damage, so grinding it or keeping it for fun modes is a good idea.
-Tier 9 is the FV4004 Conway. It loses mobility compared to the previous 2 tanks, however it really steps up in armour. Frontally, this tank cannot be penetrated by any regular HE rounds, only HESH or HEP will go through. The Conway also has a fairly large and strong gun mantlet, which will be able to bounce shots. Its flat turret face and large hull are weak to AP, only the mantlet can bounce.
The mobility of Conway is decent, with a good top speed of 40km, and good acceleration. Traverse speed is very slow, closer to a heavy tank.
Conway has 2 gun choices, the stock gun is a 120mm with high DPM and penetration. It gets AP/APCR/HESH, and is accurate with a quick reload. The top gun is a 5.5 inch (139.7mm) gun, still with good standard penetration, aim time, and handling, but worse accuracy. This gun’s ammo is AP/HESH/HE with AP doing 600, HESH doing 670, and HE doing 770 damage.
Both guns are highly effective on this tank.
The stock Conway is a decent grind, however the traverse speed really holds back its mobility. The stock gun is amazing, its the smaller 120mm gun discussed above. There is no turret upgrade, putting more emphasis on the tracks and engine research. These should be researched first, as the biggest issue of the Conway is that hull traverse speed, and the stock gun is just fine to use for grinding.
Tier 10 is the FV4005, which tanks a significant step down in armour, due to that atrocious turret. The hull is the same as the Conway, but the FV4005 has far better traverse speed and acceleration rate.
The gun is completely different to previous tanks, and can take some getting used to, as it has an autoloader, and loses the HESH that previous tanks had access to.
