Page last updated 2nd of October, 2024.

Hazard I is a tier 7 hybrid nation medium tank. It features good all-round stats, similar to a Type 59 for tier 7. It has reliable armour, decent mobility, and a relatively accurate 280 alpha damage gun.
- Armour
- Playing against a Hazard I
- Gun
- Mobility
- Equipment, provisions, & consumables
- Gameplay advice
- Tank gameplay:
- Overall
- Is it worth getting?
- How to obtain:
- Camo cost:
- Notes for stock tank:
Armour
(The Hazard I in the images is using Enhanced Armour:)
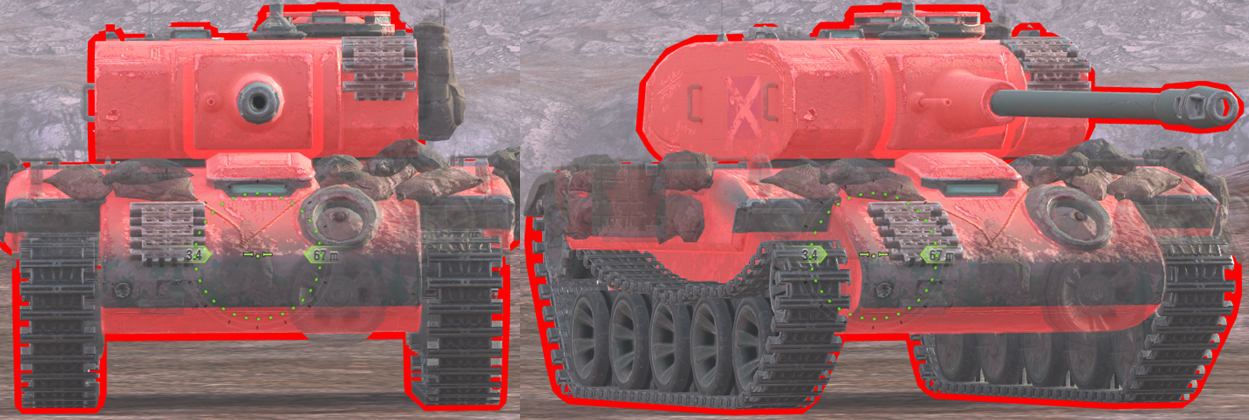
Drag slider right -> to view 160mm AP
Drag slider <- left to view 208mm APCR
When flat and facing head-on:
Upper plate 150-350mm (weakest point 120mm)
Area above tracks 58mm
Lower plate 62-100mm
Lower-lower plate 150mm (auto-ricochet)
Turret face 174mm
Area above/below the gun 250-390mm (auto-ricochet)
Gun mantlet 300mm
Cupola 60mm
Side armour:
Hazard I’s side armour is 46mm, with no spaced armour protection. This is very weak, and makes the tank quite vulnerable to HE shells from most guns that are 100mm or larger in caliber.
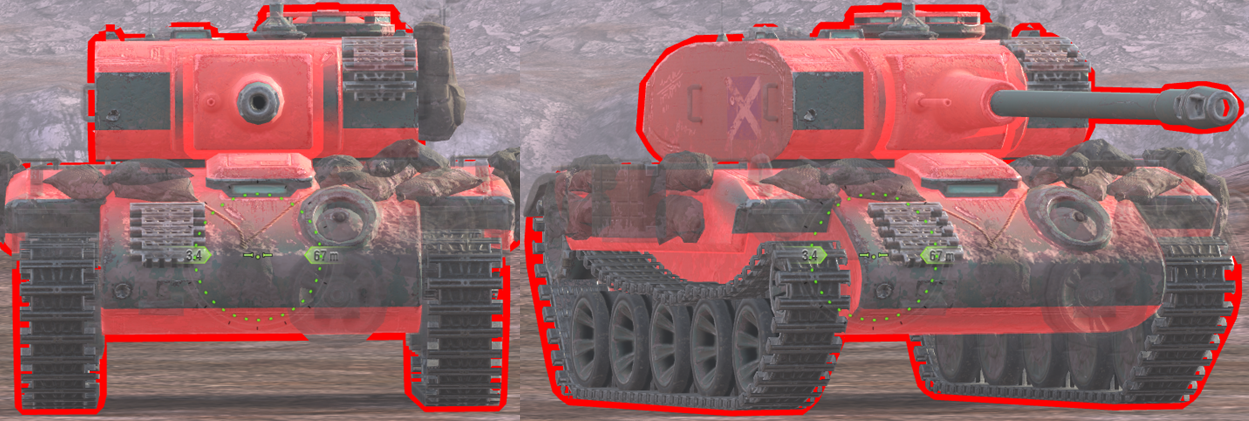
vs 160mm AP (top image), 208mm APCR (bottom image)
Using -8 gun depression:
Upper plate 210-760mm
Area above tracks 50mm
Turret face 177mm
Area above/below the gun 200-530mm (auto-ricochet)
Gun mantlet 300mm
Cupola hidden
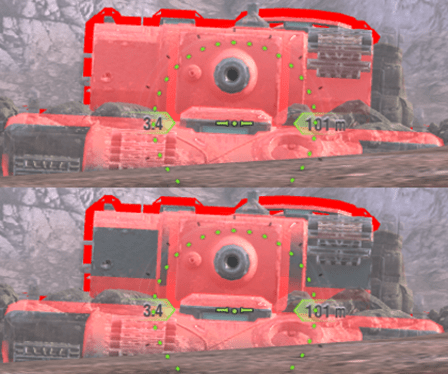
Armour vs tier 6:
Facing tier 6 enemies, the Hazard I has very good armour. No tanks in tier 6 (other than TDs) can penetrate the turret front with standard ammo, premium ammo is needed to go through.
The hull is also very effective, most tanks will bounce off the upper plate, and due to the lower-lower plate being strong, there’s even a chance enemies bounce when trying to shoot the lower plate.
The side armour and lower plate are weakpoints to standard ammo, turret cheeks are weak to premium ammo.
Armour vs tier 7:
Against tier 7 the armour performance is very similar to tier 6, and still very effective. Most enemies can’t penetrate the turret with standard ammo and will need to use premium ammo. Some enemies, such as Tiger I, T29, Pharaoh, or Carro P.88 will be able to penetrate the turret front with standard ammo.
The hull is still effective to all tanks. The higher the penetration, the more grey enemies see on the upper plate, so consider this when facing enemies.
Armour vs tier 8:
Against tier 8, the armour is just troll. The turret front will be penetrable, and more of the upper plate will be penetrable, but the red areas on the lower-lower plate, upper parts of the upper plate, the gun mantlet, and above/below the turret cheeks are still easy to bounce off.
Due to there being so many red areas around the weakpoints, the Hazard I can still bounce a lot of tier 8 shots, it just relies on RNG a bit more.
Playing against a Hazard I
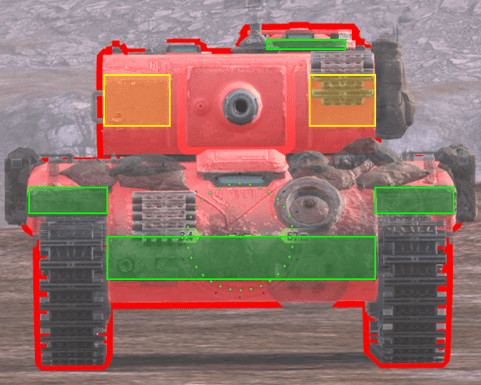
For many medium and light tanks, and lower tier enemies, the Hazard I’s armour is actually quite difficult to deal with, but there are a few ways to counter it.
Shoot the tracks:
If the hull is turned at all, you can easily just shoot the tracks and automatically penetrate the hull size, this will work with any gun caliber (just don’t use HEAT or HE and expect to penetrate).
Shoot green areas:
Shown in the above images, the green areas are easy for any enemy to penetrate.
Since the upper plate is quite angled, its best not to shoot here unless its fully grey (not partly grey like shown in the image).
Yellow areas:
These are penetrable to tier 6 & 7 premium ammo, and to most tier 8 standard ammo. Make sure to aim carefully, as hitting the gun mantlet, or the areas above/below these yellow highlighted areas will result in a bounce (irrelevant of how much penetration you have).
Gun
The Hazard I mounts a 100mm gun.
-Alpha damage is 280 on AP, 240 on HEAT, and 370 on HE
-It has an 7.9s reload, giving it 2123 DPM.
-Penetration on AP is 156mm, HEAT is 195mm, and HE is 45mm.
–Estimated aim time is 3.3/3.5s
–Base aim time is 2.05s, but it can get down to 1.58s.
-Dispersion is 0.340/0.289
–Gun handling is 0.14/0.14/0.12, or 0.12/0.12/0.1 with Vertical Stabilizer.
-Gun depression is -8 degrees.
Overall this is a great gun, it has great alpha damage, a good reload time, good DPM, quick aim time, good gun handling, and decent dispersion. Its penetration is low, but this is “average” for tier 7 mediums, almost all have low penetration.
This gun feels very comfortable for a tier 7 tank, unlike the Svear, Leo, or CS-52 LIS, which all have a similar 290 alpha damage, this tank doesn’t lack accuracy, or have poor gun handling, or mediocre aim time. For such good alpha damage at tier 8, this gun is very consistent, and also has great DPM. The good -8 gun depression just helps the tank to be flexible and use its armour easily in battle. The only stat that’s not amazing is penetration.
Another great, often overlooked stat is shell velocity, this tank has a great 1060m/s velocity on AP, allowing it to be so consistent even at long range.
HEAT and HE are still decent, with 870m/s on HEAT and 790m/s on HE.
Mobility
-Top speed is 49km/h forwards, and -18km/h in reverse.
-Traverse speed is 66.35 deg/s on hard terrain, and 51 deg/s on medium terrain.
-In game acceleration rate is shown as 18.9 hp/t, it has a strong 1123 horsepower engine for its 57 ton weight.
-Actual acceleration rate is 19.8hp/t on hard terrain, and 15.3 hp/t on medium terrain.
–Terrain resistances are 1/1.3/1.5
Overall this is good mobility. Top speed is just average, though reverse speed is slightly below average. Traverse speeds are great on both terrain types, especially for tier 7. Acceleration is great on hard terrain, but just average on medium terrain, this is due to the terrain resistance difference of 1 to 1.3.
There is a noticeable decrease in mobility when going off road, though the mobility on medium terrain definitely isn’t bad, especially considering how good the armour of this tank is.
Equipment, provisions, & consumables
The Hazard I has no special consumables or provisions.
Gun Rammer/Calibrated Shells:
Due to having the typical low penetration of a tier 7 medium tank, but also due to having good alpha damage and DPM, calibrated shells can be a great choice for this tank.
Calibrated shells would increase penetration on AP from 156mm to 168mm, on HEAT from 195mm to 220mm, and on HE from 45mm to 49mm. Since the Hazard I isn’t a DPM-reliant tank (and its DPM/alpha damage are already good for a tier 7), it doesn’t need gun rammer as much.
Gun rammer is still a great choice for this tank, as tier 7 is a very high DPM tier. Having low penetration in tier 7 is normal, so the Hazard I isn’t at a disadvantage if it doesn’t use calibrated shells. Gun rammer is great to be able to use the high 280 alpha for trading, while still having competitive DPM (especially against tier 8 tanks with the same alpha damage).
Gun rammer would lower the reload time from 8.3s down to 7.9s, and increase DPM from 2017 to 2123.
Enhanced Armour:
Enhanced armour is better than improved assembly for this tank, as the Hazard I puts a big emphasis on armour use during gameplay. This tank also has high base HP, with 1280.
The main benefit of using it is for the turret face, which will increase from 174mm to 179mm, allowing to bounce many heavy tanks which have 175-180mm of standard penetration (and there are MANY in tier 7).
Enhanced armour also increases the upper plate from 150mm to 155mm, which is very useful when using gun depression, or on flat ground against tier 6 tanks or tier 7 medium/light tanks.
Vertical Stabilizer/Refined Gun:
Due to having both great aim time and good gun handling, the Hazard I can use either equipment piece, so this more down to personal preference.
If you like having a more accurate gun with better dispersion, then use refined gun.
If you like having quicker aim time/better gun handling, then use vertical stabilizer.
Gameplay advice
The Hazard I plays very similarly to the Type 59, but as a tier 7 tank. The Hazard has that similar “perfect combination” of good armour, good mobility, and unlike the Type 59, its gun is much more reliable.
General gameplay:
The Hazard I should be played on the medium flank, this is where its good armour comes into use, and its 280 alpha damage really has an advantage over enemy tanks.
This tank works well in all situations, but prioritize being hulldown and using gun depression, as thats where the armour will work best. You can easily hide the small lower plate of the tank and use the great -8 gun depression. This doesn’t increase the armour much, as the turret front is flat, however it makes your size profile smaller, and allows you to easily trade damage and hide.
Trading damage:
Tier 7 is a DPM-focussed tier. On the majority of tanks, they have low penetration, but high DPM. For medium tanks, many have 2.5-2.8k DPM.
Compared to same tier enemies, the Hazard I has quite low DPM, so you have to be careful with damage trading. When fighting any enemy medium tank, try to avoid them for as long as possible after shooting them. All enemy mediums which reload faster than you have less alpha damage, so if you only let them trade 1-for-1, then you will always be dealing more damage, since you aren’t letting them shoot you multiple times every time you shoot them.
There are a few exceptions to this, the Leo and Svear have an 8.2s reload, (0.3s longer than Hazard I), so you can try to put in multiple shots against them, but its risky. Those tanks have 10 more alpha damage than you, so you will eventually lose the trade if you can’t bounce or avoid their shot.
The CS-52 LIS has an 8.6s reload, so you can put in multiple shots against one much easier than the Svear or Leo, so you still have to be careful. Immediately retreat after shooting them, as they will be reloaded 0.7s after you.
The Mutant is the slowest reloading tier 7 medium, with 15.6s (or 16.4 with calibrated), you can easily shoot them twice for each time they shoot you, and you easily out-DPM a Mutant.
Keep to hard terrain:
This isn’t mandatory, as the Hazard I still has decent medium terrain mobility, however the mobility difference on hard terrain is noticeable. If you want to be quicker and more mobile (such as if you need to run away, rush a position, move to support allies, etc), then its more beneficial to stay on roads, paths, paved areas, and concrete areas. These areas are hard terrain, and give you better mobility performance than medium terrain.
As medium terrain (any off-road area, grass, sand, mud, hills, gullies, etc) takes up roughly 80% of most maps in game, you generally will need to consciously find hard terrain to utilize it. Only maps like New Bay or Himmelsdorf are largely hard terrain.
Wiggle the hull:
Due to its armour angling and where its weakpoints are, the Hazard I shouldn’t just sit still when enemies are aiming at it, or if you are driving towards an enemy. Wiggling the hull quickly from let to right can throw off the enemy’s aim, or cause their shot to hit a red area that previously was penetrable.
Your unpredictable movement makes the armour harder to deal with, as angles and thicknesses are constantly changing. Be careful to only wiggle slightly, if you over-angle then enemies can easily just shoot the tracks or side armour and penetrate there.
Use HE:
The HE shells on this tank are great, their penetration is below average, 45mm, however they have high damage, doing 370 on average.
Even against tanks which use spall liner, you should use HE, as your HE shells will still do 296 damage on average (while your AP damage is 280). HE also has a higher chance to damage modules.
Overall the Hazard I just plays as a “standard” medium, taking early positions hulldown to use its armour, trading with its good alpha damage, and flanking using its mobility when needed.
Tank gameplay:
Overall
Armour – 8/10
Gun – 8/10
Mobility – 5/10
Speed – 5/10
Hazard I is overall a amazing tank.
Armour is very good for a MT. Upper plate is strong, lower plate is troll, turret front is strong to same tiers, troll to higher tiers. HE protection is average, HESH protection is average, very weak side armour.
Gun has great alpha damage, aim time, and shell velocity. good DPM, good reload time Gun handling is good, penetration is average, aim time & dispersion are mediocre. Gun depression is -8 degrees.
Mobility is average, with great acceleration & traverse speed on hard terrains, but average acceleration & traverse on medium terrain. Reverse speed is below average at -18km/h.
Speed is average at 49km/h.
Is it worth getting?
The Hazard I is definitely worth getting, this tank has amazing capabilities for tier 8, and is one of the strongest, if not the strongest tier 7 medium tank.
This tank has the perfect combination of a great gun, great armour, and good mobility. It lacks very few stats. It should be an overall enjoyable tank for most players due to such good capabilities and comfortable stats.
The Hazard I is worth 6,000 gold. Its a great tank, it has good stats, and its enjoyable to play. If you can get this tank then definitely consider it, as its just an overall strong tank.
How to obtain:
This tank is available as the first reward tank in Season 5 “Legends”. It can be earned completely for free just by playing somewhat actively during the season.
Camo cost:

Hazard I’s camouflage is permanent and cannot be adjusted.
Notes for stock tank:
Turret:
The stock turrets of this tank still has great armour (images will be added later), and is just as effective as the top turret. The turret cheek weakpoints are also smaller.
HP is lower.
Gun:
For tier 7 the stock guns of this tank are still relatively decent. Their accuracy, aim time, reload time, and alpha damage are worse, but they are still usable for tier 7.
Mobility:
Mobility of the stock engine and tracks is noticeably worse, especially as the terrain resistance difference is 1 -> 1.3 for hard -> medium terrain.
However, the difference isn’t massive, and the mobility is still usable while stock. One great aspect is that stock tracks have the same gun handling as the fully upgraded tracks, so your on-move-dispersion isn’t any worse when stock.
