Page last updated 10 December, 2024.

The mau5Tank is a tier 9 hybrid nation medium tank. It features mediocre mobility, but solid frontal armour. The tank has a choice of either using a consistent gun with 374 alpha & good DPM, or a less reliable but tri-shot burst gun, with a 480 alpha burst.
- Armour
- Guns
- Choose the right gun:
- Mobility
- Special Mechanics
- Provision & consumable loadout
- Equipment loadout
- Gameplay advice
- Overall
- Is it worth getting?
- Most recently sold for:
- Camo cost:
Armour
(The mau5Tank in the images is using Enhanced Armour)
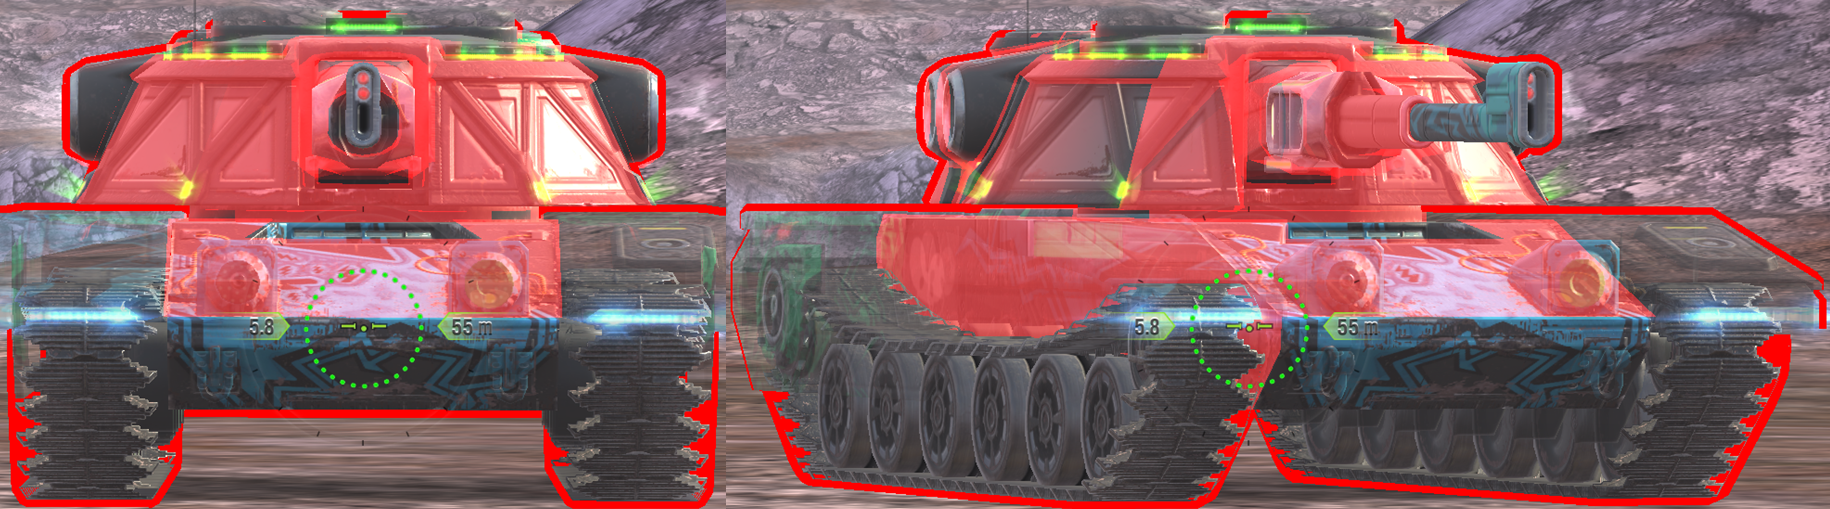

Drag slider right -> to view 245mm AP
Drag slider <- left to view 300mm HEAT
Armour when flat and facing head-on:
Upper plate 243-265mm (auto-ricochet)
Flat mid bar 69mm
Lower plate 135mm
Turret front 275-290mm
Turret cheek edges 315-360mm
Areas above/below gun 225mm
“Ears”on turret side 120mm
Side armour:
The mau5Tank’s side armour is 74mm, with no spaced armour. This is prety decent side armour, it can’t sidescrape but will be able to resist most HE shells.
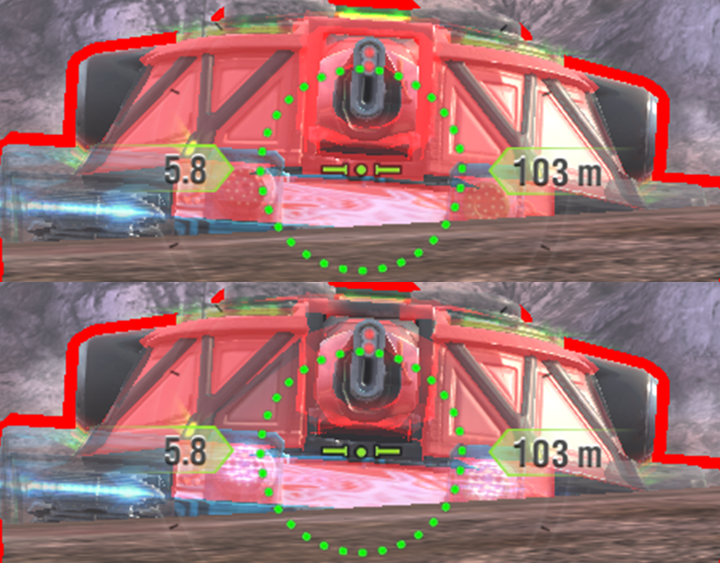
vs 245mm AP (top image), 300mm HEAT (bottom image)
Using -7 gun depression:
Upper plate 375-395mm
Turret front 290-315mm
“Ears”on turret side 120mm
Armour vs tier 8:
Facing tier 8, the mau5Tank has great armour. Its upper plate is strong enough to bounce all standard ammo, all lower penetration HEAT ammo, and app premium AP/APCR ammo.
The turret front can only be penetrated by the highest penetration ammo in tier 8 (285-300mm+), and is impenetrable when using full gun depression.
Armour vs tier 9:
Against tier 9 tanks the mau5Tank can bounce all standard ammo & premium AP/APCR off its upper plate, but all premium HEAT ammo will penetrate easily.
The turret will bounce all standard ammo easily (except form high penetration TDs), but is penetrable to mediums with good HEAT penetration (290-300mm). Heavy tank premium ammo will also penetrate easily.
When using gun depression, mediums not using calibrated shells won’t be able to penetrate the turret cheeks. most heavy tank premium ammo can penetrate, but the weak areas are quite small and require some aiming.
Armour vs tier 10:
Facing tier 10 tanks, the upper plate performance remains the same, able to bounce any AP/APCR shell, but all HEAT penetrates easily.
The turret on flat ground is penetrable to most mediums when they use premium ammo, as nearly all tier 10 mediums have 295-300mm on premium ammo.
The only way to really be able to rely on the turret armour in tier 10 is by using gun depression, which will make the weakpoints on the turret cheeks smaller.
Guns
The mau5Tank mounts 2 different 110mm guns.
Single-shot 374 alpha gun:
-Alpha damage is 374 on AP, 310 on HEAT, and 472 on HE
-It has a 8.4s reload, giving it 2664 DPM.
-Penetration on AP is 229mm, HEAT is 291mm, and HE is 60mm.
–Estimated aim time is 2.7/2.8s.
–Base aim time is 1.7s, but it can get down to 1.30s.
-Dispersion is 0.322/0.273
–Gun handling is 0.14/0.12/0.11, or 0.12/0.1/0.1 with Vertical Stabilizer.
-Gun depression is -7 degrees.
Overall this is an amazing gun. It has great alpha damage, quick aim time, good penetration, good accuracy & gun handling, and very nice gun depression to go with its fairly reliable armour. On top of this it has good shell velocity & some nice HE shells.
Tri-shot 160×3 alpha gun: This gun is a burst-fire autoloader.
-Alpha damage is 160 on AP, 125 on HEAT, and 210 on HE
-It has 3 shells in the magazine, with a 0.23s intra-clip reload, so in 0.46s it can burst out 480 damage.
-It has a 11.2s reload, giving it 2462 DPM.
-Penetration on AP is 233mm, HEAT is 291mm, and HE is 60mm.
–Estimated aim time is 3.0/3.2s.
–Base aim time is 1.9s, but it can get down to 1.43s.
-Dispersion is 0.340/0.289
–Gun handling is 0.14/0.12/0.13, or 0.12/0.1/0.11 with Vertical Stabilizer.
-Gun depression is -7 degrees.
-After-shot-dispersion is 1.800
Overall this is a decent gun. For having a 480 alpha damage burst, it has great aim time, good gun handling, decent dispersion, and decent DPM. Gun depression of -7 is also not bad, and an 11s reload is fairly quick. Premium alpha damage is very poor (roughly 35-45 less than it should be), and module damage is a terrible 55 (roughly the level of a Matilda, which has a 40mm gun, not a 110mm gun which this has).
The main issue of this gun will be the fact that it is a tri-shot burst autoloader, so it suffers from a similar issue to the Annihilator, that often out of 3 shells, you will bounce 1-2. You can mitigate this by shooting large and flat armour plates which have few red areas
Choose the right gun:
There is a clear right/wrong choice for the gun on this tank.
374 alpha single-shot gun:
If you want to be effective, win battles, and be an overall better/stronger tank in battle, use the single-shot gun with 374 alpha. It has far better aim time, accuracy, DPM, and the advantages of a single-shot blow, rather than spreading out your damage into 3 shots.
160×3 tri-shot gun:
Use this for fun, as its not nearly as effective as the single-shot gun. It has worse aim time, gun handling, accuracy, DPM, terrible module damage, and terrible premium damage. This gun also has the downsides of being a tri-shot, which means it can often miss 1-2 shots out of its 3, and isn’t as effective at long range.
However, this gun is fun to use, and can be good in a platoon due to its high burst damage, especially with tungsten shells.
Mobility
-Top speed is 50km/h forwards, and -21km/h in reverse.
-Traverse speed is 57.9 deg/s on hard terrain, and 44.5 deg/s on medium terrain.
-In game acceleration rate is shown as 18.5 hp/t, it has a decent 827 horsepower engine for its 45 ton weight.
-Actual acceleration rate is 18.5 hp/t on hard terrain, and 14.2 hp/t on medium terrain.
–Terrain resistances are 1/1.3/1.5
Overall this isn’t terrible mobility, however for a tier 9 tank its definitely not impressive, its actually the least mobile medium with the E 50 even having better mobility.. Top speed is very average, though reverse is good. Traverse speed & acceleration rate on hard terrain are respectable, though on medium terrain the mau5Tank is noticeably slower due to its terrain resistances.
Special Mechanics
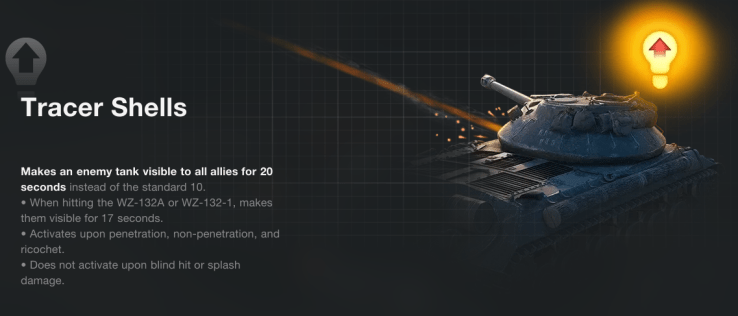
The mau5Tank has the tracer shells mechanic. This enables the mau5Tank to spot any enemy it hits with its shells for 20 seconds, which is double the usual duration.
This does give the mau5Tank a big advantage on enemies who aren’t aware of tracer shells, as they might make a move to retreat or leave cover after 10s, the normal unspotting time. As you have tracer shells though, the enemy is still spotted, which lets you know exactly what they are doing.
Provision & consumable loadout
mau5Tank has reactive armour, improved engine power boost, reticle calibration, & tungsten shells consumables. It can use adrenaline with the single-shot gun.
Provisions:
Use a normal provision setup for this tank, as it has no special provisions. 10% & 3% food with 10% works well.
Consumables:
Use the multi-purpose-restoration pack in all setups, this is mandatory for being able to repair the tank if anything gets damaged.
Adrenaline + Tungsten:
Use this for the single-shot gun, its a great combination which will maximize on the good DPM & good alpha damage combination of this gun, with adrenaline reducing reload time down to 7.2s for 3117 DPM, and tungsten increasing damage to 430.
Reactive armour + Tungsten:
This works well for both guns. Reactive armour will allow you to take less damage from enemies, which will amplify your damage trading ability due to tungsten shells increasing the damage you deal to enemies. This is a very good setup as it allows you to both survive longer in battle and to deal more damage (430 on the single-shot gun, and 184×3/552 on the tri-shot).
Improved engine power boost + Tungsten:
Use this for the tri-shot gun. Tungsten helps to maximize on the high burst trait of this gun, increasing the average burst damage from 480 up to 552 (from 160 to 184 per shot). The improved speed boost is very useful as the mau5Tank is the least mobile tier 9 medium, and in some situations it struggles with mobility.
This setup also works well for the single-shot gun, as it improves on the tank’s mediocre mobility, while still giving it that great alpha damage of 430 with tungsten shells.
Equipment loadout
Calibrated Shells:
The mau5Tank can’t use a gun rammer on either of its guns, and while vents are useful for improving accuracy, aim time, view range, traverse, & a small amount of reload. However the mau5Tank doesn’t need these improvements on either of its guns, due to both having amazing aim time with great handling stats.
Calibrated shells is mandatory for the tri-shot gun just due to its fast burst and low single shot alpha, its so important to penetrate as many shells as possible, just to not lower your DPM even further. For the 374 alpha single shot, its just nice to have the combination of accuracy, alpha, and great penetration to deal with enemies.
Calibrated shells would increase penetration on AP from 229mm to 247mm for the single-shot gun, from 233mm to 252mm for the tri-shot gun, on HEAT from 291mm to 328mm for both guns, and from 60mm to 65mm for both guns.
Enhanced Armour:
As the mau5Tank has actually got some armour on both the hull and the turret, improving it with enhanced armour is a far better choice than using improved assembly, since bouncing a shot is worth far more HP than what improved assembly gives.
Enhanced armour would improve:
Upper plate from 243mm to 252mm.
Lower plate from 135mm to 139mm.
Area under gun from 225mm to 232mm.
Turret cheeks from 275mm to 284mm
These improvements will be most noticeable on the upper plate & turret cheeks, especially when going hulldown and using the gun depression.
Vertical Stabilizer/Refined Gun:
For the 374 alpha gun, both of these work and are fine choices, just due to this gun having an amazing combination of great aim time, gun handling & dispersion. The choice depends on your personal preference, aim faster with slightly less dispersion, or aim slightly slower with better dispersion/accuracy.
For the tri-shot gun, use vertical stabilizer. The reason for this is after-shot-dispersion, which can only be reduced by vertical stabilizer. The dispersion of this gun also is not lacking, and you won’t notice it much in battle at all. Refined gun is still a valid choice, as it reduces the maximum bloom of your gun.
Gameplay advice
With the single-shot gun, the mau5Tank is just a holistic medium; with the tri-shot gun, its more of a damage trader/support medium, as its DPM and gun are less reliable.
Gameplay for tri-shot autoloader:
Generally with the tri-shot gun, the role you have to play is more of a support and damage trading tank. The DPM of the tank is too low, and reload too long to be competitive in a brawl or a frontline fight, hence often its better to use a 2nd line position where you aren’t the main focus of enemy guns and have less reload pressure.
Still try to use gun depression and go hulldown where possible, as it allows you to block shots with your armour much easier.
Avoid using premium ammo as much as possible:
As this gun has already got low DPM for a medium, you want to avoid using premium ammo as much as possible (which is why calibrated shells is so important). On top of this, the premium HEAT ammo does on average 35-45 less damage than a premium shell should for the burst damage that this tank has.
If possible, try to use AP as much as you can. Only switch to HEAT ammo if you reallyc ant penetrate, or aiming for a weakpoint would likely cause you to miss at least 1 of your 3 shells.
Be careful using HE:
Since you shoot 3 shells, rather than one single shell, it can be very easy to miss 1 or even 2 shells when using HE, causing you to hit thicker armour where the HE can’t penetrate. At that point, HE isn’t worth using, since you would do more damage with 3 penetrating AP shots.
HE is only worth using on enemies which have have very large and thin armour plates, such as a Skorpion G or FV4005.
(HE is still worth using on some spall liner tanks, given you penetrate all 3 shots. Your AP burst damage is 480, HE is 630, and on a tank with spall liner, with HE its 504.)
Be aware of your module damage:
With this gun, your module damage is 55. Just to put that in perspective, the Gravedigger’s module damage is 100, and that has 6 shells for a 57mm gun in tier 7. Your module damage is barely more than half of that, 2 tiers higher, with fewer shells.
This makes it very hard to cause crits on enemy tanks, as multiple of your shots need to roll a crit (which on some modules, is only a small chance, between 27-45%). Most tracks will need 2 or all 3 shells to hit before the enemy’s track breaks.
Aim carefully:
With this gun, its all about the alpha damage, so you need to try and maximize the possibility that you hit all 3 shells. With this, you need to aim carefully on targets to try and reduce the possibility of a miss as much as you can.
Similarly, sometimes its just not aiming at weakpoints. If an enemy weakpoint is small, such as a cupola, then often only your first shell will hit, if you’re lucky then maybe two will hit. This is 160 damage, or 320 for two. Compared to just using premium ammo, where 3 penetrating shells do on average 375 damage.
In all cases, go with the option where you have the highest chance to penetrate all 3 shells, don’t risk misses just to try and use a higher damaging shell.
Use consumables:
Tungsten Shells-
Use this whenever you have a clean shot into the enemies, and you believe that all 3 shells can penetrate enemy armour. For this gun its better to use tungsten when you can maximize your damage output, which means penetrating all 3 shots.
Of course, for important kill shots you might want to not risk it and use tungsten anyway, just in case one of your shots bounces (for example on an enemy that has 340 health, 2 shots without tungsten will do 320 damage, but with tungsten will do 368).
Improved Engine Power Boost-
Use it to quickly get into positions at the beginning of the battle, to quickly retreat, flank, relocate, or otherwise. Essentially, save it for when you need to be fast and when it would rally give you an advantage or save you.
Reactive Armour-
Use it when you are about to take a lot of damage. This could be when you face an autoloader, when your tank is exposed to multiple enemies, you make a push, or you get rushed by multiple enemies. Its also just helpful for tanking a shot (even just one) from a high alpha heavy tank or TD.
Gameplay for single-shot 374 alpha:
The general gameplay of the single shot gun is very simple, as its just like other generic medium tanks. Use the mobility to get into position, go hulldown to block damage & use gun depression, and use the good alpha damage and DPM to deal with enemies. Just be aware that almost every other medium tank you fight is more mobile than you, and due to this you have to be quite situationally aware, in case you have to retreat.
Use consumables:
For speed boost & reactive armour, their use is the same as on the tri-shot gun (mentioned in detail above). Use the speed boost when you need good mobility at important moments of the battle, use reactive armour when you are about to take a lot of damage.
Tungsten Shells-
Use it when you need to secure a kill shot on an enemy with 370-420 HP. The average 430 damage of tungsten shells generally ensures kills on enemies with that much HP. Also use it just even you can get a shot, since tungsten gives your tank an advantage even if you only get 1 shot out, unlike adrenaline which needs multiple.
Adrenaline-
Use it when you have the opportunity to put out multiple shots into enemy tanks, and when you need/can use a faster reload speed.
Trade in alpha damage, not DPM:
Unless you have the adrenaline + tungsten consumable set and have them both activated at once, don’t try to out-DPM your enemies.
While DPM is good for having 374 alpha, its still lower than many tanks that also have good alpha damage, for example the Leopard PTA, Char Futur 4, M46 Patton, & E 50 (which all have around 3k DPM with 350 alpha).
However the advantage of your gun is to out-damage these tanks, so try to trade one-for-one. Reverse and avoid the enemy for as long as possible, so they can’t use their reload advantage against you, and you can use your alpha damage advantage.
The only tanks you can’t do this to are the WZ-120 & Cobra (and some tier 8 & 1o high alpha mediums), as they have 400-500 alpha damage, which will out-trade you.
Use gun depression & go hulldown:
This is effective with both guns, as the mau5Tank has a good upper plate with quite a solid turret, and a nice -7 gun depression. This allows the tank to be relatively flexible with what positions it can go hulldown in, as unlike a T-54 its not limited by gun depression.
Be wary that your turret isn’t invincible, enemies can penetrate some small areas around the gun, and there’s the “ears” on each side of the turret which are penetrable to standard ammo. Keep moving, as sitting still just allows enemies to easily notice and aim on these weakpoints.
Stay on hard terrain:
As with many tanks which released in 2024, the mau5Tank suffers from a very common trend, which is having 1/1.3 terrain resistance.
Having 1.0 terrain resistance on hard terrain means your mobility is just as shown in game, which is fairly decent. Hard terrain is also where your mobility will be the best, so try to stay on roads, concrete/paved areas, or paths.
1.3 medium terrain resistance is decent but not great, it means your mobility is roughly 23% worse than on hard terrain (mobility stats divided by 1.3, ie: 23% less). Due to already being the least mobile tier 9 medium tank, its quite important to try and stay on hard terrain and avoid going off road (which is medium terrain), just so you don’t lower your mobility even further.
Overall the mau5Tank plays as a regular medium with the single-shot gun. It can go to the frontlines, use its good alpha damage & decent DPM to brawl, and go hulldown and bounce shots.
With the tri-shot, the mau5Tank needs to play more carefully, as its DPM is low, reload is longer, and gun is less consistent. Generally this gun works best on the second line, with allied support.
Overall
Armour – 6/10
374 alpha gun 9/10
Tri-shot gun – 6.5/10
Mobility – 4/10
Speed – 5/10
mau5Tank is overall a good tank.
Armour is good for a medium. Upper plate is almost an auto-ricochet, with decent base thickness. Turret front is solid & decent in hulldown. Good HE protection, average HESH protection.
The 374 alpha gun has amazing aim time, good gun haling & accuracy, good DPM & alpha, with -8 gun depression & good penetration.
The tri-shot gun has good penetration & gun handling, great aim time, & high burst damage (480). Accuracy is decent, with decent DPM for such high burst damage. Module damage & premium shell damage are both low.
Mobility is mediocre. On hard terrain it has decent acceleration & traverse, on medium terrain its among the slower tier 9 medium tanks. Reverse speed is good, -21km/h.
Speed is average, 50km/h.
Is it worth getting?
The mau5Tank is worth getting, just for its unique factor of having a tri-shot burst damage autoloader with 480 alpha. The single shot gun isn’t so unique nor too interesting to play, though it does make the mau5Tank a very competitive medium. However you don’t have to choose as the tank comes with both guns, so it is definitely worth considering.
The mau5Tank is worth 14,000 gold. Its a good tank with some very competitive traits when using the single-shot gun, but with very fun and unique gameplay when using the tri-shot gun.
Most recently sold for:
Battlepass style event reward – December 2024
Camo cost:

“Random” camo, 2D, currently not available to buy.
(Placeholder image until camo is released, credits to Aeson000)
