
The Swindler is a tier 8 tank from Season 3 “Resistance”. Its an French-style light tank based on the AMX 13. It has very weak armour, and good top speed, with a 3 shot auto-reloader gun.
Click the table of contents below to access the section you want:
- Armour
- Gun
- Mobility
- Equipment, provisions, & consumables
- Gameplay advice
- Tank gameplay:
- Overall
- Is it worth it?
- Camo cost:
- Stock grind
Armour
(The Swindler in the images is using Improved Assembly)

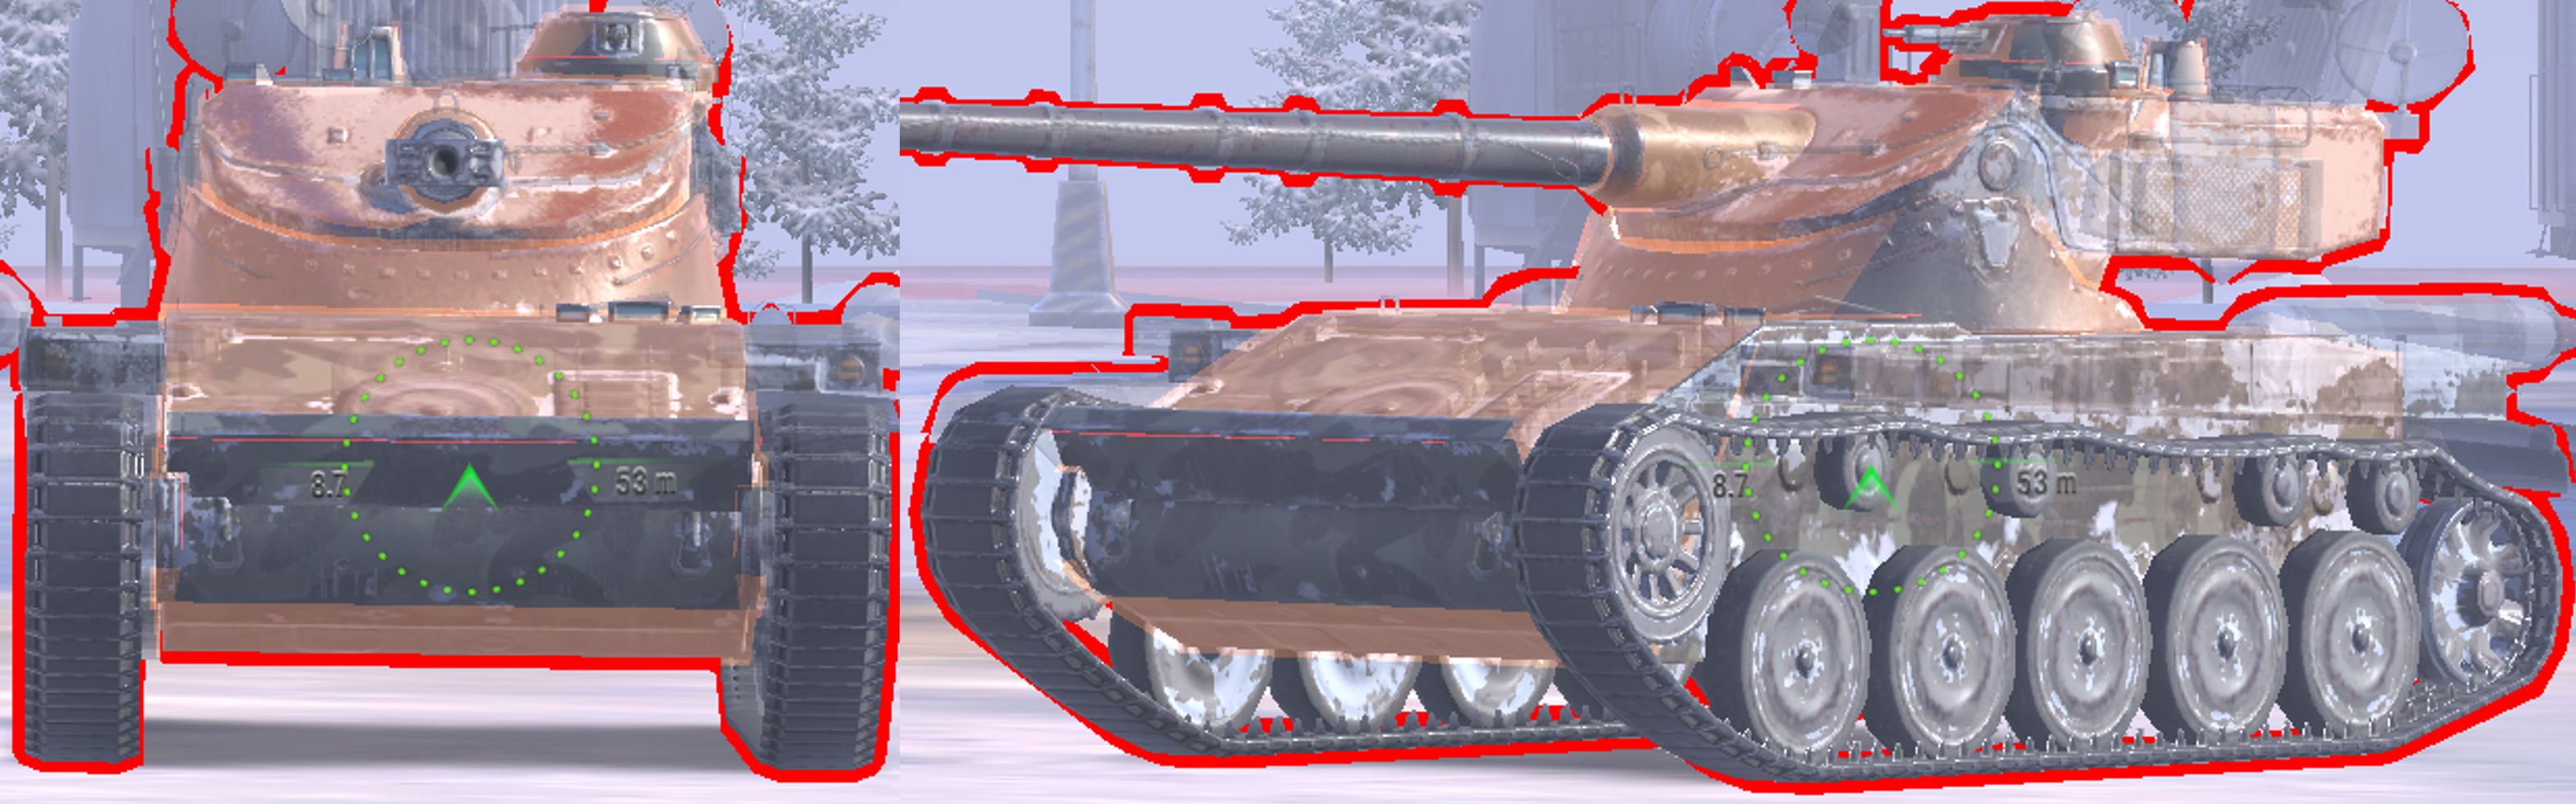
Drag slider right -> to view 185mm AP
Drag slider <- left to view 50mm HE
When flat and facing head-on:
Upper plate 90mm
Lower plate 30-35mm
Turret face 60-65mm
Cupola 44mm
Side armour:
Hull sides are 28mm thick, and turret sides are 36mm thick, with no spaced armour at all.
The sides & rear of the Swindler are easy for any tank to HE.
Armour vs all tier 7-9 enemies:
As this is a light tank, it has no armour at all to any enemy. All standard ammo can penetrate easily, and all HE can easily exploit the side armour.
The only good things about this armour profile come down to this tank being an AMX 13, and that is, its front is well angled and can resist the majority of HE, and the tank is also small and fast, making it harder to aim HE shots.
Gun
The Swindler mounts a 100mm auto-reloader in its top configuration.
The more it fires, the longer the reload of each shell is. It also has a “reserve shell“, the last shell you shoot out from the magazine has an extremely long reload.
All auto-reloaders have 3 firing modes (you won’t notice in battle, but it helps to understand the gun better).
Single shot mode:
(Where you shoot one shell, reload, shoot….)
-The best DPM in “single shot mode” is on shell 1*
-Shell 1* has an 6.86s reload with 240 alpha, giving the tank 2099 DPM in this mode.
Autoloader mode:
(Where you just unload 2 shells then reload back to full, DON’T shoot the 3rd shell)
-Reload time from having 1 (reserve) shell in the clip to having 3 shells in the clip takes 12.-07s.
-Intra clip is 2.22s with 2 x 240, giving the tank 2015 DPM if it shoots like an autoloader would (as in: fires 2 shells, reloads fully, then fires 2 shells, etc).
Auto-reloader mode:
(A combination of the first two. Only shooting until you need, and then reloading one-by-one.)
-Reload time for each shell is:
Shell 3* – 19.89s
Shell 2* – 5.21s (+ 2.22s) = 7.43s
Shell 1* – 4.64s (+ 2.22s) = 6.86s
Gun stats:
-Alpha damage is 240 on AP, 200 on HEAT, and 320 on HE
-Penetration on AP is 181mm, HEAT is 253mm, and HE is 48mm.
–Estimated aim time is 3.1/4.2s
–Base aim time is 2.02s, but it can get down to 1.65s.
-Dispersion is 0.353/0.318
–Gun handling is 0.13/0.13/0.09, or 0.11/0.11/0.08 with Vertical Stabilizer.
-Gun depression is -6 degrees
*Shell 1 is the first shell you shoot when the magazine is fully loaded. Its the last shell that gets loaded into the magazine. Shell 3 is the reserve shell.
Overall this is a great gun. Its only marginally less accurate than the AMX 13 90 in the tech tree, but has more impressive damage and penetration stats.
For a light tank, this gun has great burst potential, 480 in most situations, or 720 if you use the reserve shell. It also has amazing ammo choice with great alpha damages and very high HEAT penetration for an autoloading light tank. It also has good aim time with decent gun handling and accuracy.
The only real downside of this gun is its gun depression of -6, which isn’t flexible. However with the small size of the tank its definitely sufficient enough.
Mobility
-Top speed is 63km/h forwards, and -20km/h in reverse
-Traverse speed is 75.1 deg/s on hard terrain, and 62.6 deg/s on medium terrain.
-In game acceleration rate is shown as 29.8 hp/t, it has a strong 1093hp engine for its 37 ton weight.
-Actual acceleration rate is 29.8 hp/t on hard terrain, and 24.8 hp/t on medium terrain.
–Terrain resistances are 1/1.2/1.6
Overall this is good mobility. Top speed forward is decent, but reverse speed is below average. Acceleration and traverse on both terrain types are good, though are below average for tier 8 due to the terrain resistances.
The Swindler is not a slow tank, and does move like a proper light. The difference to other tier 8s isn’t too noticeable in gameplay of the feel of the tank.
Equipment, provisions, & consumables
The Swindler doesn’t have any special provisions or consumables.
Calibrated Shells:
Due to being an auto-reloading light tank, shot effectiveness is important on this tank. Calibrated shells helps you to put out the 2 or 3 shot damage burst more effectively, since you’ll be able to penetrate more tanks. On a tank like this, vents cannot nearly make up the benefit that calibrated shells gives.
Calibrated shells would increase the AP penetration from 181mm to 190mm, HEAT from 253mm to 278mm, and HE from 48mm to 53mm.
(HEAT & HE are especially important on this, since its rare for light tanks to have such good HEAT penetration, and the HE damage on this tank is very impressive.)
Improved Assembly:
The Swindler is a light tank, it has no armour to enhance, so instead increase its HP with improved assembly. This would take its HP from 1200 up to 1272.
Vertical Stabilizer:
Vertical stabilizer works really well on this tank, since its an active light tank, constantly moving around the battle to get shots into enemies and use its magazine. Vertical stabilizer helps to improve the tank’s accuracy while its moving and being active, but also helps the gun to keep accurate while unloading its shells (one of the most important stats on an autoloader).
Though the accuracy of the tank (0.335) is nothing special, its definitely not bad, and not worth using refined gun for.
Gameplay advice
Swindler plays similarly to other autoloader light tanks in the game, it just reloads in a different way, and is hence much more flexible in how it plays.
General gameplay:
You can start the game either by scouting, or choosing a position to get ambush shots on enemies which are getting into position. Generally this works best on the MT flank, where enemies deal less damage, and terrain is more favourable to light tanks.
Deal damage in 2 shot bursts, essentially play as a 2 shot autoloader. Shoot twice, then fully reload. The only situation where you should hold your shots, and only use the 1st shell, if in a situation where you need to use the DPM to kill an enemy (in this case, shoot once, fully reload, then repeat until, the enemy gets to low enough HP where you can use the magazine to kill them).
Try to avoid head-on engagements with enemies, generally they have more HP, more armour, and more DPM. You have to play more sneaky and cautious as a light tank, flanking, using mobility, and being opportunistic with your magazine damage.
Ram enemies:
In terms of HP use this isn’t the most ideal, since you have a fairly mediocre 1272 HP, however the Swindler is the heaviest light tank in tier 8 by far, and is only 1 ton off from the heaviest tier 9 light tank.
Being almost 37 tons means that, combined with the high speed you can achieve, you can actually do some very good ramming damage to other light tanks and even some mediums. If you combine this with the fact you have great HE damage, you can take down an enemy light tank from full HP in just 5-6 seconds.
Use the view range/camo rating:
The Swindler has a very comfortable combination of camo rating and good view range (being better than all but 3 other light tanks in tier 8). This means you’re very capable of scouting enemies both actively and passively.
Using bushes is also very helpful for this, since they increase the camo rating of your tank. This can allow you to out-spot enemy light tanks who are in the open. or just sneakier mediums or TDs.
Use 2 shells of the magazine:
Never shoot 3 shells in a normal battle situation. Using that 3rd “reserve” shell completely ruins your DPM and puts you on a 31.6s timer until your magazine is back to full. This is a ton of time, especially for a light tank which can quickly get into positions where it can get shots.
The best use of DPM in this tank, is as a 2-shot “autoloader”.
This works very well in this tank, since you can burst out 480 damage quickly and out-trade most tanks. This 2 shot “autoloader” also doesn’t ruin your tank’s DPM. Playing it as this 2 shot burst tank gives you 2015 DPM, if you try to shoot only 1 shot at a time, your DPM only increases to 2099.
When to use the reserve shell:
As a light tank, you can create distance from enemies by using speed, so you can create time for yourself to reload. However you can also use this speed to get the gun into positions where it can shoot, so using the reserve shell should only be done for very important shots, or on very isolated enemies.
-Use the reserve shell to kill enemies at important times of the battle. For example if its a close game, and killing an enemy would give your team a better chance of winning the battle.
-Use the reserve shells if its your last shot of the battle, for example if you’re about to die, or if the last enemy is about to be killed.
-Use the reserve shell to save yourself. There’s no point trying to keep your DPM if there’s a 1-shot enemy who’s about to kill you. Using the reserve shell to kill them allows you to stay in the battle and influence its outcome more.
Use the ammo:
The ammo this tank has is a very good and diverse choice.
The standard shell is AP, useful in all situations and especially good for spaced armour plates or tracks.
The HEAT shell has very high penetration for a light tank, and you can easily penetrate even strong enemies (such as Tiger II, AT-15, T28).
The HE is very good due to its high alpha of 320. This can significantly boost your damage capabilities and is very good against enemy lights or paper TDs.
Trading damage:
Trade in bursts of 2. Don’t use the gun as a single shot while doing damage trades, since its just not effective for that. With a burst of 480, and a pretty quick 12s reload (back to full), you can out trade most enemies you face.
Try to avoid actual damage trading, since you have low HP. Light tanks aren’t meant to tank hits and trade damage, but in some situations it may come up. Mostly its better to use the mobility to just avoid damage completely while finding a position to still shoot the enemies.
This tank basically just plays in the same way as a regular autoloader light, but instead of 3 shells, it has 2 shells, and isn’t forced into a full reload, and can reload each shell one by one. Other than this, it has the same sort of run-and-gun gameplay, where it uses mobility and positioning to get its gun working and support the team.
Tank gameplay:
Overall
Armour – 2.5/10
Gun – 9/10
Mobility – 5/10
Speed – 6/10
Overall the Swindler is a great tank.
Armour is weak, but that’s normal for a light. One of the best armour aspects is that the front is hard to HE and the tank is small. Hull and turret sides, along with lower plate are weak to HE. No armour to AP, HESH protection is terrible.
Gun is amazing, with good reloads and comfortable alpha for a light tank. Penetration is very high. Accuracy & gun handling are fairly average, but with great aim time. -6 gun depression is average for an AMX 13. The auto-reloader carries so much potential and is not punished by a long reload (on shells 1-2).
Mobility is nothing impressive for a light tank. It has quick acceleration & good traverse speed, but in tier 8 its nothing special. Reverse speed is mediocre at -20km/h.
Speed is fairly average at 63km/h.
Is it worth it?
This tank can be earned for free in Season 3, however upgrading it to its top modules will take serious dedication to grinding and even possibly some money spending in the store.
Considering this is the tank worth it?
It definitely will be for some players. The Swindler is the only auto-reloader light tank in the game, and it sports very unique gameplay. While its gun may seem just worse than a Progetto 46, it plays a complete different role and offers a style of gameplay which a medium tank or even a regular autoloading light can’t offer.
If you aren’t the biggest fan of light tank gameplay or auto-reloaders, then its probably not worth all that effort to max the modules of this tank. If you’re barely going to play it, then why take the time for so much grinding.
The Swindler is worth 8,000 gold. Its a great tank in tier 8. It has great carry potential due to its autoloader, good camo rating, view range, and high level of mobility.
This tank is a high-skill tank, since you need to position well and manage your shells to deal the most effective damage. Newer players will likely struggle with the tank’s more unusual gun mechanic and the tank’s lack of armour.
Camo cost:

Swindler has a permanent appearance which can’t be adjusted.
Its shown here in the stock configuration.
Stock grind
As you upgrade modules, the stats of each module improves slightly, improvements are not large, they are very gradual.
This tank starts with a 80mm gun that does 220 damage, this is the same for T2 and T3 versions of the gun, only the T4 gun becomes a 100mm, which deals 240 damage.
If you want to check the stats of each module, you can view the tank in-game, or use gamemodels3d or Blitzstars.
Important:
-Only the top turret improves turret armour, all the stock and intermediate turrets have the same armour.
-Stock and top turrets/guns have the same gun depression.
-Tracks only upgrade traverse speed (not terrain resistances or gun handling).
-The hull doesn’t upgrade, the armour is the same throughout.
Gun:
When stock, it starts with terrible DPM and 200 alpha, gradually upgrading to 210 and then 220 with T2 and T3 guns. Accuracy, aim time, penetration, and DPM are all significantly worse.
The burst damage is still decent, but much less impressive, and much harder to trade with if you can’t get both shots out.
Turret:
The stock turret is weaker than the top one, due to flatter armour and being more easily HE-able. It also has much lower HP & view range.
Engine/tracks:
Engine power, traverse speed, acceleration, are all very noticeably slower when stock, and makes this tank feel very slow for a light tank.

vs 50mm HE
Turret face 40mm
Turret sides 32mm
Upgrading:
As said above, upgrading each module improves it slightly. In total there are 4 of each module on this tank. 1 stock module, 2 intermediary modules, and 1 top module for each turret, gun, engine, and tracks.
Each gun upgrade makes it slightly more accurate, higher penetration, quicker reload, and increases in alpha damage.
Each turret upgrade gives better view range, HP, and turn rate.
Each engine & track upgrade improves traverse speed and acceleration rate.
Eventually you get to the top modules, these are the only modules which change in appearance.
-The top gun has by far the best accuracy and penetration, but also increases in both alpha damage and DPM.
-The top turret much better HE protection, but also better view range and HP.
-The engines and tracks also put out the best possible mobility, which is completely necessary, as the Swindler isn’t the quickest of lights in tier 8.
