
T110E5 is one of the top tier USA heavy tanks. Its a great all-rounder heavy, with good mobility, frontal armour, and a great gun with an amazing combination of accuracy, penetration, gun depression, and DPM.
Click the table of contents below to access the section you want:
- Armour
- Gun
- Mobility
- Equipment, provisions, & consumables
- Gameplay advice
- Overall
- Is it worth grinding?
- Camo cost:
- Tech tree overview
- Historical info:
Armour
(The T110E5 in the images is using Improved Assembly)
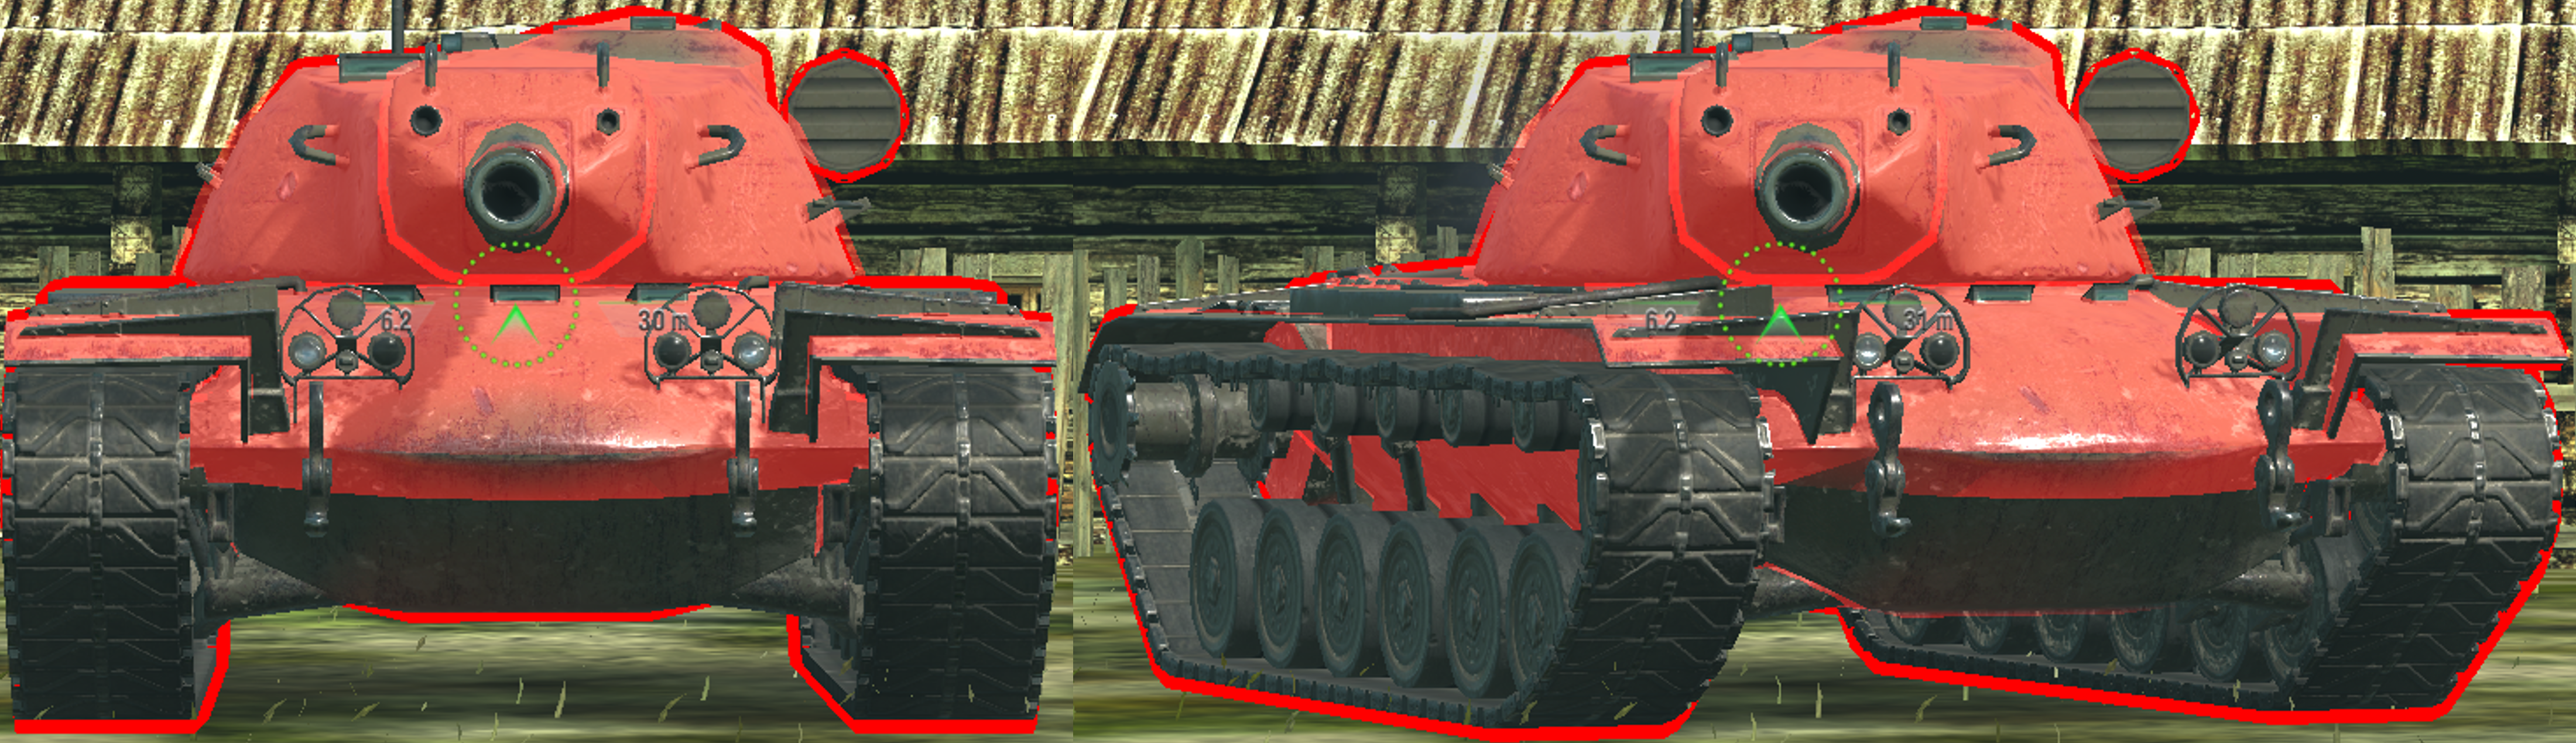

Drag slider right -> to view 257mm AP
Drag slider <- left to view 330mm HEAT
Flat ground:
Upper plate 290-760mm
Middle armoured bar 290-315mm (lower part), 260-325mm (upper part)
Lower plate 145-160mm
Turret cheeks mostly 340-390mm (weakest point 286mm)
Gun mantlet 265-520mm
Cupola 230-260mm
The turret roof is 51mm, so it can be overmatched by guns larger than 153mm (so on tanks like Foch 155 or T30 with 155mm guns).
Note that the very center of the gun mantlet is a slight weakspot, but its not a reliable penetration point with standard ammo due to its thickness, and premium HEAT isn’t reliable either due to this being spaced armour. Also due to the size of this weakpoint, shooting here to penetrate the tank isn’t very reliable.
Side armour:
The T110E5 has very similar side armour to many other top tier USA tanks.
Its upper sides (behind the top part of the track) are flat, and are 86mm thick.
Its lower sides are angled inwards in a sort of boat shape, and are 44 mm thick.
These sides taper in to the also rounded lower plate, which makes sidescraping difficult, as enemies can penetrate right through the front idler wheel, as the armour behind it is essentially flat, even when you angle the tank.
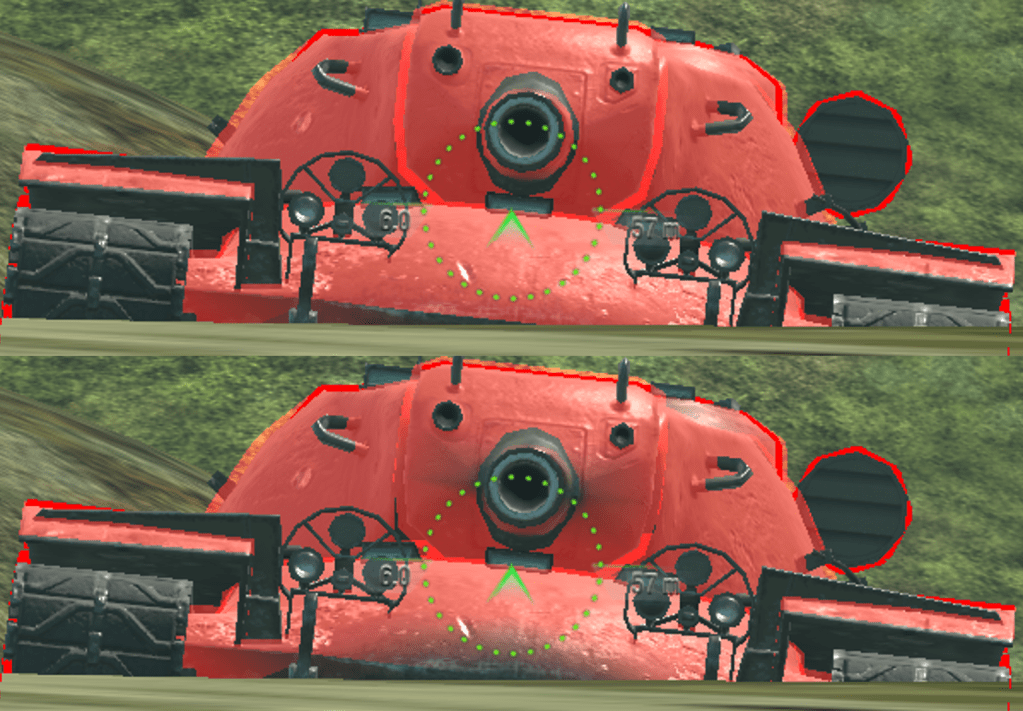
vs 310mm HEAT(top image), 330mm HEAT (bottom image)
Using -8 gun depression
Upper plate 305mm-800mm+
Turret cheeks 420mm
Cupola 300-470mm
Armour vs all tier 9-10 tanks:
The T110E5 has a solid but simple armour profile, which offers roughly the same level of protection, no matter which enemies you face.
Turret:
This is very strong against standard ammunition, but if enemies you premium ammunition, the turret cheeks will be penetrable.
If you move the tank back and fourth, these can be very hard to hit as the weakpoint is fairly small.
Upper plate:
The upper plate is insanely strong, and you can be confident in bouncing essentially every enemy you face. The only tanks that might be able to penetrate it are tanks like the Ho-Ri, or the Obj. 268.
Lower plate:
The lower-lower plate is weak, and penetrable to every enemy you face, however the upper part of the lower plate is reinforced with strong armour, and is about 330mm thick.
This makes it easy to use hulldown positions, as it reduces the profile of the weak lower plate.
Sidescraping:
Sidescraping does work in this tank, however only in specific scenarios, against specific enemies. Essentially, you can only use sidescraping to bait enemies into bouncing off the exposed rear half of the sides, since if enemies hit the front, they will most likely penetrate.
Due to the lower sides being 44mm thick, you can sidescrape against any enemy with a gun that’s 132mm in calibre or smaller. Tanks with larger guns will overmatch your lower side armour.
You cannot over-angle the T110E5 at all, or enemies can easily penetrate the sides due to its low thickness.
When sidescraping, only expose the rear side armour at most. If you expose the front areas or the track wheel expect to get penetrated.
Gun
The T110E5 mounts a 120mm gun.
-Damage per shot is 400 on AP, 340 on HEAT, and 515 on HE.
-Reload time is 8.5, giving it 2818 DPM.
-Penetration is 254mm on AP, 340mm on HEAT, and 60mm on HE.
–Estimated aim time is 2.5s/2.7s
–Base aim time is 1.7s, but it can get down to 1.31s.
-Dispersion is 0.299/0.254
–Gun handling is 0.18/0.18/0.08, or 0.16/0.16/0.07 with Vertical Stabilizer.
-Gun depression is -8 degrees
Overall, this gun is incredible in every regard except for its DPM (which is just average). Its very accurate, with amazing gun dispersion, quick aim time, and good gun handling. It has great penetration with amazing HEAT rounds, and it also has great 1067m/s shell velocity on all of its shells.
Only the DPM isn’t classed as an amazing stat, but its still definitely not bad, and generally perfectly sufficient. In nearly all scenarios, shot consistency and accuracy of the T110E5 help it to actually have better “effective DPM” than other tanks with higher raw DPM.
Mobility
-Top speed is 42km/h, reverse is -12km/h.
-Traverse speed is 34 deg/s on hard terrain, and 26.1 deg/s on medium terrain.
-In game acceleration rate is shown as 18.1 hp/t, it has a strong 1006 horsepower engine for its 57 ton weight.
-Actual acceleration rate is 17.8 hp/t on hard terrain, and 13.7 hp/t on medium terrain.
–Ground resistances are 1/1.3/1.9
This is great mobility, considering that this tank also has a solid armour profile. The top speed is good, with a very strong engine allowing the tank to utilize that speed. Traverse speed is also good, but nothing too impressive. The reverse speed is slow, similar to many other USA heavies.
Equipment, provisions, & consumables
T110E5 has sandbag armour for special consumables/provisions.
Provisions:
10% food – This is necessary for all aspects of the tank, but especially the accuracy, traverse speed, and reload time. All these aspects would be significantly worse without food.
10% fuel – This gives the tank great mobility and is needed to help the E5 properly utilize its good top speed and decent traverse speed.
6% Sandbag Armour – This will add 138 extra HP to your tank, there are no alternative provisions which give as useful of a benefit as this 138 HP.
Gun rammer:
Due to the very low DPM (relative to its alpha damage) of the T110E5, gun rammer is by far the best equipment choice on this tank. The amazing accuracy and great standard and premium penetration mean that calibrated shells are just not nearly as useful as the improved reload time that gun rammer gives.
Calibrated shells are wasted on this tank, as it will cause the reload to be far too long, and the tank will just be unable to fight effectively in any form of frontline combat. The tank also just doesn’t need more penetration.
Gun rammer would decrease the reload time from 10s down to 9.3s, and increase DPM from 2410 up to 2591.
Improved Assembly:
Due to the T110E5 having very rounded armour plating, its effective armour is already extremely strong.
While enhanced armour would benefit the turret cheeks, it doesn’t benefit any other area, and the turret cheek weakpoints can be mitigated by not exposing your tank for too long, or just slightly moving back and fourth to get enemies to miss.
Improved assembly is a very strong option on the T110E5 due to it being able to stack with the sandbag armour provision.
If using enhanced armour (with sandbag armour), the T110E5 would have 2392 HP.
If using improved assembly with sandbag armour, the T110E5 can achieve 2530 HP.
Vertical Stabilizer:
The T110E5 is a standard, frontline brawler heavy tank. It doesn’t need improved dispersion, as its not fighting at long distances, its also already has among the most accurate guns of any tier 10 heavy in terms of dispersion.
Due to this, the T110E5 gains much more benefit by using the vertical stabilizer than refined gun. Vertical stabilizer will improve the accuracy of the tank in closer ranges and when its constantly moving, which is very useful for the playstyle of a heavy tank.
Gameplay advice
The T110E5 is a standard, generic heavy tank, though slightly different, as it has low DPM in exchange for great accuracy. It plays a frontline, brawling role.
General gameplay:
Take the T110E5 to the HT flank. The tank’s low DPM and long reload holds it back from being very effective against medium tanks, which have faster-paced gameplay, so its best to go play against heavy tanks.
On the HT flank, try to find hulldown positions. The T110E5 only has one obvious frontal weakpoint, which is its lower plate. Its very effective at bouncing shots once this is hidden, and you can easily dominate a position while hulldown.
Similarly, gun depression positions also favour the T110E5 due to its strong turret and upper hull armour. It also has comfortable gun depression at 8 degrees, and the great accuracy allows you to poke out and shoot without needing to aim much.
Go hulldown and use gun depression:
As stated above, the T110E5 is a very strong hulldown tank, when that lower plate is hidden, it becomes very difficult for enemies to penetrate the tank.
In these positions, try to only push out and expose your armour when you’re reloaded. If you push out before you’re ready, you may lose the shot on the enemy tank since they pull into cover before you’re loaded. This also ensures your tank is exposed for the least possible amount of time, and reduces the chances of taking damage.
If you can’t fully hide your tank, try to make small back and fourth movements. This will make the turret cheeks of the tank harder to aim for (these are the weakest area on the front of the tank, other than the lower plate).
Sidescraping:
Sidescraping isn’t recommended as a favourable armour use in the T110E5, however its still better than driving out completely sideways.
If you must sidescrape, try to use the sharpest angle possible, don’t over-angle at all. This gives enemies the highest chance of bouncing off the sides, or only damaging the tracks.
Hide the front part of the tracks. This area tapers inwards to the lower plate, so its very poorly angled. If the enemies can see your front idler wheel, then you can be penetrated.
Use the tank’s rear to bait shots, and once the enemy shoots, then you can poke out to get your shot in.
Don’t sidescrape against any gun larger than 132mm (so the 139.7mm gun of the Conway, or the 149mm gun of the Ho-Ri, and any guns larger than this).
The T110E5 features very standard heavy tank gameplay, but has to be played with consideration of its lower DPM. Its a great hulldown tank and has reliable armour and mobility, though its raw damage output is slow for a 400 alpha tank.
Overall
Armour – 8/10
Gun – 9.5/10
Mobility – 7/10
Speed – 7/10
T110E5 is overall a great tank.
Armour is strong on both the hull and turret, and the lower plate is even half strong. The sides and rear are fairly weak.
Gun is perfect, great accuracy, aim time, and high penetration, with good DPM and gun handling.
Mobility is good, with a strong engine and good acceleration, traverse speed is average, and reverse speed is slow.
Speed is good, 42km/h.
Is it worth grinding?
The T110E5 is a tank that’s worth grinding for. Its an enjoyable vehicle that has familiar heavy tank traits, but offers something different with its amazing gun consistency, though with low DPM. The tank isn’t too hard to play, even for newer players, as its quite a generic and standard tank with comfortable stats in accuracy, armour, and mobility.
Camo cost:
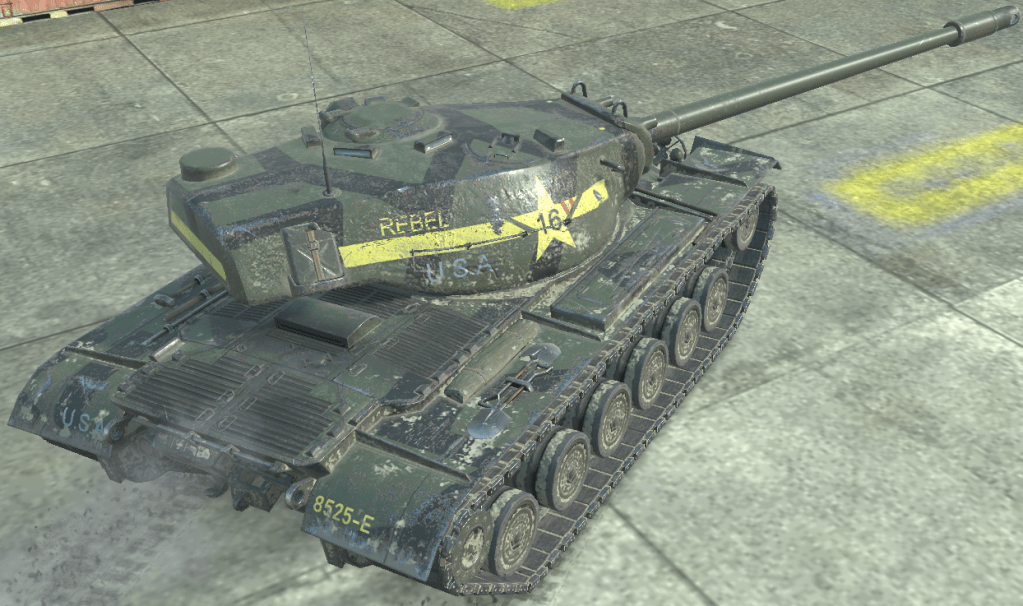
“Rebel” camo: 2D, costs 2,550 gold
Tech tree overview
To get to the T110E5, you’ll have to grind through the low tier medium and light tanks, and then onto the USA heavy tree at tier 5. These heavy tanks all feature similar traits of good mobility, good (but somewhat inaccurate) guns with average alpha damage, and strong hull and turret armour.
All of these tanks have an alright stock grind. They all share the same trait of being extremely immobile while stock due to their tracks, but all these tanks have pretty good stock guns.
-Tiers 1-3 are all fairly similar tanks, all have light armour, decent to good mobility, great guns, and great gun depression. All are fairly easy and enjoyable to grind.
-Tier 4 is the M7, a strong medium tank with good armour and gun. This tank’s best gun is actually its stock “QF Mk. III”, a 6-pdr gun with insane premium penetration, quicker reload, and far better accuracy than the top 75mm gun.
The stock grind of this tank is fine. The tank is perfectly usable, though slow. Upgrade the engines, tracks, and turret first. Since the stock gun is the best gun on this tank, you don’t need to get the top gun till last, and even after unlocking it, don’t mount it as it just performs worse than the stock gun.
-Tier 5 is the T1 Heavy, a very strong tank with good mobility and armour. The frontal armour is practically impervious when you hide the lower plate, even most tier 6 enemies will struggle to penetrate it. The lower plate is very weak, but the side armour is very strong. The mobility is good, but the gun has unimpressive DPM and terrible accuracy.
The stock version of this tank is perfectly usable. The stock turret is still strong enough to bounce most same tier enemies, and the stock gun isn’t too much worse than the top gun. The tank will be significantly slower, but this is due to stock tracks having terrible terrain resistance, not the stock engine.
-Tier 6 is the M6, its essentially a T1 heavy with a bigger gun. The turret armour is the same as the T1, and the upper plate is weaker than the T1. This armour is still very effective in tier 6, but tier 7 tanks can penetrate the M6 quite easily. The gun has decent DPM and accuracy, but amazing premium penetration, and the mobility is great, though with an average top speed.
The stock M6 is also perfectly usable. The stock turret armour is actually identical to the top turret, it just has less HP. The stock gun has good DPM and aim time, but lacks penetration and accuracy; this is just fine for a stock gun. Same as with the T1, the tank will be very slow when stock, and this is caused by the stock tracks, not the stock engine.
-Tier 7 is the T29, another very strong heavy tank. This one has amazing turret armour, great penetration, and good alpha damage. The hull armour is decent, but won’t stand up to higher tier enemies, the turret will. The gun has decent accuracy and aim time, and great penetration with good DPM and alpha. The mobility is quite poor, especially on medium terrain, where it turns and accelerates slowly.
The stock version of this tank isn’t great. Its unbelievably slow, again due to terrible terrain resistances. The stock tracks should be the priority upgrade, since without the top tracks, the tank is basically impossible to get moving.
The stock turret, stock gun, and stock engine are all relatively ok. The turret is very strongly armoured, and the gun has good aim time and accuracy with good DPM. The engine causes the tank to be slower than when fully upgraded, but the biggest issue with mobility is caused by the stock tracks.
(Research all engines on the T29, as they are used on the T32 as well).
-Tier 8 is the T32, a tank very similar to the T29. It has a fairly similar gun, with good penetration and gun handling, though with poor accuracy and unimpressive DPM. The turret armour is impervious, and is one of the strongest turrets tier-for-tier in the game, and the hull armour is strong and can be angled effectively. The tank isn’t fast but is mobile enough for its armour. The T32 is one of the most durable tanks in tier 8, with very high HP.
The stock T32 is an ok tank, but can’t really play the heavy tank role. The stock tank is actually alright, the gun performs similarly to the T29’s stock gun, and the top engine is actually reaseachable on the T29. The biggest issue is the terrible stock turret armour, which can’t bounce anything.
The best upgrade path on this tank is to first upgrade the turret to gain armour and play as a heavy tank, then upgrade the tracks, and finally the top 105mm gun.
-Tier 9 is the M103, compared to the T32, this tank lost a significant amount of armour, but gained a great gun and better mobility in exchange. The armour is decent, but the turret is weak to tier 10 enemies, and the hull armour isn’t reliable, even though its rounded. The gun is amazing, having the same penetration as the T110E5, but still having a decent reload rate and accuracy. The mobility of the M103 is significantly better than any of the previous tanks, though its limited by top speed.
The stock M103 is tragic. Its not the worst grind in tier 9, but its among the more painful. The stock turret has terrible armour, with a big weakpoint on the roof. The stock gun has significantly worse penetration than the T32 had in tier 8, and now you have to face tier 10 tanks with it. The stock mobility is one of the redeeming features, as the acceleration rate is actually pretty decent, though traverse is slow.
The recommended upgrade path would be to get the first 120mm gun, then at least you can penetrate the enemy tanks you face. After that upgrade the tracks, which improve mobility significantly. Then get the turret to improve the tank’s HP and armour, and finally choose between the engine and the top 120mm gun.
(The top gun actually isn’t needed to get the T110E5, the T110E5 is researched through the top engine. Its fully possible to just grind the M103 by using the middle 120mm gun, this gun is decent for tier 9.
-Tier 10 is the T110E5, it takes a significant upgrade over the M103 in armour, speed, and accuracy. Out of the tech tree, the T110E5 is by far the most mobile and quickest heavy tank, with the most reliable and accurate gun. It has very solid hull and turret armour, just like the tanks before it (not the M103).
Historical info:
T110E5 was the 6th version of the T110 GMC project by Chrysler (and Detroit Arsenal).
It was the only turreted version of the T110 project, and the only one to be a heavy tank, rather than an assault TD/GMC. It was the last proposal for the T110 project before it ended.
Naming:
T110E5 is an incorrect name, as this was the 6th version of the T110 tank. A better name would be T110E6, or T110 HT, as this was the only non-GMC (tank destroyer) version of the T110 tanks.
