
The Basilisk is a tier 7 tank from Season 2 “Constellation”. Its an American-style medium tank based on the T20. It features great DPM on its 225 alpha gun, decent mobility and speed, and spaced armour covering the tank’s front.
Click the table of contents below to access the section you want:
- Armour
- Gun
- Mobility
- Equipment, provisions, & consumables
- Gameplay advice
- Overall
- Is it worth it?
- Camo cost:
- Stock grind
Armour
(The Basilisk in the images is using Improved Assembly)

Drag slider right -> to view 145mm AP
Drag slider <- left to view 195mm APCR
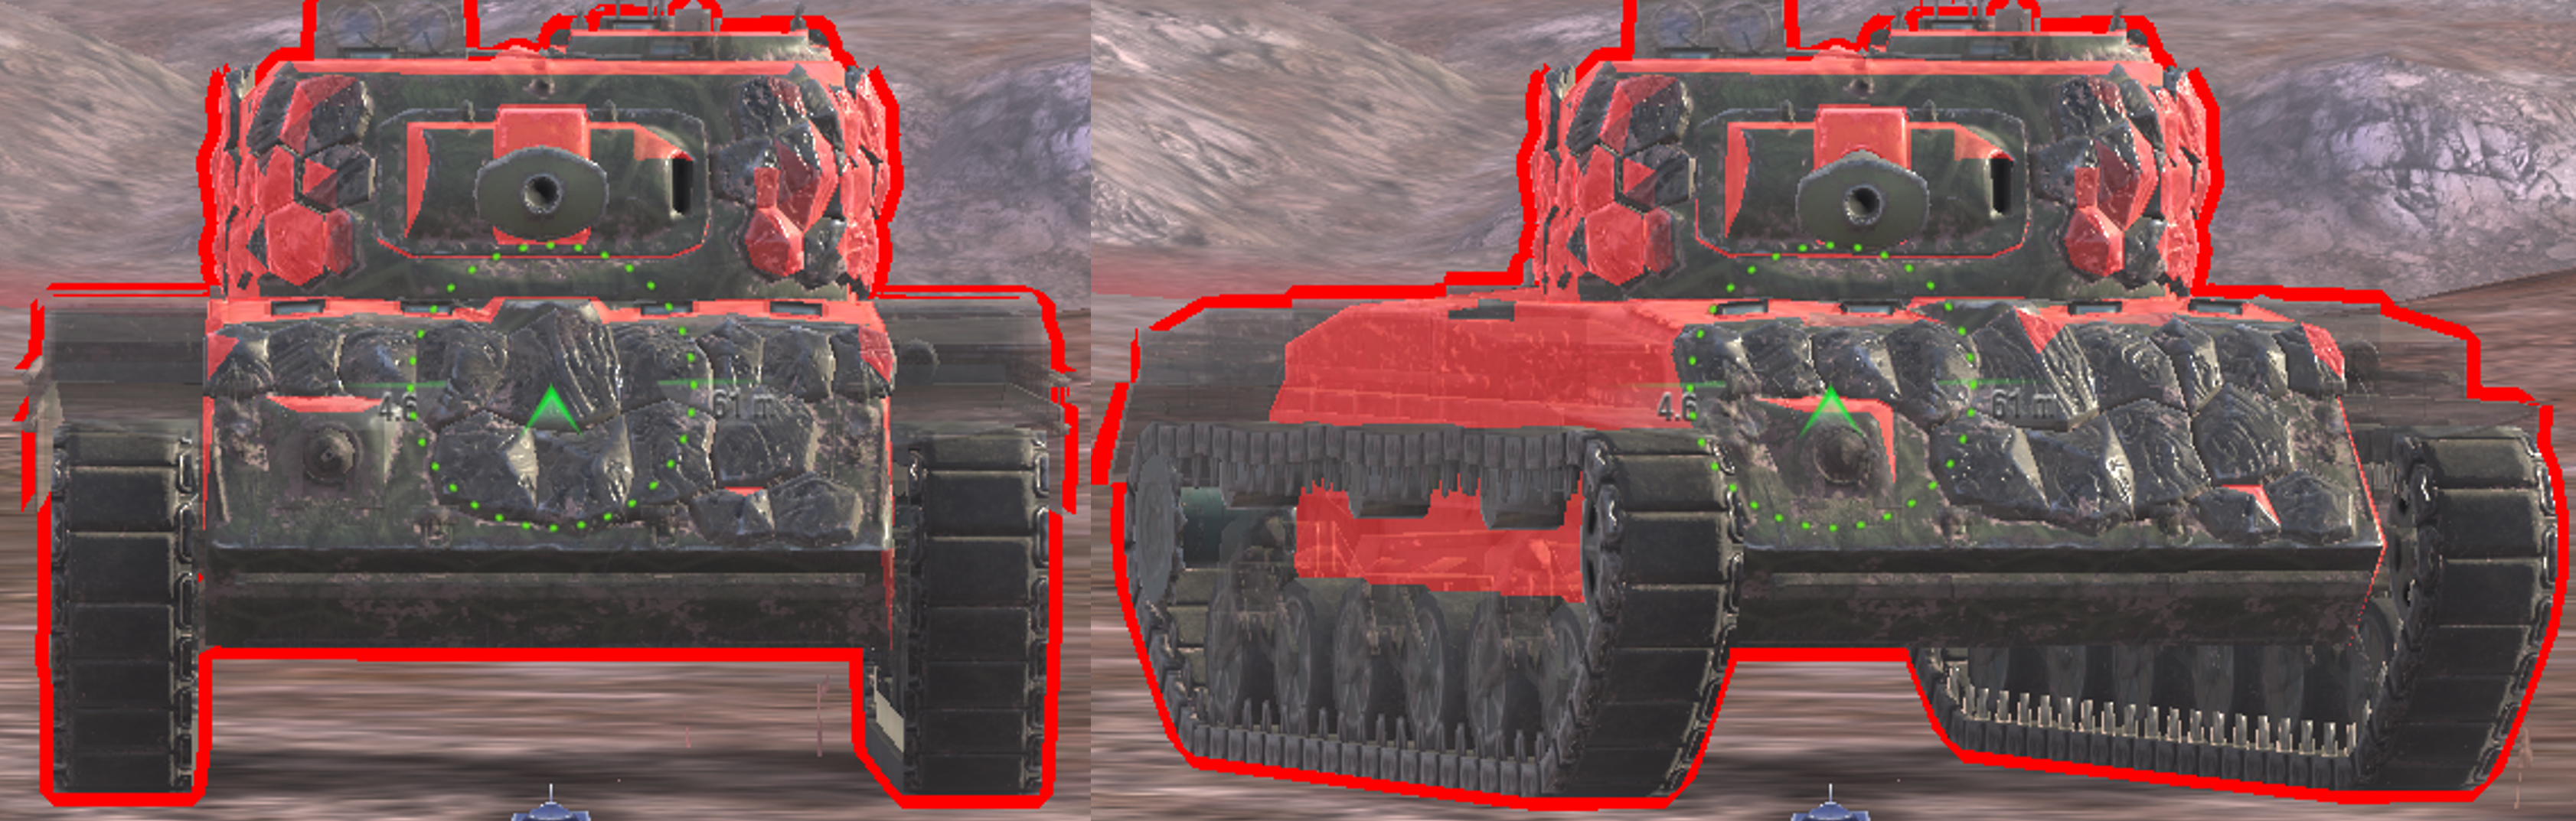
When flat and facing head-on:
Base upper plate 66-91mm
Upper plate + spaced armour 125mm-145mm
Lower plate 115mm
Turret front 135-140mm
Turret edges + spaced armour 175-220mm
Side armour:
The hull sides of this tank are 45mm thick, and are not angled, with no spaced armour protection.
This means they can easily be HE penetrated by most 105mm caliber guns or larger.
vs 145mm AP (top image) 195mm APCR (bottom image)
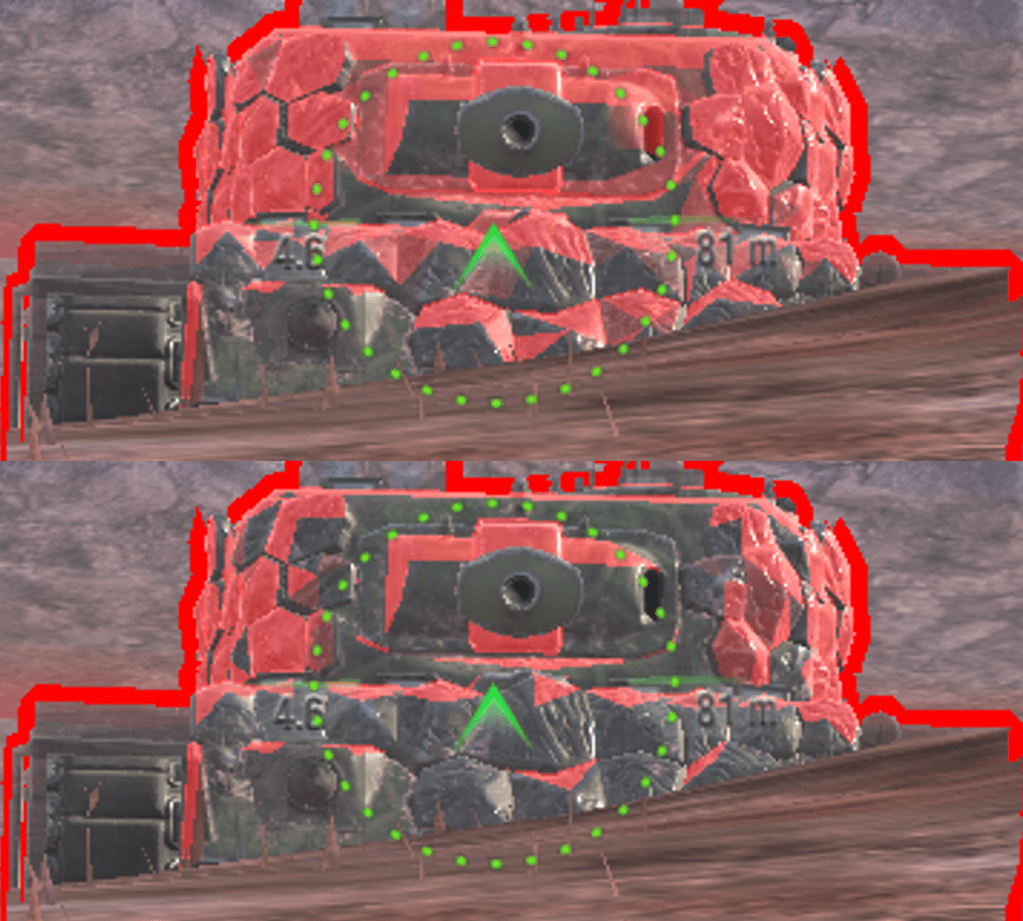
Using -9 gun depression:
Base upper plate 68-108mm
Upper plate + spaced armour 150-170mm
Turret face 155mm
Turret edges 190-230mm
Armour vs tier 6 enemies:
Against tier 6 enemies, the Basilisk actually has some decent armour. The spaced armour areas on the turret will be able to reliably bounce most tier 6 standard ammo, and the spaced areas on the hull can bounce lower penetration tanks (125-135mm penetration).
This spaced armour can make the tank quite troll to penetrate, as you have to properly aim for where there’s no spaced armour. The base armour areas (where the spaced armour doesn’t cover) are weak, and easily penetrable nearly all enemies.
When using full gun depression, the base turret armour will be able to bounce lower penetration tier 6 tanks, however the gun mantlet is a weakpoint.
Armour vs tier 7 enemies:
In tier 7, the armour is much less effective and weaker, but you’ll still be able to bounce a few shots off the spaced armour, its just not very reliable.
When using full gun depression, the turret becomes a bit stronger, but still not enough to be fully reliable against tier 7 enemies.
Armour vs tier 8 enemies:
Against tier 8 enemies, the armour won’t bounce anything, and can easily be penetrated on every area, even by the lowest penetration enemy.
Gun
The Basilisk mounts a 90mm gun in its top configuration.
-Alpha damage is 225 on AP, 190 on APCR, and 270 on HE
-It has an 5.6s reload, giving it 2428 DPM
-Penetration on AP is 154mm, APCR is 218mm, and HE is 40mm.
–Estimated aim time is 3.1/3.4s
–Base aim time is 2.1s, but it can get down to 1.71s.
-Dispersion is 0.344/0.310
–Gun handling is 0.12/0.12/0.1, or 0.1/0.1/0.09 with Vertical Stabilizer.
-Gun depression is -9 degrees
Overall this is a good gun for a tier 7 medium. Its got quite high DPM for a 90mm gun, with good aim time and great gun handling. It also has great penetration for a medium tank, and comfortable gun depression. The only area this tank lacks is the accuracy, 0.344 isn’t great for a 90mm medium.
Mobility
-Top speed is 50km/h forwards, and -20km/h in reverse
-Traverse speed is 62 deg/s on hard terrain, and 52 deg/s on medium terrain.
-In game acceleration rate is shown as 22 hp/t, it has strong 667hp engine for its 30 ton weight.
-Actual acceleration rate is 22 hp/t on hard terrain, and 18.3 hp/t on medium terrain.
–Terrain resistances are 1/1.2/1.5
Overall this is decent mobility for a medium tank. It accelerates fairly quickly with the strong engine power it has, and has a fairly average top speed. Traverse speed isn’t that good, but its also not bad.
Equipment, provisions, & consumables
The Basilisk doesn’t have any special provisions or consumables.
Gun Rammer:
The Basilisk already has great penetration for a tier 7 medium tank, with 218mm on its APCR. This is more than enough to deal with nearly all same tier tanks, and even the majority of higher tier enemies.
Improved Assembly:
The Basilisk doesn’t have great armour, its fairly thin and generally won’t bounce many shots, just like a T20. Enhancing the armour really won’t help this tank at all.
Improved assembly is the better equipment choice, as it lets the tank take more hits in the battle, and is helpful for damage trading. Improved assembly would increase the Basilisk’s HP from 1250 up to 1325.
Vertical Stabilizer/Refined Gun:
The Basilisk already has great gun handling and good aim time, so improving its mediocre dispersion can actually be quite beneficial to the tank. Refined gun would improve the dispersion form 0.344 to 0.310.
Vertical stabilizer also works well on this tank, especially if you aren’t often fighting at range, and don’t sit still for long to aim. It can help to hit snapshots, and make the gun more consistent in mid and lose range with this tank’s active playstyle.
Gameplay advice
The Basilisk is a typical tier 7 90mm medium tank. It has generally weak armour, good mobility, and great gun flexibility. It plays similarly to many other tier 7 tanks with 90mm guns, especially the T20, VK 30.02 (D), P.43 Ter, or Edelweiss.
General gameplay:
Go to the medium tank side of the map, brawl with enemy mediums, use hulldown positions, flank enemies, etc.
When you are top tier, facing only tier 6 and 7 enemies, you can play the tank a bit more actively and on the frontlines. Its armour will be a bit more troll, and your DPM and alpha will be more significant and better for damage trading.
When bottom tier and facing tier 8 enemies, play more carefully. The Basilisk’s armour is essentially useless at this tier, and everything can easily penetrate your armour. Tanks generally also have higher alpha, and similar if not better DPM with that alpha, so you have to be smart with how you trade shots.
Try to use the tank’s good mobility to flank around slow TDs to take them out, or coordinate a push against enemies. With multiple tanks, and the Basilisk’s good DPM and 225 alpha, you can quite quickly take out enemies with good focus fire.
Use gun depression & hulldown positions:
Even when your armour doesn’t work against tier 8 enemies, doing this is still beneficial to your gameplay, as the Basilisk has a small size profile, and when the hull is hidden, enemies will have to aim longer and more carefully at your tank.
Against tier 7 and 6 enemies though, there will be a bit of usable armour, so going hulldown or using gun depression actually helps you to survive and take less damage in battle.
(Not always, note the armour of this tank is troll at best, not reliable or consistent.)
Trading damage against tier 6 tanks:
Tier 6 enemies will generally have less DPM than the Basilisk, so you generally can just DPM the enemy to death, but trading is still better, as it reduces the damage you take from the fight.
If the enemy has 160 alpha or less, then they reload faster then you. Try to avoid these enemies when you aren’t reloaded, and only expose your armour when you can shoot them back.
If the enemy has over 200 alpha (and is not a TD), then they will reload slower than you. You should pressure this enemy, don’t let them retreat, since it will let them reload, and then you lose that advantage of reloading before them.
Push the enemy once they shoot, put 2 shots into them, then try to avoid their shot when they reload (retreat to cover, make them miss, circle around them, get them to shoot another tank, etc), and then repeat by pressuring them again.
Trading damage against tier 8 tanks:
If the enemy has 190-200 alpha (British 20pdr guns), then try to only trade damage when you’re reloaded. Tier 8 tanks have more HP, but if it comes to damage trading, only exposing your tank when you have a shot will maximise this trade, since you deal more damage to the enemy than they deal to you.
If the enemy has 220-240 alpha, try to avoid doing damage trades with them, since you’ll nearly always lose. Tier 8 tanks with 220-240 alpha generally just have a quicker reload than you, and they also have same/better alpha.
If the enemy has more than 240 alpha, then you can try to put in 2 shots for every 1 time they shoot. Generally the tanks with 280+ alpha in tier 8 have a reload longer than 5.6s, which is your reload time. Due to this, you can actually fairly easily put in 2 shots for every one time the enemy shoots.
Overall the playstyle of the Basilisk is similar to the tank its based off, the T20. It just has a little bit more armour with a bit different gun and mobility stats. You should take advantage of the Basilisk’s great DPM in battle, as its a strong point of the tank and can definitely have good use in the super high DPM meta of tier 7.
Overall
Armour – 3/10
Gun – 7/10
Mobility – 7/10
Speed – 5/10
Overall the Basilisk is a decent tank.
Armour is fairly weak overall, but the spaced armour can troll tier 6-7 enemies. HE protection is poor, side armour is fairly thin.
Gun has great DPM & gun handling, good alpha damage, premium penetration, and gun depression. Accuracy is mediocre.
Mobility is good, a engine is strong and has good acceleration rates, traverse speed is decent, and reverse speed is average.
Speed is fairly average at 50km/h.
Is it worth it?
This tank can be earned and upgraded completely for free, just by being fairly active in the game. Is it worth spending the time and effort to do so?
No. This is just a T20 with a tiny bit more armour, but overall a worse gun and mobility profile. Its not a unique tank, nor a unique playstyle, its basically a “remix” of a tech tree tank. Its not that special, and its not a “crazy good tank”, its just a decent vehicle.
The Basilisk is worth 3,000 gold. Its a decent tank with a playstyle that works and is fairly comfortable in tier 7. Its just not a very unique or interesting tank.
Camo cost:

Basilisk has a permanent appearance which can’t be adjusted.
Its shown here in the stock configuration.
Stock grind
As you upgrade modules, the stats of each module improves slightly, improvements are not large, they are very gradual.
This tank starts with a 75mm gun that does 160 damage, this is the same for T2 and T3 versions of the gun, only the T4 gun becomes a 90mm.
If you want to check the stats of each module, you can view the tank in-game, or use gamemodels3d or Blitzstars.
Important:
-Only the top turret improves turret armour, all the stock and intermediate turrets have the same armour.
-Stock and top turrets/guns have the same gun depression.
–Gun handling does upgrade with each track updgrade.
-The hull doesn’t upgrade, the armour is the same throughout.
Gun:
When stock, it starts with low alpha and low DPM. Its penetration is decent, especially on premium ammo. This gun only has around 2000 DPM, which is low for tier 7, especially for 160 alpha. Accuracy is also very poor at 0.362.
Going to the T2 and T3 guns, penetration, accuracy, and DPM all gradually increase.
Turret:
The turret armour is mostly around 155mm thick (shown in images below), but only on the areas covered with spaced armour. This thickness will be somewhat troll against low penetration tier 7 tanks, and pretty decent against tier 6 tanks, but very weak against higher penetration tanks.
Engine:
Engine power, traverse speed, acceleration, are all decent when the tank has equipment and provisions on. It will feel quite slow, as it is stock, but its not to the point where the tank moves like a heavy.
Tracks:
Stock tracks are terrible, as they give the tank much worse gun handling then the top version, and also 1.4 terrain resistance on medium terrain, which significantly slows the mobility of the tank.
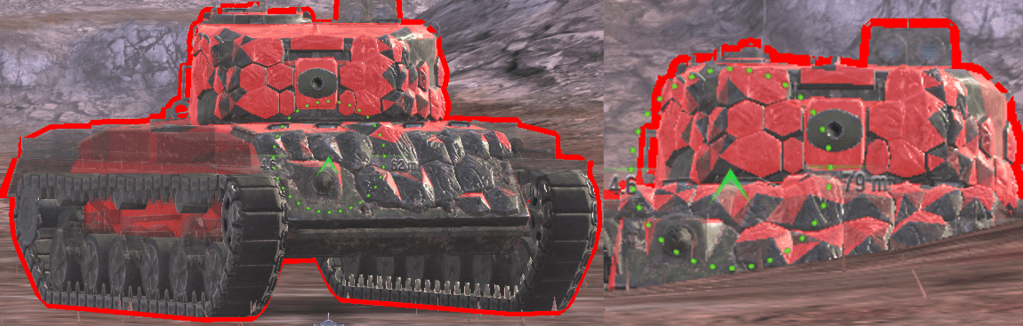
vs 145mm AP
Turret face 120mm
Spaced armour areas 155mm
Note for stock turret:
This armour looks red because its faced against one of the lowest penetration tier 7 mediums, with 145mm AP.
The majority of tier 7 tanks have over 155mm AP penetration, so this turret is only useful against tier 6 tanks, or tier 7 tanks with stock guns.
Upgrading:
As said above, upgrading each module improves it slightly. In total there are 4 of each module on this tank. 1 stock module, 2 intermediary modules, and 1 top module for each turret, gun, engine, and tracks.
Each gun upgrade makes it slightly more accurate, higher penetration, quicker reload.
Each turret upgrade gives better view range, HP, and turn rate.
Each engine upgrade improves traverse speed and acceleration rate.
Each track upgrade improves traverse speed, overall mobility performance, and gun handling.
Eventually you get to the top modules, these are the only modules which change in appearance. The top turret slightly improves in armour, but its not too noticeable, and the top gun increases in alpha damage to 225.
The engines and tracks are also in their best configuration, so also output the best possible mobility for the tank. At this point the tank feels very mobile, compared to the stock versions where its fairly unimpressive.
