
Page last updated 06 August, 2026.

Bisonte C45 is an Italian tier 8 heavy tank. It has a 2 shell auto-reloader, but one of these shells is a reserve shell. It has amazing DPM for 310 alpha, but other than this, it has very average mobility, standard heavy tank armour, and unimpressive gun handling.
- Armour
- Playing against a Bisonte C45
- Gun
- Mobility
- Equipment, provisions, & consumables
- Gameplay advice
- Overall
- Is it worth it?
- Legendary camos:
Armour
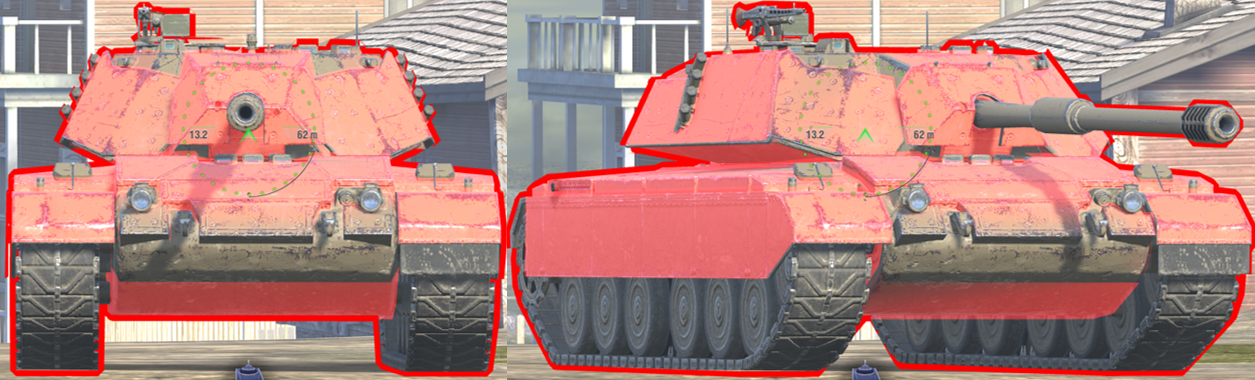
(The Bisonte C45 in the images is using Improved Assembly)
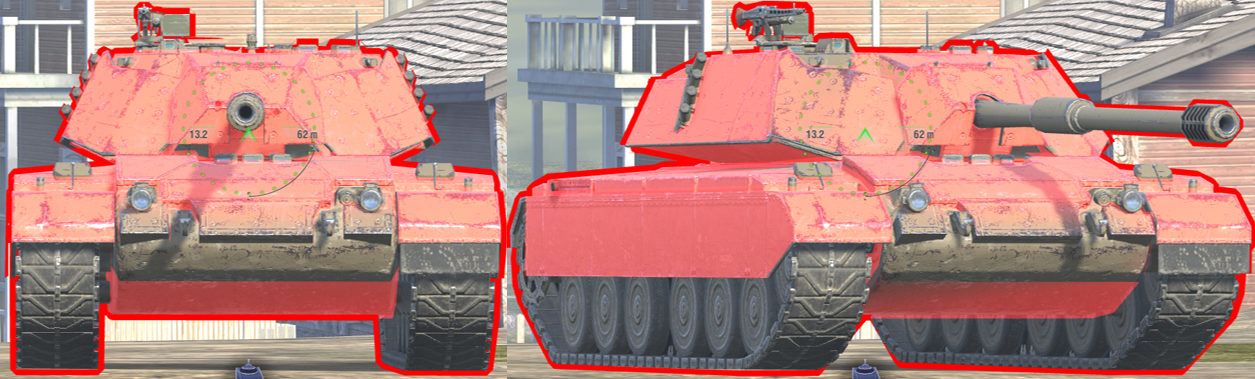
Drag slider Right –> to view 225mm AP
Drag slider <– Left to view 265mm APCR
Flat ground (when facing head-on):
Upper-upper plate 340mm
Lower part of upper plate 195mm
Lower plate 100-125mm
Lower-lower plate 200mm auto-ricochet
Turret cheeks 285mm
Turret weakpoints 255mm

vs 230mm AP (top image), vs 280mm APCR (bottom image)
Using -8 gun depression:
Upper-upper plate 390-540mm
Lower part of upper plate 220mm
Turret face 315mm (weakpoints 280mm)
Side armour:
Side armour is 75mm, with 15mm spaced armour covering every area of the hull side.
Armour performance:
Strong areas:
-The entire turret front is very strong and reliable against most enemies. The turret cheeks can be penetrated by tier 9 HT with premium ammo.
-The top areas of the upper plate and bottom areas of the lower plate are also strong.
Main weakpoints:
-The middle area of the hull front both on the upper and lower plate are quite weak to all enemies.
-The areas on the turret not covered by spaced armour are the weakest points of the turret. They are penetrable to most premium ammo on flat ground.
Playing against a Bisonte C45
Spaced armour:
The Bisonte is covered in spaced armour, having plates on the turret front and sides, and fully covering the hull sides and most of the upper plate.
The plates covering the turret are 20mm thick, the plates on the side armour and upper plate are 15mm thick.
Against AP and APCR shells:
While thin spaced armour hugging the base armour is generally bad (it causes very high shell normalization), it actually works fine on the Bisonte.
This is due to the spaced armour being just thick enough to stop most standard ammo shells from penetrating it.
Against HEAT shells:
Due to the distance from the spaced armour to the base armour being very little, high penetration HEAT rounds will be able to go through the turret face and the lower parts of the upper plate.
Note that HEAT loses a large amount of effective penetration against spaced armour, so even though the Bisonte’s turret armour is “only 248mm”, HEAT shells with 270mm penetration only have a roughly 50% chance of penetration.
(Through testing, 260mm HEAT cannot penetrate the turret spaced armour. 270mm can penetrate roughly 5/10 times. 265mm is somewhat in-between.)
Essentially, don’t fire HEAT at the Bisonte’s turret, unless its very high penetration. If its 265-270mm HEAT, expect to sometimes bounce, sometimes penetrate.
To understand the full mechanics of spaced armour, check this page.
Lower-lower plate:
This armour plate is 55mm in nominal thickness, and angled to the auto-ricochet point.
Note that this plate’s effective thickness is only 145mm, so all HEAT shells will be able to penetrate it (HEAT ignores the 70 degree auto-ricochet angle).
Sidescraping:
Look at the below image, 2 shots of 225mm AP penetration are fired at the tracks of the Bisonte in a sidescraping position.
The first shot hits the 10mm spaced armour which covers the side of the tank, this shot doesn’t penetrate.
The 2nd shot hits just below the spaced armour, and its able to penetrate.

Try to avoid hitting the spaced armour on the side of the tank, since its very effective at stopping shells from penetrating the tank.
Gun
The Bisonte C45 mounts a 105mm auto-reloader with the reserve shell mechanic.
Firepower:
-Ammo: AP/HEAT/HE.
-Penetration: 225/255/53mm.
-Alpha damage: 310/260/420
-Shell 1: 16.30s
-Shell 2: 4.8s (+2.00s)
-Reload time from empty: 21.1s
Best DPM:
-Shell 2
-Reload: 4.80 (+2.00s) = 6.80s
-DPM: 2736
Handling:
–Estimated aim time: 4.0/4.3s
–Base aim time: 2.33s
-Dispersion: 0.344/0.306
–Gun handling: 0.23/0.23/0.15
Usability:
-Shell velocities: 945/940/920 m/s.
-Gun depression is -8 degrees around the entire tank, except the rear where its -5.
Overall:
This gun has very high DPM, combine that with the fact that you can burst out 2 shells of 310 alpha in only 2s in some situations, and its a very powerful trait to have on a gun.
However, other stats of this gun are very unimpressive, with low HEAT penetration, bad gun handling, mediocre aim time, and fairly average dispersion.
Overall its a good gun, as the great firepower balances out the poor handling, and you can deal out damage very quickly with this tank.
Mobility
Raw stats:
-Forward speed is 35km/h.
-Reverse speed is -19km/h.
-Raw acceleration rate is 14.3 hp/t.
-Engine power is 882hp for its 62 ton weight.
–Terrain resistances are 1/1.3/1.9
Hard terrain mobility:
-Actual acceleration is 14.3 hp/t.
-Traverse speed is 38.4 deg/s.
Medium terrain mobility:
-Actual acceleration is 11.0 hp/t.
-Traverse speed is 29.5 deg/s.
Overall this is very mediocre mobility for a heavy tank. None of the stats are bad, but none stand out enough to really make the mobility of this tank feel impressive.
The top speed is average, but reverse speed is good. Traverse speed and acceleration on hard terrain are both very good, on medium terrain they are both average.
Ground resistances are good for a heavy tank, but the difference (1 to 1.3) causes a noticeable difference when going off-road in this tank.
Equipment, provisions, & consumables
Bisonte C45 has no special provisions/consumables.
Calibrated Shells:
Calibtrated shells are completely necessary on the Bisonte. This tank has good standard penetration, but its 255mm premium HEAT penetration isn’t adequate in tier 8, especially when this tank sacrifices gun handling to gain DPM.
Calibrated shells can be used on this tank without much penalty to the DPM, as the Bisonte can’t use a gun rammer.
Calibrated shells will improve the penetration of all shells, taking AP from 225 up to 238mm, HEAT from 255 to 273mm, and HE from 53 to 57mm.
Improved Assembly/Enhanced Armour:
Either equipment piece can work well on the Bisonte, both give a fairly significant benefit to the tank.
Enhanced armour would increase the effective turret armour by roughly 8mm, making it harder for APCR with 250-258mm penetration to go through.
It would also strengthen the hull side armour from 85mm in total, 88.5mm in total. This makes it more troll against lower penetration guns in tier 8, and most tier 7 enemies.
Enhanced armour doesn’t help the hull front much, but it definitely does make the turret more challenging to penetrate, especially when using gun depression.
Improved assembly is also a viable choice, and would increase this tank’s decent 1750 base HP, up to 1838 HP. This will allow the tank to take more hits in battle and survive longer when it armour gets penetrated.
Vertical Stabilizer:
Vertical stabilizer is essential on the Bisonte due to the tank having very poor gun handling. While the dispersion isn’t impressive, its also not bad for a 105mm gun, and its perfectly usable, therefore there’s no reason to use refined gun.
Use vertical stabilizer, since it will help the tank’s accuracy when its moving, and make it more accurate after the tank has stopped moving and is aiming in.
Due to the long estimated aim time, the Bisonte often won’t have time to get fully aimed in, so the vertical stabilizer is more useful to the tank’s plasytyle.
Gameplay advice
The Bisonte’s gameplay is nearly identical to tech tree 105mm heavy tanks, as it has many of the same features. Tanks like the Ju-To, Chi-Se, AMX M4 45, Tiger II, 45TP, T-32, TNH 105/1000, etc, all have very similar playstyles.
Keep in mind that you should always be playing the Bisonte as a cyclic gun heavy tank. It has a 6.8s reload, 310 alpha, and 2.7k DPM. The reserve shell is very rarely used, and generally the tank plays a lot more like the tanks mentioned above.
General gameplay:
The Bisonte C45 just plays a very regular and generic heavy tank role. It has the characteristics of similar standard heavies such as the TNH 105/1000, Tiger II, Chi-Se, T32, etc.
The mobility is average, its well armoured, and its got a 310 alpha gun.
Play it similarly to these other standard heavy tanks, go to the HT side of the map, use hulldown and gun depression positions, and brawl with enemy heavies.
It doesn’t really have any special gameplay other than the occasions where it uses the reserve shell, which is explained below.
Using the Reserve shell:
In most situations, shooting the reserve shell will just cripple your tank and make it very hard to deal with enemies.
The Bisonte’s great DPM comes from keeping 2 shells in the magazine at all times, so you have to really consider if using the reserve shell is worth it, as it destroys your damage output.
When to use the reserve shell:
The most important thing to note with this reserve shell is that it reloads much faster than most other tanks with this same mechanic.
The Bisonte’s reserve shell reload is about 16s, while all other tanks with a reserve shell have 20-22s reloads. This is a very significant difference gameplay wise, as unlike those other tank, the Bisonte’s reserve shell is actually usable in a few situations.
Use it at the end of an engagement, such as if you need to finish off a tank, and there are no other enemies in close proximity to you (ie, you won’t need to shoot again in the next ~20 seconds).
Use it for game-winning shots or kills, such as if you can take a kill shot on an enemy in a close battle where either team could still win the game.
Use it to save your tank, such as if an enemy tank is on 600 HP, but you are a one-shot to them, use it to kill them before they kill you. This is always worth doing, since if you die, you can’t influence the outcome of the game.
Use it at the end of the battle:
Like with other reserve shell tanks, shoot the reserve shell if the battle is ending and you don’t think you’ll be able to get in another shot before the battle is over.
Sidescrape:
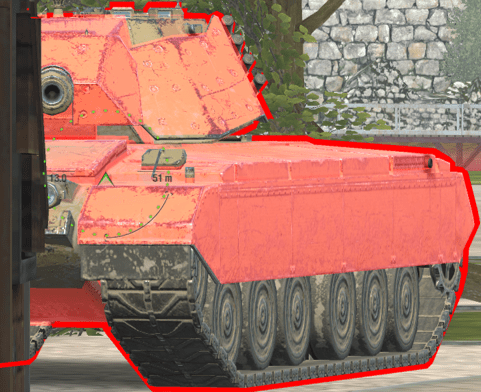
As shown here, this tank actually can sidescrape pretty well.
The Bisonte C45 has decent side armour of 75mm, and 20mm tracks. The whole side is also covered by 15mm of spaced armour, which does help the tank as its quite distanced from the base hull side armour.
Be aware of the weak frontal plates, as the enemies will be able to shoot here when you reverse out to take a shot.
The track wheel is also penetrable when you reverse out, but the spaced armour above it does cause enemies to bounce.
Note that these 2 weakpoints are hidden when you pull forward into cover. The rest of the side armour isn’t penetrable when these areas are hidden by a building. Try to only reverse out when you’re reloaded, this way these weakpoints are exposed only for a very shot length of time.
(The turret cheeks are also penetrable to premium ammunition.)
Overall
Bisonte C45 is overall a good tank.
| Rating 1-10 | Reason | |
| Armour | 6.5 | Strong sidescrape/hulldown |
| HP | 4.5 | 1750, lower average for tier 8. |
| Firepower | 8 | Very high DPM & good alpha |
| Gun Consistency | 4.5 | Mediocre accuracy/handling |
| Mobility | 5 | Average HT dynamics |
| Speed | 5 | 35km/h, average for tier 8 HT. |
Is it worth it?
The Bisonte C45 is worth getting if you’re looking for a heavy tank with reliable armour and high firepower. It has great DPM and its armour is very solid whenever hiding the lower plate or sidescraping, making it a great general heavy tank and brawler.
Its worth noting that the gun isn’t too accurate or consistent, and does need to take its time to aim in shots.
The Bisonte C45 is worth 8,000 gold. This tank is great at what it does, performing well in brawls and heavy tank trades. The reserve shell is a nice additional mechanic to occasionally boost the firepower in select situations.
Legendary camos:
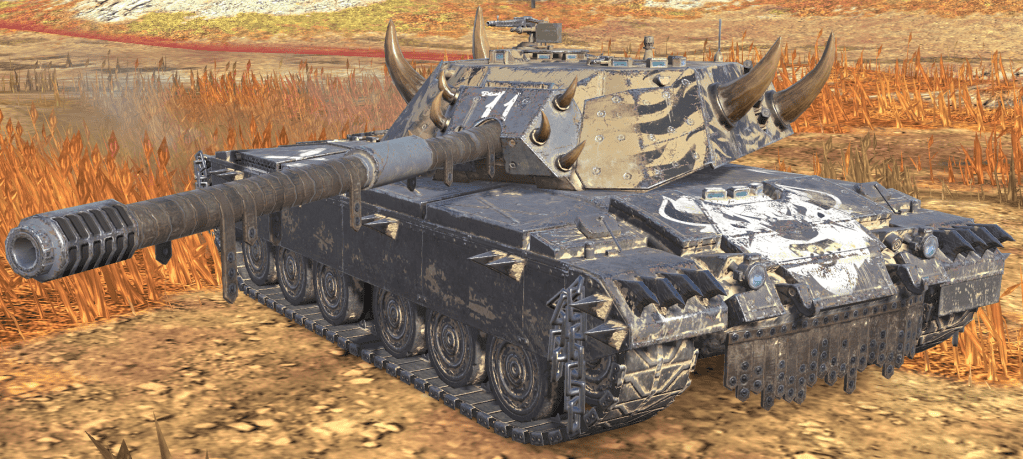
“Unbreakable” camo: 3D, costs 1,450 gold

