
BZ-75 is one of the top tier Chinese heavy tanks. Its an all-rounder tank, featuring solid armour, good gun depression, and good speed & mobility. It can mount either a reliable and consistent 130mm gun, or a 152mm “derp” with premium HE shells.
Click the table of contents below to access the section you want:
- Armour
- Overall armour performance
- Gun
- Mobility
- Equipment & provision loadout
- Gameplay advice
- Tank gameplay:
- Overall
- Is it worth grinding?
- Camo cost:
- Tech tree overview
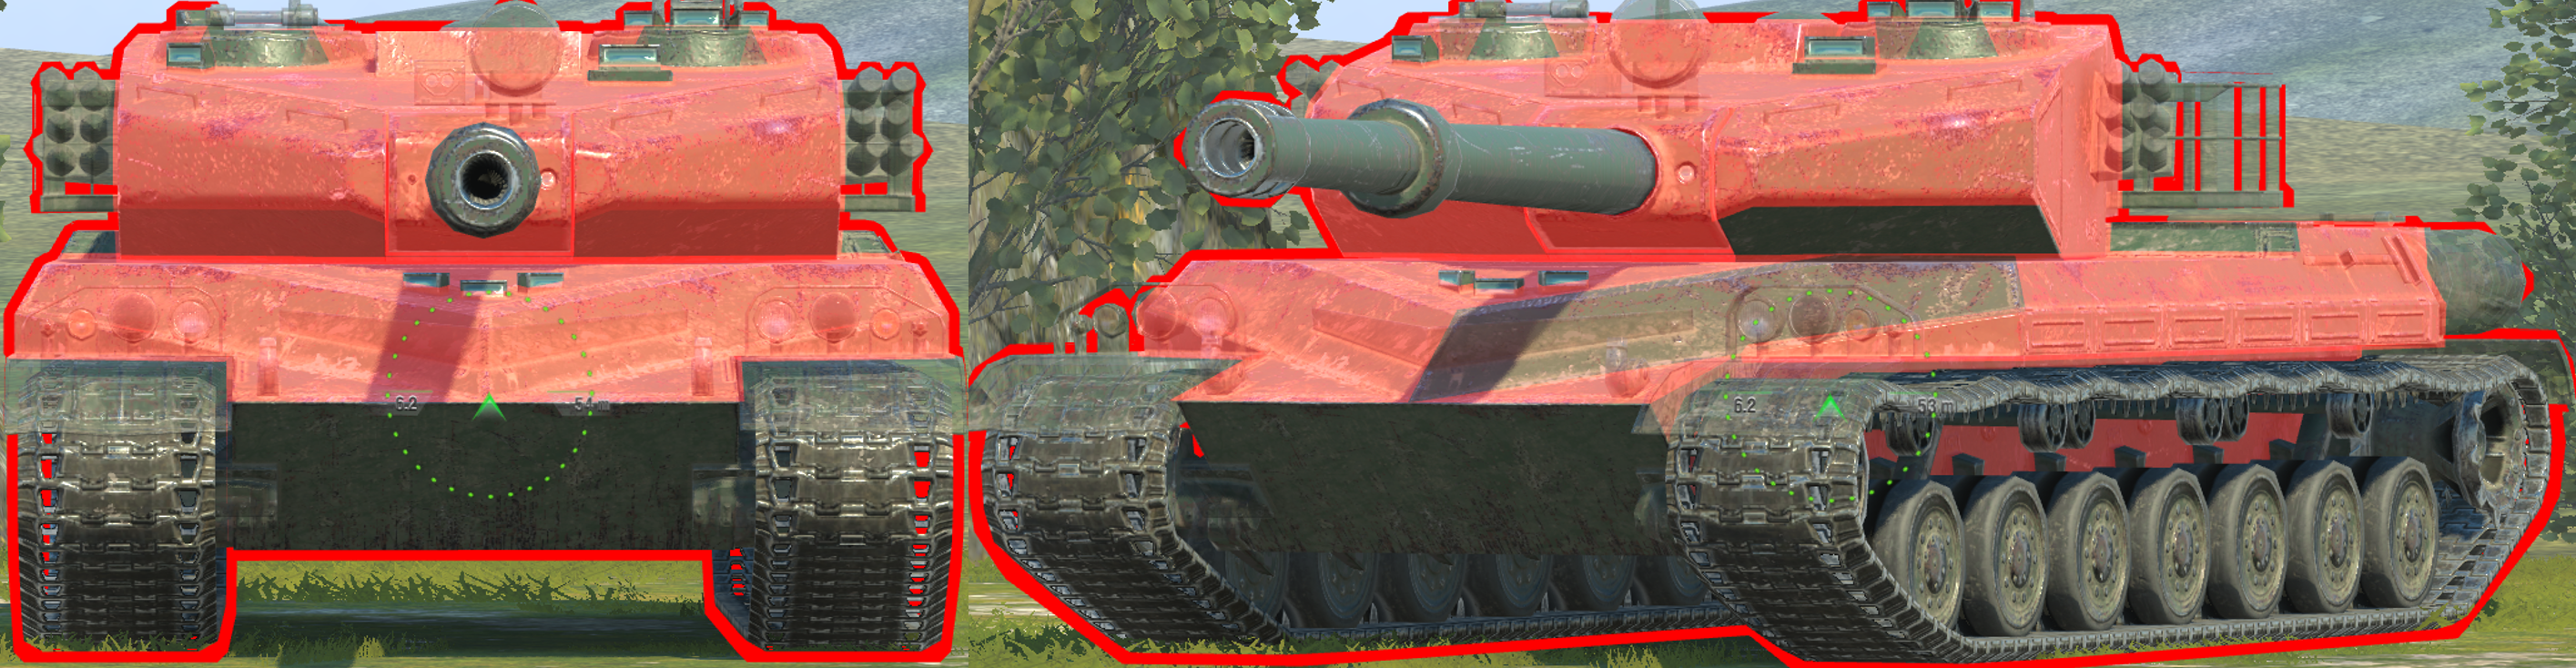
Armour
(The BZ-75 in the images is using Enhanced Armour)
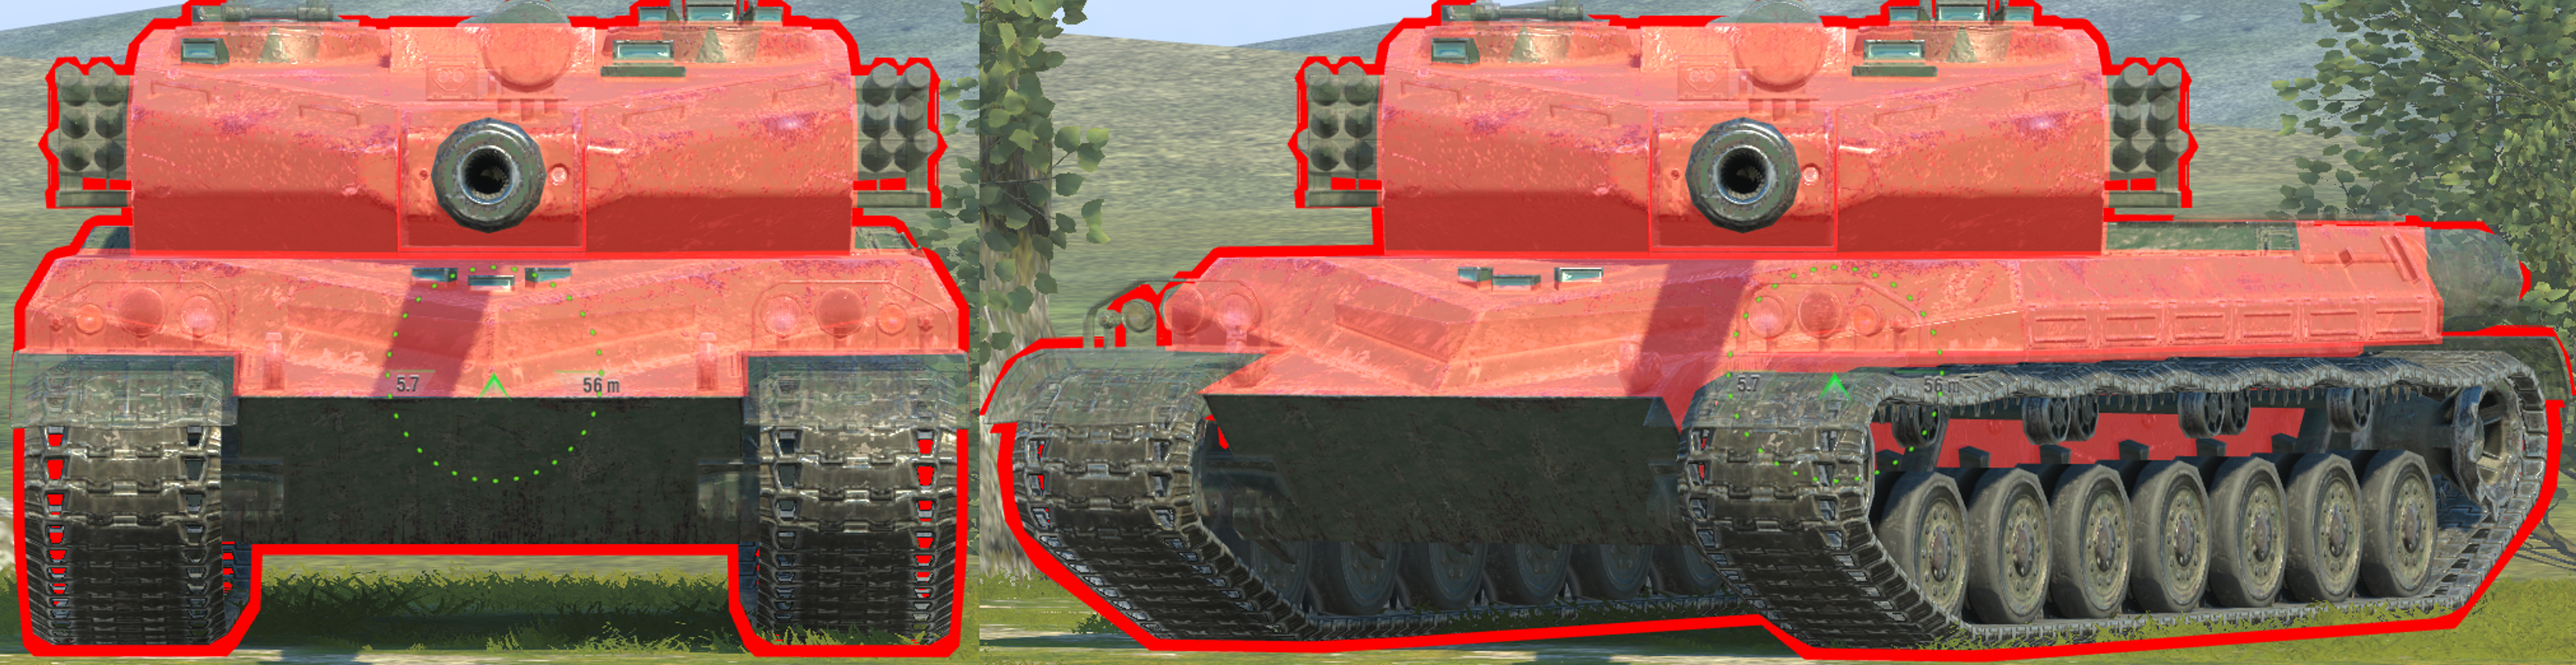

Drag slider right -> to view 245mm AP
Drag slider <- left to view 300mm HEAT
This penetration level represents a tier 10 medium tank.
vs 245mm AP (top image), 300mm HEAT (bottom image)
Using -8 gun depression:
Upper plate 400mm
Upper plate lower edges 370mm auto-ricochet
Turret cheeks 335-340mm
Turret cheek weakpoints 245mm
Cupolas 260mm (420mm on edges)
Box between cupolas 310mm


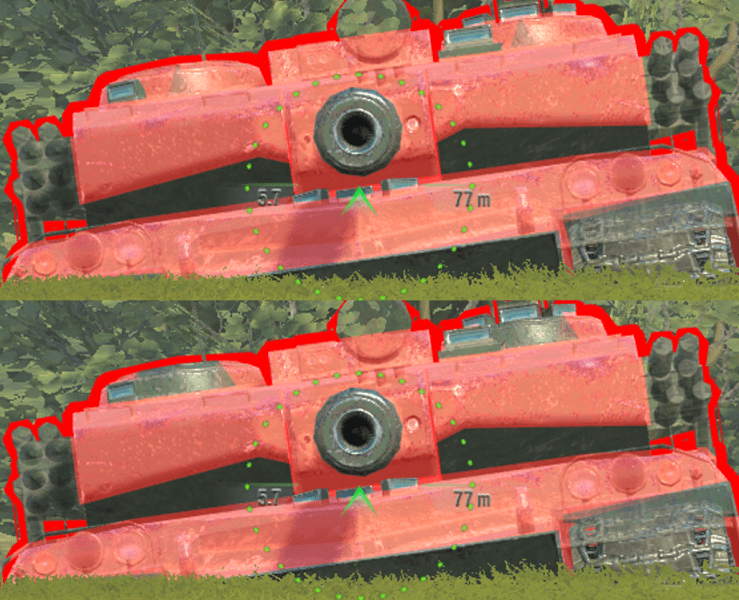
Drag slider right -> to view 257mm AP
Drag slider <- left to view 330mm HEAT
This penetration level represents a tier 10 heavy tank.
Armour on flat ground when not angled:
Upper plate 315-330mm
Upper plate lower edges 370mm auto-ricochet
Lower plate 205-212mm
Turret cheeks 330mm
Cupolas 230mm (370mm on edges)
Box between cupolas 275mm
Notes about armour:
-The hull is a pike nose, so angling it decreases its effective thickness.
-The turret also behaves like a pike nose, turning it away from the enemy makes one side of the turret cheek weaker, while the other side gets stronger.
-The angled parts below the turret cheeks are only 120mm thick, so are easily penetrated when the turret is turned. They are also not an auto-ricochet angle, so aren’t a shot-catch.
Side armour:
Side armour is 150mm above the tracks, and 120mm behind the tracks. The tracks are 20mm thick, and there’s a 20mm spaced armour box (counts as 20mm+20mm) just above the tracks, under the 150mm part.
This is very good side armour, since its all flat with no odd angles, and is a good thickness. The spaced armour box doesn’t have angled armour behind it (unlike on a WZ-111 5A for example), but still provides a bit of extra protection due to its decent thickness and distance to base armour.
This armour can be sidescraped, but does still have weakpoints, such as the rear engine deck that sticks up, or the front pike nose when you reverse out.
vs 257mm AP (top image), 330mm HEAT (bottom image)
Using -8 gun depression:
Upper plate 400mm
Upper plate lower edges 370mm auto-ricochet
Turret cheeks 335-340mm
Turret cheek weakpoints 245mm
Cupolas 260mm (420mm on edges)
Box between cupolas 310mm
Armour vs both tier 9 & 10 tanks:
Against both tier 9 and 10 tanks, the BZ-75 has fairly similar armour performance.
Turret face is strong on flat ground, and fully impenetrable up to around 330mm (around 320-325mm if APCR). This means that all standard ammo will bounce off, and only heavy tanks with good premium penetration can reliably penetrate the turret face.
(If you use enhanced armour, enemies will need around 340mm of penetration to penetrate the turret front).
Cupolas are quite strong against medium & light tanks, but heavies can reliably penetrate them on flat ground. If using gun depression, the cupolas become harder to penetrate for most tanks, but some can still cut through with standard ammo (again, if using enhanced armour, the cupolas become very red even to 257mm AP, as shown in the images above).
Turret lower weakpoints on the lower half of the turret to each side of the gun are about the same thickness as the turret cheeks themselves, but only when on flat ground. If you use gun depression, these 2 weakpoints are very easy for any enemy to penetrate.

You can mitigate these weakpoints by exposing as little of your turret as possible when taking a shot.
Upper plates are both very strong when not angled, however they are a pike-nose, meaning that when you angle the hull, one side gets weaker.
(However, similar to a WZ-111 5A, there are some troll auto-ricochet areas around the upper plate.)
The upper plates also require about 330mm of penetration to go through, at the optimal angle (so when they aren’t angled at all. Enhanced armour will improve the thickness by around 13-14mm of effective armour.
Lower plate is a weakpoint that any tank in tiers 9-10 can penetrate, even if its angled.
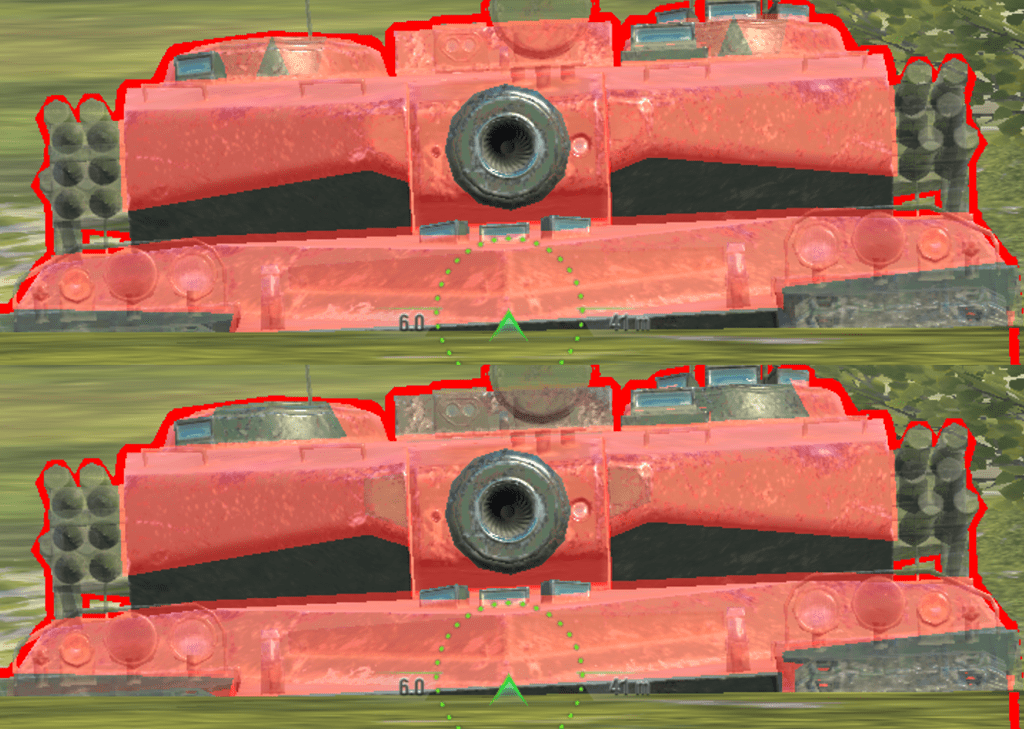
Overall armour performance
Its easy to misjudge this tank’s armour, due to its 8 frontal weakpoints, and pike nose armour layout. However there are some caveats which make this armour actually better than many players make it out to be.
Overall armour performance:
If not angling the hull, both sides of the upper plates are quite strong, especially if you use enhanced armour. There are weakpoints only when you turn the hull or get in a facehug, but general performance is good outside of those scenarios.
The upper plate is effective up to around 320mm in its default state, or around 332mm if using enhanced armour.
The turret is strong on flat ground. It has 5 weakpoints in total, but only the the 2 round cupolas are penetrable to standard ammo (if using enhanced armour, then the 2 cupolas are even troll to some standard ammo, and the 2 weakpoints on the lower turret will resist up to 330-335mm HEAT). The flat box in the middle of the 2 cupolas is only weak to HEAT (around 280mm
If using gun depression, the 2 cupolas weakpoints on the turret top are harder to penetrate for standard ammo, but the 2 weakpoints on the bottom of the turret become penetrable to all ammo. While this may seem “bad”, they are quite small weakpoints which you can hide behind a ridge after shooting (explained more below).
The box between the cupolas is 306mm, meaning low penetration tanks can’t penetrate this with premium ammo (increases to around 320mm with enhanced armour).
The lower turret weakpoints:
These are the weakest part of the turret when using gun depression, as they are penetrable to all tier 9-10 standard ammo, and reduce in effectiveness when the tank uses gun depression.
These weakpoints aren’t as bad as they seem.
For one, they are not huge weakpoints, especially with the BZ-75 being the smallest tier 10 heavy tank. Enemies will have to aim for them, and can’t just easily snapshot (unless in a close range).
Secondly, these are only weak when using gun depression. On flat ground they are actually decently strong, around 328-332mm (or around 340mm with enhanced armour).
Finally, these are the first things to “disappear” when you reverse into cover on a ridge line. Basically, if you expose the tank to shoot, enemies only see these weakpoints for a split second. Once you shoot and then reverse back, these weakpoints disappear first since they are mounted low on the turret.
This can mean that if enemies were aiming for this, they either have to switch to trying to aim for your cupolas (higher on the turret), or try to hit those weakpoints as you reverse (which is a shrinking target, and increases the chances they hit the stronger mid turret area).
Tank size:
The BZ-75 is the smallest tier 10 heavy tank, its as low profile as an Obj.777 II, but even shorter in length.
This small size amplifies the difficulty of hitting weakpoints, especially at distance or if the tank is using terrain.
Enhanced Armour:
Enhanced armour makes a HUGE difference to the turret front, upper plates, and even all turret weakpoints on this tank.
In the image below, its faced against 330mm HEAT penetration, a fairly common premium ammo round for tier 10 heavies (though on the higher end, fewer heavies have more than 330mm, majority have less).
Its recommended to use this equipment if you want to use the armour in battle; however if you want to play the tank without relying on or using armour so much, then increase HP instead.
Pike nose:
Due to the armour not being a single angled plate (like the tier 9 BZ-68 is), and instead being a pike nose, one side becomes much weaker when you turn the hull. This pike nose is similar to the WZ-111, WZ-111 1-4, WZ-111 5A, just better armoured.
The armour is strongest when not angled at all, so when facing enemies, you want to point the hull directly forwards, facing their gun. If you turn, the closest upper plate becomes immediately weaker.
(As an enemy aiming for a BZ-75, if the upper plate is turned, still make sure to aim properly. The small size of this tank means its easier to miss if you don’t aim properly, especially as this is a Chinese pike nose, so it has some troll autobounce zones at the top and bottom of each side of the upper plate.)
Gun
BZ-75 mounts two guns, a 130mm with regular shells, or a 152mm gun with premium HE shells.
130mm gun:
-Alpha damage is 460 on AP, 390 on HEAT, and 600 on HE.
-Reload time is 10.4s, giving the tank 2643 DPM.
-Penetration is 260mm on AP, 325mm on HEAT, and 73mm on HE.
–Estimated aim time is 3.2/3.4s
–Base aim time is 2s, but it can get down to 1.63s.
-Dispersion is 0.344/0.310
–Gun Handling is 0.2/0.2/0.08, or 0.17/0.17/0.07 with Vertical Stabilizer.
-Gun depression is -8 degrees.
The 130mm gun is overall good. It has decent accuracy, fairly average gun handling, but very good aim time. Standard penetration is high, with good HE, premium penetration is fairly average. DPM, reload, and alpha damage are a comfortable combination, especially with the penetration, aim time, and gun depression of this gun.
152mm gun:
-Alpha damage is 620 on AP, 780 on premium HE, and 920 on HE.
-Reload time is 16.1s, giving the tank 2313 DPM on AP, or 2910 DPM on premium HE.
-Penetration is 250mm on AP, 180mm on premium HE, and 65mm on HE.
–Estimated aim time is 4.0/4.4s
–Base aim time is 2.51s, but it can get down to 2.05s.
-Dispersion is 0.380/0.342
–Gun Handling is 0.2/0.2/0.12, or 0.17/0.17/0.1 with Vertical Stabilizer.
-Gun depression is -8 degrees.
With calibrated shells:
-Reload time is 17.3s, giving the tank 2151 DPM on AP, or 2707 DPM on premium HE.
-Penetration is 263mm on AP, 198mm on premium HE, and 72mm on HE.
For a “derp” gun, its overall a great gun. Its got great aim time & gun handling for its alpha, with amazing flexibility of -8 gun depression (amplified by it being the smallest tier 10 HT, and having a frontally mounted turret). It also has great ammo choice, with premium HE for dealing high damage to side armour and lower plates, but a consistent AP shell for overmatching and going through spaced armour.
The only real downsides of this gun are the lack of a high penetration premium round, and low DPM when the gun has to use AP.
Note that this gun shouldn’t be taken at face value. Its strengths are shown through other aspects of the tank which you can’t see on stats.
(Note that “great” in this sense, is compared to derp gun standards. Derp guns aren’t meant to be effective or consistent in battle, and generally have much worse ammo choice, accuracy, or gun handling for their respective tiers.)
152mm gun caveats:
This gun has a very poor reload, terrible overall penetration (highest possible penetration being 263mm AP), and the same dispersion as an E 100. On paper and based on stats, this gun looks really unimpressive.
However what you can’t see on stats is the flexibility of the tank, and this aspect is what allows the gun to work well despite these “bad” stats.
BZ-75 is faster, has better acceleration, has much lower profile, a more frontally mounted turret, and better gun depression than any heavy with 600+alpha damage. Additionally, BZ-75 has by far the strongest combination of good aim time & gun handling, to allow it to hit shots more effectively than other 600+ alpha heavy tanks.
Basically this tank can set up its shots really well due to that better aim time, gun handling, and gun depression; and the mobility lets it be more flexible with how it plays and uses that gun. AP must also not be ignored.
On a derp gun, AP is an underrated shell type, since it can overmatch enemy armour, penetrate modules, and penetrate spaced armour. This means that even if you can’t penetrate your premium HE, you have a shell with deals 620 damage reliably against even spaced armour. AP is a luxury for any gun with premium HE shells, and its ease of use and flexibility against armour types cannot be understated on this tank.
Mobility
-Top speed is 40km/h, reverse is -15km/h.
-Traverse speed is 36 deg/s on hard terrain, and 30 deg/s on medium terrain.
-In game acceleration rate is shown as 14.6 hp/t, it has a fairly strong 848 horsepower engine for its 58 ton weight.
-Actual acceleration rate is 14.6 hp/t on hard terrain, and 12.2 hp/t on medium terrain.
–Ground resistances are 1/1.2/1.6
Overall this is a good mobility profile, the tank has a good top forward and reverse speed, with great terrain resistances. Acceleration rate and traverse speeds are both good on hard and medium terrain. This level of mobility isn’t heavium-like, but its very good for a more standard heavy with solid armour like the BZ has.
Equipment & provision loadout
Gun choice:
Try both guns and take the one you prefer. Some players may want the more effective and consistent 130mm, but other players may enjoy the niche and unique feel of the 152mm derp gun.
The 130mm gun is more consistent with its damage output, being more accurate with more sustainable DPM, consistent penetration on all 3 shells, and a comfortable level of alpha. This is the better gun for general performance.
The 152mm is far less consistent, its alpha damage is much higher at the cost of worse accuracy, overall penetration on all 3 shells, and a much longer reload which is harder to use. This gun has a far more niche playstyle due to such unusual statistics for a tier 10 heavy.
Gun Rammer:
Use this for the 130mm gun. There isn’t much point to use calibrated shells with this gun, as it has already great penetration on standard ammo, and rarely struggles with it. Great aim time also allows this gun to be quite precise.
If after playing a few battles with this gun using gun rammer, you really feel that it needs more penetration, then use calibrated shells; but there’s no point to do that immediately without actually verifying that the extra penetration is indeed required.
Gun rammer would improve the reload time from 11.2s down to 10.4s, and the DPM from 2458 to 2643.
Calibrated shells:
Use this for the 152mm derp gun. calibrated shells are completely mandatory when using this gun, since this gun isn’t about DPM or reloading quickly, its about delivering that high impact single shot of damage. To deliver that shot with higher effectiveness, calibrated shells is needed; the quicker reload and better DPM aren’t needed at all, since the gameplay with this gun isn’t based on brawls or DPM fighting.
Calibrated shells would increase the penetration from 250mm to 263mm on AP, from 180mm to 198mm on premium HE, and from 65mm to 72mm on standard HE.
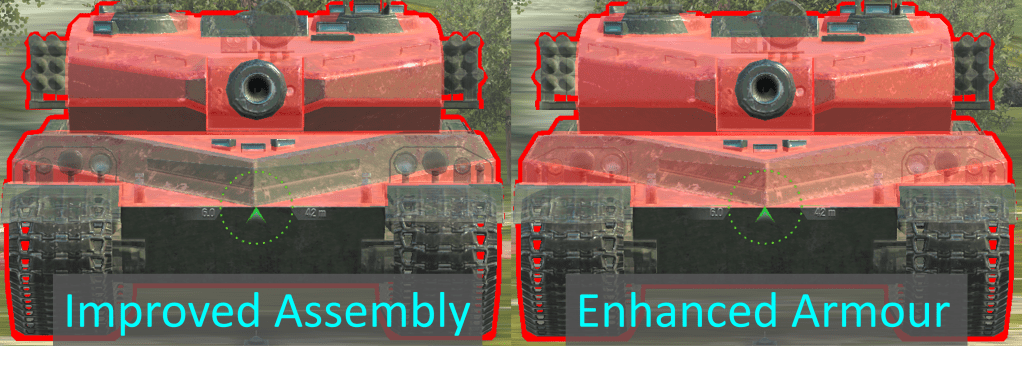
Enhanced Armour:
Either improved assembly or enhanced armour can work well on the BZ-75, however enhanced armour is recommended, as it makes a very noticeable difference to the armour of the tank; and even if you bounce only 1 extra shot of damage from any enemy, its worth more than the HP of improved assembly.
Improved assembly adds 150 HP, increasing the BZ-75’s HP from 2500 to 2650, a very good amount for a tier 10 HT.
Enhanced armour would improve:
-Lower plate from 190mm to 213mm effective.
-Upper plates from 315-330mm to 328-344mm.
-Turret cheeks from 330mm up to 341mm.
(Both the turret cheek and upper plate armour decrease when turned due to how they are shaped)
Drag slider right -> to view Improved Assembly
Drag slider <- left to view Enhanced Armour
Drag slider right -> to view Improved Assembly
Drag slider <- left to view Enhanced Armour
Note the difference that enhanced armour makes against 330mm HEAT penetration (fairly average tier 10 HT premium penetration).
While there are still weakpoints, it forces enemies to aim at them, rather than just going through the upper plate or turret cheeks.
Improved Assembly:
If you feel that the armour just doesn’t work for you, and you want to play the tank as though it has no armour, then use improved assembly. This would increase the good base HP of the tank, from 2500 up to 2650.
Note that for this equipment, you need to play the tank with a different mindset. Don’t be expecting bounces, or rely on the armour.
If you want to actually utilize the tank’s armour in battle, then there is no point using improved assembly, since enhanced armour adds so much (especially against the 325-335mm level of penetration, which is some of the most common tier 10 premium penetration).
If you use improved assembly, then play the tank as an HP tank, not an armour-reliant one.
Vertical Stabilizer:
The BZ-75 has fairly average dispersion on both of its guns, its not bad but its also not the best. On the 130mm its 0.344, on the 152mm its 0.380.
Due to the good aim time of both of these guns, their dispersion isn’t as much of an issue as it might seem on paper. BZ-75 is also a heavy tank, its not sniping at long range, and is generally in a closer quarters environment. For such gameplay, its better to use vertical stabilizer, which improves the gun’s accuracy in closer range fights and when you don’t have time to fully aim every shot.
Gameplay advice
With the 130mm gun, the BZ plays similarly to the Vz.55, or like the old WZ-111 5A (back when it had 460 alpha, 2.6k DPM, 0.353 dispersion, and better armour).
With the 152mm gun, it has very odd gameplay, which poses a learning curve for many players. You can’t play it like a “heavy tank”, since its not about brawling, bouncing shots, or going hulldown. With this gun, the only purpose of the tank’s armour, mobility, and gun depression, are to get the gun into a position where it can be used. Hence it is a support tank, and requires team support, rather than relying on its own capabilities.
130mm gun gameplay:
With this gun, the BZ-75 is more of a regular heavy tank. While it has many weakpoints (3 on the turret top, 2 on the turret bottom, pike nose hull, and lower plate), its overall armour is still solid.
The cupolas are fairly strong to lower penetration rounds, and the upper plate and turret bottom weakpoints are only weak to premium ammo or when turned. This means that in general gameplay, the majority of the BZ’s armour will still hold up well, allowing you to play an effective role as a brawling/hulldown heavy on the heavy flank (given that you use enhanced armour. Improved assembly has to be a bit more careful with armour use.)
152mm gun gameplay:
This gun poses a big learning curve for many players, since when you use this gun, the BZ-75 plays like no other heavy tank in game.
Don’t get caught out by thinking “this is a heavy tank”, while that’s technically true, you don’t play like a heavy tank. The 152mm gun relies very heavily on team support due to its long reload of 17.3s, and its poor penetration against heavily armoured plates. You must always have teammates around you who can help you deal with targets while you reload, or in case you bounce/have to splash HE.
Don’t take this to the heavy tank frontline. Take it to the 2nd line, on the frontline there is too much reload pressure for the BZ to effectively stack up its damage well. You also often aren’t able to choose what target you shoot (ie, there’s an enemy in front of you, you shoot them or else they will take advantage of your reload).
On the 2nd line, you have more control over the situation. Since you aren’t right at the front, its harder for enemies to quickly push you or overrun your position. The frontline tanks are blocking enemies from doing that. If the frontline falls, you have warning and a bit of time to run away; alternatively, if the frontline pushes forward or needs support, the 2nd line position is close enough that you can push up and support them.
Try to avoid brawls at all costs. Heavy tank brawls will end badly for the BZ-75, since its only shell with reliable penetration is its AP, with 620 damage. This has a 17.3s reload, meaning if you mess up a shot on the enemies, they have a long time to put damage into you. Brawls are also close range fights, you can’t really run away, and the BZ-75’s armour is weak in close ranges. Other than this, the BZ-75 has the lowest DPM AP shell of any tier 10 heavy tank, making it basically impossible to win in a close range fight (which is what brawl is). You also have no high penetration premium shell if you can’t penetrate AP, putting you at an even bigger DPM/trading disadvantage.
Positioning for the 152mm gun:
Second line positions are best for this gun, but how is it different to frontline?
Try to choose positions behind your frontline tanks where you can either go hulldown or use some gun depression. If neither of these, then at least take a position where you can quickly reverse into cover, such as next to a rock.
The most ideal 2nd line positions are ones where you can still shoot the enemy frontline enemies, so try to avoid positions that are completely hidden from the frontline. You want to be able to shoot enemies, but be far enough away that they can’t rush you or take advantage of your long reload.
2nd line positions are not sniping positions. You need to still be fairly close to the frontline due to the tank’s 0.380 dispersion and low shell velocity, but also importantly so you can still support your allies easily if they need it. A heavy tank should never be in a sniping TD position.
Below are some screenshots showing examples of what a 2nd line position could be. Note that all maps have different positions, and depending on where enemies or allies are, the 2nd line may change.

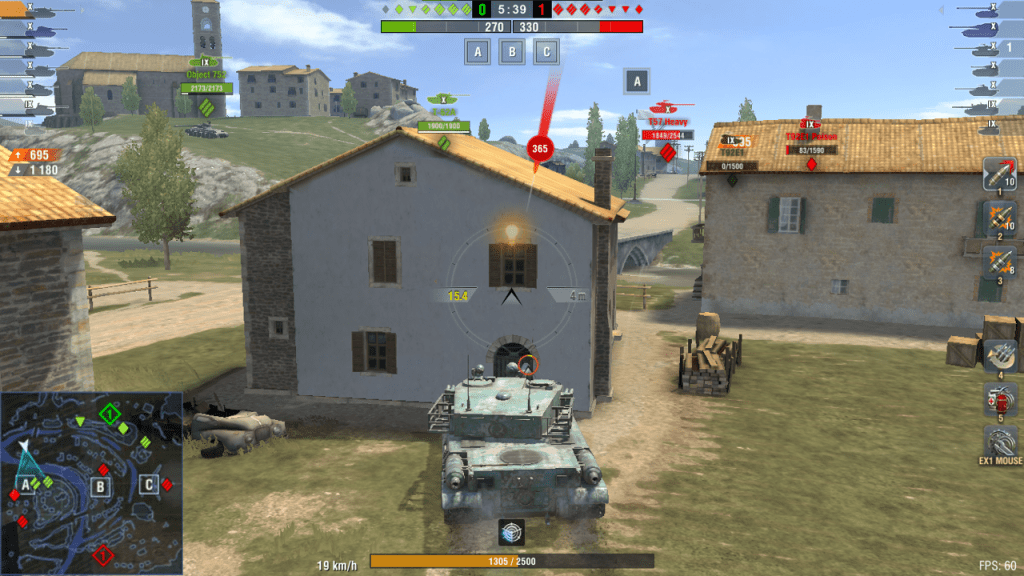
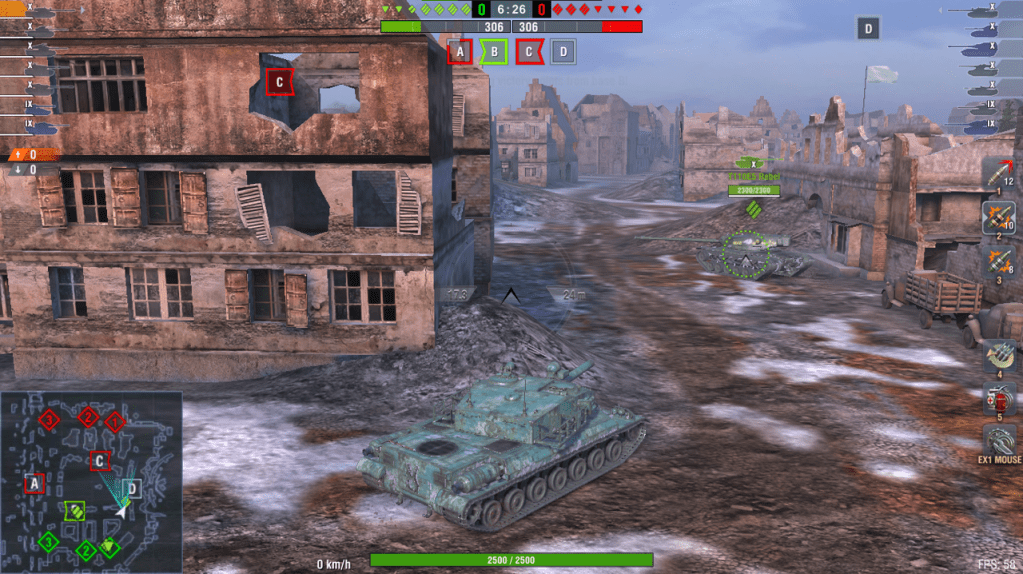
Other than 2nd line positions, the BZ-75 can also work in frontline positions, however it must have allied support, and must be able to easily retreat to cover. An example of this would be on Mines, sitting near to the base of the hill and only poking to shoot when enemies are distracted, or have shot shot at your allies and are reloading.
Another alternative way to position the gun is by flanking or pushing with mediums. Since this gun has premium HE, it can’t always penetrate heavy tanks frontally, so by getting behind enemies with a flanking maneuver, you can easily use that high alpha shell on the sides or rears of enemies. Pushing with the mediums/lights also works well, since all mediums/lights are less armoured than heavies, and you can penetrate many of them much more easily, especially with your premium HE shell.
With the reload support of allied mediums, your 780 alpha and good HP can really change the outcome of the medium flank battle quite quickly.
Enhanced Armour or Improved Assembly?
Depending on which choice you took (explained in the equipment section above), you need to play the tank differently.
If you took enhanced armour, then you can rely on your armour more often, and expect more shells to bounce, especially on the upper plates, or when enemies use premium ammo on the turret. Don’t be fully reliant of confident in your armour, while enhanced armour greatly improves it, there are definitely still weakpoints in all situations.
If you’ve chosen improved assembly, you’ve basically already given up on trying to use the armour, so do just that: don’t rely on the armour at all. With this equipment choice, you HP is more impressive at 2650, but armour is much less reliable, especially against premium ammo.
This doesn’t mean the tank suddenly has no armour, or won’t bounce shots (since its still pretty solid, especially against standard ammo); however, choosing to not improve the armour means you aren’t expecting it to work anyway, hence shouldn’t be relying on it in your gameplay as much.
You have to play the tank like you expect to be penetrated easily, so using more cover, baiting shots less, and just overall being a bit more cautious with exposing your armour during the battle. This will help you to conserve your HP better, since you don’t have as much armour to block the damage, and since you rely on HP more.
Facehugging:
Just as with all 3 previous heavies in this line, do not facehug enemies.
The BZ-75 is by far the worst tank to facehug with, since it has a pike nose, which relies heavily on armour angling to be effective. This armour becomes very weak if your enemies can look down on it (which is exactly what happens in a facehug).
The turret also has 3 large weakpoints on top. While they are fairly strong (in terms of thickness), facehugging enemies reduces the range, penetration, and accuracy needed for enemies to hit and penetrate them.
(BZ-75 facehug is shown in the gameplay video below at 08:34, and you can see how the armour just doesn’t work.)
Go hulldown & use gun depression:
Going hulldown is the most ideal scenario for this tank in terms of armour use. You can keep you hull faced forward (ideally un-angled), hide the lower plate, and remain on flat ground (this keeps the 2 lower turret weakpoints at a strong thickness). This leaves only the 3 weakpoints on the turret roof.
When hulldown, the most obvious weakpoint (lower plate) is completely hidden, which makes the tank immediately harder to deal with. Enemies will either have to use premium ammo against the upper plates/turret cheeks, or have to aim for the turret roof weakpoints (depending what equipment you use, the upper plates/turret cheeks may or may not be penetrable).
When using gun depression, the upper plates are impenetrable, the lower plate is fully hidden, and the turret cheeks are very strong. However the 2 weakpoints on the lower turret are now exposed. When using gun depression, expose as little of your turret as possible, and only poke out to shoot for a split second and then immediately reverse back into cover, this gives enemies the least possible time to aim at your weakpoints. This will be helped by your tank’s small size, and even more so if enemies have poor accuracy or penetration.
Expose as little as possible:
When using gun depression, you can see the gun depression marker on your screen. Compare this to the ridge you are using. Try to expose as little of the tank as possible, since the more of your turret comes out over the ridgeline, the more of your weakpoints enemies can hit.
Notice the size of those 2 lower turret weakpoints.
Even though the BZ-75 isn’t using its full gun depression here, its armour is more effective, since its only exposing the minimum amount needed to put a shot into the enemy.
Sidescraping:
Due to the strong and flat side armour, the BZ-75 can actually sidescrape well.
Note that the purpose of sidescraping is not to be completely impenetrable while being able to shoot enemies. The purpose is to give you a way to come out of cover and shoot enemies, with a chance they get baited into bouncing off your sides.
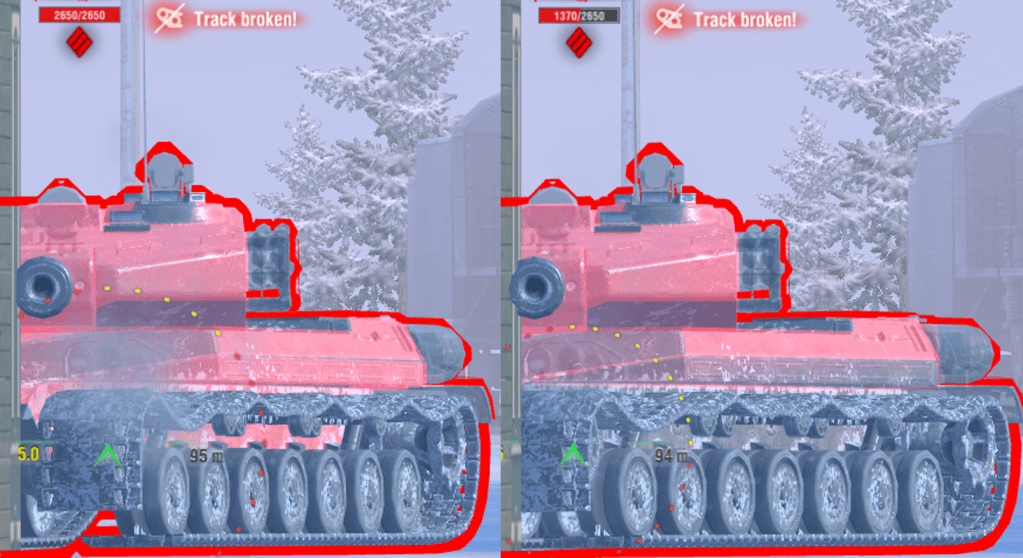
The tank is over-angled in both of these images, and is faced against a 100mm AP shell with 257mm penetration.
The tank in the left image is a better angle, since the lower sides are red.
The tank in the right image is over-angled even further, however still able to bait a shot due to the thick base sides, even though the shell hits the tracks.
When sidescraping, be aware that you have weakpoints. The rear engine deck is small but penetrable, and when you reverse out of cover, the pike nose armour and the cupolas on the roof are weakpoints. Even if enemies penetrate you on the pike nose or cupolas, you can at least still get to shoot the enemy back, and its better than going forwards around a corner, exposing the weak lower plate.
Aiming shots:
Both the 130mm and 152mm are balanced in the same way. Out of their 3 accuracy related stats (aim time, dispersion, gun handling), both guns have great aim time and good gun handling (for their alpha), but average dispersion on both guns.
This type of accuracy balance means that you must stop moving to be accurate. Despite having pretty good gun handling, the dispersion means that you aren’t very accurate if you fire on the move or without aiming.
However, once you stop to aim in, the aim time is quick, allowing you to be quite consistent (this is true even for the 152mm derp gun, its aim time and gun handling are both significantly better than other heavies with 600+ alpha damage, but it still has that mediocre 0.380 dispersion).
Also note, shell velocities for the 152mm gun are very low for a tier 10 gun. 750m/s on AP, 640m/s on premium HE, and 620m/s on standard HE. This makes it far less reliable at range compared to most other tier 10 heavy guns, and especially compared to the 130mm on this tank, which has decent shell velocities (870/780/740 on AP/HEAT/HE).
Overall gameplay of this tank can vary quite a bit. Which gun you use has a big effect on this, with the 130mm playing more like a regular heavy tank with a consistent and fairly accurate gun, and the 152mm playing more of a supporting role due to its long reload and lack of high penetration premium shell.
The 152mm gun poses a learning curve, since it really can’t play like you expect a heavy would. You shouldn’t brawl, shouldn’t be at the very front, and you have very low DPM on AP, with no premium HEAT or APCR shell. To use this gun well you also need quite good knowledge of enemy armour thicknesses, for when to use your AP, premium HE, or standard HE.
Tank gameplay:
130mm gun gameplay:
152mm gun gameplay:
5 battles shown in this 152mm gun video, each sort of shows a few different things mentioned in the gameplay advice section above:
-The 1st battle on Dead Rail shows the ability of this tank to set up its shots, due to having a turret, good gun depression, and great aim time.
-The 2nd battle on Faust shows where the gun can fail if rushing shots, but it also shows how quickly the damage racks up once you do start penetrating those shots. (The shot on the side of the 183 was not the guns fault, the 183’s upper sides are spaced and I forgot, so shot HE and didn’t penetrate).
-The 3rd battle just shows some general gameplay of the tank, using a covered position to put out damage then pushing when needed. It also shows the BZ-75 facehug.
-The 4th battle is where things go perfectly and high damage is achieved. The enemies don’t push aggressively and allies are putting in support shots, despite there being no other allies on the frontline.
-The 5th battle shows the gun failing to hit snapshots and rushed shots. There was definitely a lot of luck in this battle to bounce 6k damage, however it does show that the armour can work well with enhanced armour and all of its odd angles.
Overall
Armour – 4.5/10 (default armour), 6/10 (with enhanced armour)
130mm Gun – 7/10
152mm Gun – 6/10 (can be 8/10 if used right)
Mobility – 7/10
Speed – 6.5/10
BZ-75 is overall a good tank.
Armour by default isn’t impressive. There are 8 frontal weakpoints, 3 are weak to standard ammo: the 2 cupolas, and the lower plate. The other 5 are weak to premium ammo: the 2 upper plates, the turret roof mid weakpoint, and the 2 lower turret weakpoints. HE protection is high, HESH protection is average. Armour can be sidescraped, but hard to angle.
Armour when enhanced with equipment is rather good. Weakpoints mentioned above are much stronger and can resist more standard ammo or premium ammo, and general armour on the front is between 10-15mm stronger on almost all areas.
130mm Gun is good. Standard penetration is high, HE is 8mm above average, aim time is very good, alpha damage & DPM are comfortable. Gun handling & premium penetration are average, and gun depression is a good -8.
152mm Gun is decent but has potential to be amazing. Aim time & gun handling are great, dispersion is mediocre. Overall penetration is very low, but alpha damage is very high. Reload time is long and DPM is quite low. Ammo choice is good, and gun depression is great at -8.
Mobility is good, with good acceleration and traverse speeds on both terrain types, and a decent reverse speed of -15km/h.
Speed is good at 40km/h.
Note that the BZ-75 is something completely new to tier 10. The 152mm at face value is just average, or even “bad” since it lacks high penetration ammo and reload time. However when its played right it has huge potential for damage dealing due to the tank’s overall flexibility and rather good aim time for such high alpha.
It may be quite hard to get used to and learn, since even though the tank is a heavy tank, it doesn’t play a usual heavy role. Due to this, it can be easy to make mistakes, get caught out & rushed, etc.
However, once you can get used to its playstyle, the BZ-75 is a great gun platform for the 152mm, and is a very effective damage dealing tank with solid HP, mobility, gun depression, and decent armour.
Is it worth grinding?
The BZ-75 is worth grinding only for its 152mm gun. If you wanted to play a heavy tank like the BZ-75 with a 130mm gun, there are better alternatives to grind in the tech tree. The 130mm gun on the BZ is quite niche as it doesn’t offer too much as an overall package compared to a tank such as the Vz.55. The reason to grind this tank is to play it with the 152mm. The 130mm gun is there as a default in case you don’t enjoy the 152mm’s gameplay.
The 152mm on the other hand, offers very unique gameplay. Not every player will enjoy it, since it has poor reload time and penetration; however other players may really enjoy the great flexibility of this tank, its low profile with good gun depression, ability to set up shots, the satisfying 780 alpha, or just an overall combination of (decent to good) armour, and nice speed/mobility.
Its definitely not a tank that will suit everyone, as its gameplay is odd. If you’re expecting to play a true heavy tank role with this tank, then you aren’t likely to enjoy it.
Camo cost:
“Sand Cruise” camo: 3D, costs 5,500 gold (6,000 on release).
Tech tree overview
To get to the BZ-75, you have to grind up the Chinese mediums/lights to the Type 58, then to the BZ-58 at tier 7. BZ-75 costs 290,000 XP to unlock, and only has 1 researchable module, which is the 152mm gun, costing 70k XP to unlock.
All the tanks in this line have good stock grinds, since both the tier 8 & 9 can mount a competitive gun on their stock turret. All tanks have decent stock armour, mobility, and guns.
-Tiers 1-4 are low tier light & medium tanks. All have great mobility and guns, but all also lack armour. None of these have a bad stock grind, and are fairly quick to research and get past.
-Tier 5 is the Type T-34, its essentially a T-34 with the 57mm gun, just with much improved accuracy and DPM. This tank has an extremely quick reload with very high penetration, and good accuracy for a tier 5 tank. Its armour and mobility are decent but nothing special.
The stock grind of this tank is terrible, its extremely slow for a medium, has atrocious penetration, very poor accuracy, and very low DPM. Getting the top turret and gun are imperative, get the tracks after that, then the engine if you feel like the tank needs it. (The tracks are what make this tank slow, the stock tracks have terrible terrain resistance).
If possible, play this tank in a game mode where you can gain abilities, as its very frustrating to play when stock in the random queue.
This tank is worth keeping, as it leads on to both the Chinese TD and LT trees, in addition to the mediums (and heavies from the Type 58).
-Tier 6 is the Type 58, essentially a T-34-85 with its middle gun. This tank has good turret armour, and a great 85mm gun with comfortable alpha damage with good DPM and decent accuracy. The hull is fairly weak and the mobility is good but nothing special.
The stock version of this tank is good. Even though its slow, it gets an 85mm gun with good alpha and still decent DPM (a notable difference to the T-34-85, which has a terrible 76mm gun for its stock weapon). Its turret armour is still good due to its angling. This tank when stock is perfectly playable and grindable, though its still not strong (as with all stock tanks).
Keep this tank and grind all of its modules, they are used on other tanks in the Chinese tree, and the Type 58 also leads to the other Chinese heavy tank line, and the medium line.
-Tier 7 is the BZ-58, an average heavy tank with good armour, mobility, and gun. It has high penetration with 280 alpha, with good aim time and reload. Its armour is solid, and has good mobility.
When stock this tank is fine, its slightly mess mobile and worse armoured than its top version, but by stock tank standards its perfectly playable. The stock gun has essentially the same stats as the top gun, just with lower alpha damage. The stock turret is still strong against same tier standard ammo, and the mobility is decent but nothing special.
Research path for this tank should be turret first, then the gun; since these two improve performance by such a large amount. After that get the tracks, which improve both mobility and gun handling. The last modules to get should be the engines.
-Tier 8 is the BZ-166, a heavy tank with solid all-round stats. It has strong hull frontal armour, with a choice of 2 turrets, the stock turret being essentially impenetrable, and the top turret having turret cheek and cupola weakpoints. Its gun has 400 alpha with great aim time and average dispersion, and mobility is great on hard terrain but mediocre on medium terrain.
The stock grind of this tank is amazingly easy. The only module that really “holds you back” from the tank’s full potential is the tracks. These improve both mobility and gun handling, so should be the module you research first. Next upgrade the engine, as it helps with the mediocre mobility on medium terrain.
There is no gun upgrade, you mount the top gun from unlocking the tank. The top turret is needed to get to the next tank in the line, but actually has much weaker armour than the stock turret.
-Tier 9 is the BZ-68, another heavy with solid all-round stats. It has a very strong upper plate with a strong turret. Mobility is great for how much armour this tank carries, with a good top speed. There are 2 gun choices, the 130mm gun has regular shells, with 460 alpha and a 12s reload. It has good aim time and decent dispersion. The 152mm gun has AP/HE/HE, with 530 alpha on AP and 600 alpha on premium HE. This gun has much slower reload rate, worse accuracy, aim time, and DPM.
Just like with previous tanks, this tank when stock is just fine. Its stock engine is barely weaker than the top engine, making it still fairly mobile. The stock turret has good armour against standard ammo, but is weak to premium ammo. The stock gun is the “top” 130mm, so it has already good penetration and decent DPM, with a good 460 alpha.
For research path, get the top tracks first. These improve mobility, but also gun handling, making the gun more accurate and consistent (also the cheapest module and helps a lot with the grind, best to get it early). Next get the top turret, which improves HP, armour, and some gun stats. After this the choice between the engine and 152mm gun depends on your choice. If you don’t think you’ll use the 152mm gun, then get the engine. If you want to use the 152mm gun, then unlock that first.
-Tier 10 is the BZ-75, compared to the previous tank, it also has a 130mm & 152mm gun choice. BZ-75 is a lot less armoured for its tier (compared to the BZ-68), with more weakpoints on the turret and due to its pike nose armour; however it has much better gun depression at -8, and far better gun stats on both its guns. The side armour is better, but the tank now has a pike nose frontal layout.
Compared to the BZ-68, the BZ-75 has a less reliable armour profile (due to having more weakpoints) with slightly worse mobility on hard terrain; but it gains a lot of DPM, aim time, accuracy, and gun depression for the 130mm gun; and much better alpha damage, accuracy, penetration, & gun depression for the 152mm gun.
