
The Fixer is a tier 8 tank from Season 1 “Retrotopia”. Its an American-esque heavium tank with good mobility, great frontal armour, and a very nice gun with comfortable DPM and aim time.
Click the table of contents below to access the section you want:
- Armour
- Playing against a Fixer
- Gun
- Mobility
- Special mechanic/ability
- Equipment, provisions, & consumables
- Gameplay advice
- Overall
- Is it worth it?
- Camo cost:
- Stock grind
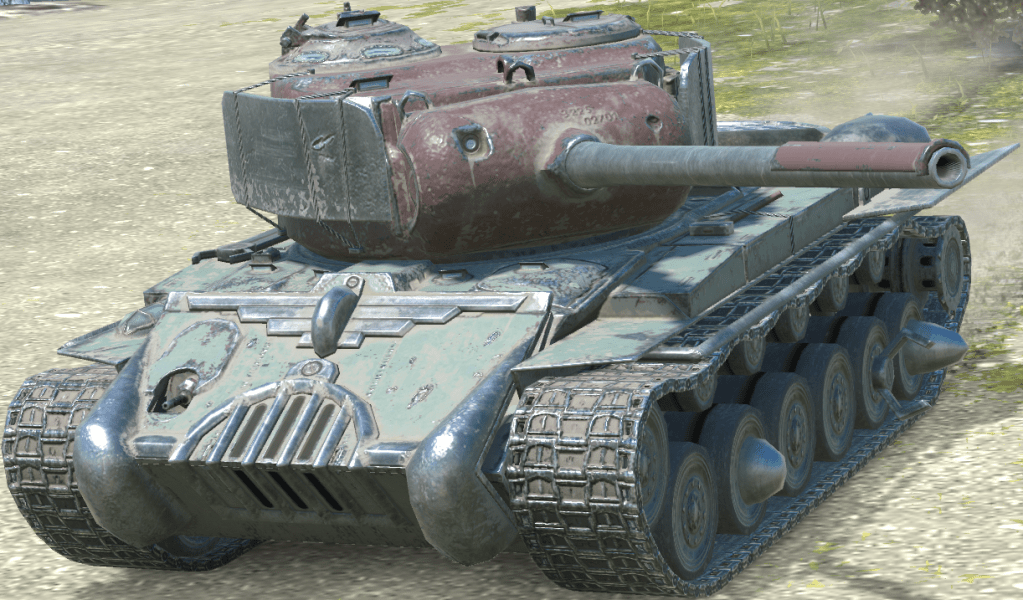
Armour
(The Fixer in the images is using Improved Assembly)


Slide right -> to view 225mm AP
Slide left <- to view 265mm APCR
When flat and facing head-on:
Upper plate 245-350mm
MG port 160mm
Lower plate 185-195mm (up to 235mm on the bulges)
Turret cheeks 160-260mm
Gun mantlet 275-340mm
Gun mantlet center 200mm
Cupolas 120-170mm
The images don’t change much, whether using AP or APCR. This really shows the strength of the armour, and how its resilient against any enemy it faces, whether its a tank with high penetration or low penetration.

vs 265mm APCR
Using -9 gun depression:
Upper plate 435mm
Turret cheeks 160-270mm
Gun mantlet same as above
Cupola 140-180mm
Spaced armour:
Like the T26E4, the while front of this tank is covered in spaced armour, but these spaced plates are different thickness to the T26E4, so don’t regard the Fixer as having the same armour profile, because its very different.
Both the upper and lower plate are covered in 2x 20mm spaced armour plates, which are both at different angles. Together, these plates add an additional 140mm of effective armour to the upper plate, and 110mm to the lower plate.
The turret is also covered in spaced armour, like the T26E4. The gun mantlet’s weakest point is around 200mm thick, and the “wings” are 20mm each, angled back to create 60mm of effective armour.
The side armour is a flat 70mm, so while you may be tempted to shoot it with HE, don’t. The stowage boxes on the hull side count as 10mm of spaced armour, which will stop any HE shells from penetrating.
VS tier 7:
Against tier 7 enemies, the Fixer has extremely strong armour. The turret cheeks will be able to bounce quite a few enemies, and the lower plate will be quite strong, especially if angled slightly.
Against tier 7 enemies, the lower plate will only be weak to heavy tanks or enemies using premium ammo; the turret cheeks and cupolas are the only other areas where tier 7 tanks have a chance to penetrate. The gun mantlet’s center is a weakness, but its not reliable to hit if the tank is moving or at distance.
VS tier 8-9:
Against tier 8 and 9 enemies, the armour will perform largely in the same way. The upper plate is fully impenetrable to any enemy. The turret cheeks, lower plate, and cupolas are all weakpoints. The gun mantlet center can be penetrated by most enemies with over 210mm penetration.
Playing against a Fixer
Due to the Fixer being a T26E4 Super Pershing, it share some similarities, but also has some differences.
When facing this tank in battle, forget what you know about the T26E4’s weaknesses, as the Fixer is very different in its armour profile.
Don’t shoot the upper plate:
As stated above, even 265mm APCR is unable to penetrate the upper plate when un-angled. Its very strong, and its covered with 2x 20mm spaced plates, meaning even high penetration HEAT won’t be reliable at going through.
Shoot the middle of the lower plate:
As shown in the armour images, the edges of the lower plate have some bulges which count as spaced armour. Due to them being angled, they can actually catch your shot and cause a non-penetration.
Your shot will still sometimes penetrate if hitting there, but its best not to risk it if you don’t have to.
Note that the lower plate itself is also covered in a 20mm spaced armour plate, so its best not to shoot HEAT at it if the tank’s hull is angled too far.
Shoot both cupolas:
Unlike the T26E4 (which has a “fake” cupola), both cupolas on the Fixer’s turret are modelled, so both of these are weakpoints.
If you aren’t confident in shooting the turret cheeks, then you can shoot either cupola to damage the tank.
Note the 2 round cylinders on top of the gun mantlet, avoid shooting this, as it counts as spaced armour, and its quite thick. Shooting it will result in a non-penetration.
Gun mantlet weakpoint:
Right at the center of the Fixer’s gun mantlet is a weakpoint. Its only 200mm thick, which means most AP and APCR from tier 7-9 enemies can penetrate this area.
Note that though the armour is flat and close together, its comprised of 3 layers, meaning its still best to avoid shooting HEAT at this area, as a penetration won’t be as reliable.
The highlight for this weakpoint is not displayed well in-game, so its shown below. Alternatively you can use the armour thickness filter on gamemodels3d. Its the easiest way to see the layered spaced armour.

The area highlighted in green is only 200mm thick.
Spaced armour covering mantlet – 20mm thick
Mantlet armour – 150mm
Armour behind mantlet – 30mm
Total armour of weakpoint is 200mm
Gun
The Fixer mounts a 105mm gun
-Alpha damage is 310 on AP, 260 on HEAT, and 350 on HE
-It has an 8.6s reload, giving it 2166 DPM
-Penetration on AP is 196mm, HEAT is 254mm, and HE is 45mm.
–Estimated aim time is 3/3.3s
–Base aim time is 1.7s, but it can get down to 1.39s.
-Dispersion is 0.344/0.310
–Gun handling is 0.2/0.2/0.1, or 0.17/0.17/0.09 with Vertical Stabilizer.
-Gun depression is -9 degrees
Overall this is a great gun for a tier 8 medium tank. It has high alpha, great aim time, comfortable gun depression, and pretty good dispersion. The penetration isn’t the best, but its also not low. Gun handling isn’t the best, but its also not bad for its alpha and with that aim time.
Mobility
-Top speed is 40km/h forwards, and -15km/h in reverse
-Traverse speed is 65.4 deg/s on hard terrain, and 50.3 deg/s on medium terrain.
-In game acceleration rate is shown as 17.4 hp/t, it has strong 1161hp engine for its 67 ton weight.
-Actual acceleration rate is 17.4 hp/t on hard terrain, and 13.4 hp/t on medium terrain.
–Terrain resistances are 1/1.3/1.8
Overall this is incredible mobility, considering the armour of this tank. For a medium tank, none of these stats are too impressive but for a heavy, every aspect of its mobility is very good. Acceleration rate is high, traverse speed is high, and top speed is decent.
With heavy-like armour, this is a very mobile and agile tank.
Special mechanic/ability
The Fixer has a ~2.15s track repair speed when its fully equipped, and with a level 7 repairs crew skill. Basically if it gets tracked, the track is already repaired before you can even press the repair kit consumable.
It can get even quicker with the protective kit provision.
Equipment, provisions, & consumables
The Fixer doesn’t have any special provisions or consumables.
Gun Rammer:
Calibrated shells isn’t needed on this tank, due to it having decent accuracy and good aim time, as well as decent penetration. Though the Fixer would gain a lot of penetration on its premium ammo (HEAT), it really isn’t needed, as it often doesn’t struggle to penetrate enemy tanks.
Gun rammer is useful for competing with the reload times of 310 alpha heavies, which often have similar reloads. Its also essential for maintaining a competitive level of DPM on the MT flank, as often many mediums will have higher DPM and quicker reloads, so using gun rammer to improve that really helps the tank in most situations.
Improved Modules:
The Fixer is the heaviest medium tank in the game, weighing 66.57 tons, in fact, its among the heavier tanks in tier 8, even compared to the HT class.
Combined with the tank’s high traverse speed, good acceleration, and decent top speed, The Fixer can very easily ram enemy tanks, and it will out-damage them due to its weight. Use improved modules, as it will reduce the damage that your tank takes from ramming.
Improved Assembly:
Due to having such strong upper plate armour, and quite weak turret cheeks, there isn’t much need for enhanced armour.
The upper plate is too strong to need enhancing, the gun mantlet is highlighted as “fake red”, and most weakpoints on the tank are easy enough for enemies to penetrate, even if using enhanced armour.
Its better to use improved assembly, which takes this tank’s vey healthy 1450 base HP, up to 1537 HP.
Vertical Stabilizer:
As the Fixer is a frontline brawler heavium, it isn’t often needing to fire at long range, and it often doesn’t have time to fully aim in every shot. The tank also already has pretty good accuracy of 0.344 for its 310 alpha.
Due to this, vertical stabilizer will be more useful to the tank’s gameplay, as it doesn’t have the best gun handling, and the tank is constantly moving during the battle.
Gameplay advice
The Fixer’s gameplay is quite unique, as there aren’t any other heaviums with 310 alpha in tier 8. It plays similarly to a T26E5, but with a longer reload and higher alpha damage.
General gameplay:
The Fixer is a heavium tank, so it plays a bit like a heavy, but on the medium flank.
Though the Fixer’s armour and gun are similar to a heavy tank, it shouldn’t be taken to the heavy side of the map, as most heavies will out-trade and out-DPM your tank, as well as penetrate your tank more, since heavies have higher penetration than mediums.
You should take the Fixer to the medium side of the map, as that’s where its armour and alpha are a noticeable advantage for the tank, and you’ll face more enemies which will struggle to penetrate your armour.
Other than that, it just plays like a usual heavium, quite aggressive, using gun depression, ramming enemies, coordinating pushes, etc.
Use gun depression & hulldown positions:
Just like the T26E4, the Fixer’s biggest weakpoint is its lower plate, which is hidden when either being hulldown or using gun depression.
Enemies can only try to hit the various weakpoints on the turret, which are all quite troll, as each of these weakpoints is directly next to a very strong spaced armour plate.
Since all the turret weakpoints are right next to strong armour plates, continually moving the tank a bit helps to bait shots from the enemy, and cause them to miss and bounce off.
Try keep these movements unpredictable, as just repeating a movement just lets the enemy know exactly what you’re doing, and they can easily just time their shot with your movement.
Play aggressively:
Know the strengths of your tank, which are its strong armour, good alpha, and good mobility. These allow you to play the tank quite aggressively on the medium flank, as not many tanks can stand up to the armour or gun of the Fixer; and while most enemies are faster, the Fixer is by no means slow, especially for its armour.
Use this to your advantage against enemy mediums, as you can easily lead a successful push in this tank due to its capabilities.
Angle and wiggle:
This is to bait enemies into shooting the tracks, or bait them into hitting the spaced armour bulges on the lower plate, which are slightly higher in effective armour.
Wiggling can throw off the enemy tank’s aim, and is very effective in this tank due to its high traverse speed, and its somewhat troll lower plate armour.
Aim each shot properly:
Due to the gun handling, its best to try avoid taking snapshots, as they are likely to miss. Aim in each shot, as your gun has quite good alpha, and quick aim time, but a fairly long reload. Aiming in ensures your fairly low DPM isn’t wasted by missing shots, and it doesn’t take long to aim in fully due to the quick aim time.
Sidescraping:
Note the 2 caliber overmatch rule. This rule occurs when the shell hits the 20mm tracks, causing a high amount of normalization, depending on the caliber of the shell hitting it. (It will also occur on the base side armour, which is 70mm thick, with guns that are over 140mm in caliber)
This is extremely important with the Fixer, as it determines how effective your sidescraping will be against an enemy.
Essentially: The smaller the gun caliber or the enemy, the more effective your sidescraping will be. Sidescraping against 90mm, 20-pdr, 85mm, 76mm, etc will generally work out fine, as their gun caliber is small.
100mm and 105mm guns will sometimes be able to penetrate the trackwheel, even when the tank is at the 70 degree angle.
Anything with a 110mm+ gun you should just not sidescrape against, these guns can penetrate right through the track wheel, even with a very slight angle.
The gameplay of the Fixer is quite similar to other heaviums, such as the T26E5, but it can also play quite like a medium. The tank is very flexible in how it plays, what positions it uses, and how it uses its gun and armour, as its stats just allow it to be very versatile in gameplay.
Note that, like the 122TM, T26E4, and the Chimera, the Fixer is a “medium heavium”, its far more effective on the medium tank flank than the heavy tank flank, as that’s where its advantages really show.
Overall
Overall the Fixer is an amazing tank, if its not OP, then its definitely bordering it.
It just has stats in every area where you need them, with very strong armour for a medium, and great agility and mobility considering that armour. The gun is also great, with a very nice amount of alpha damage, great aim time, and decent handling and penetration. Along with this it also has a high amount of HP for a medium, with good view range.
Its truly an all-purpose tank, it can be a medium, it can be a heavy, it can scout, it can block damage, it can trade damage, and it can take hits.
Unfortunately, the stock version of this tank is quite the contrast. This is reviewed more in-depth below, but the stock tank severely lacks DPM, penetration, accuracy, and alpha; and while its mobility and armour are actually pretty ok, it still can’t compare to the fully upgraded version.
Is it worth it?
The Fixer is an amazing tank with a perfect combination of stats to make it an extremely strong tier 8 tank. It features good all-round medium tank stats, but it has the added benefit of very strong hull armour and a good turret.
There are few other tanks like this in tier 8, which makes the Fixer quite a unique vehicle. Its also very enjoyable to play, and quite a comfortable tank.
Both medium and heavy tank players will be able to enjoy this tank, as it has characteristics from both of these tank classes, and it has gameplay which will be comfortable to basically any player.
The Fixer is worth 9,500 gold. Its an extremely strong tank which is just capable of doing amazing things in battle, and its also quite unique in what it offers. Its not too much of a high-skill tank, though for it really reach its potential as an “OP” tank, it needs a skilled driver.
Camo cost:
Fixer has a permanent appearance which can’t be adjusted.
Its shown here in the stock configuration.
Stock grind
As you upgrade modules, the stats of each module improves slightly, improvements are not large, they are very gradual.
If you want to check the stats of each module, you can view the tank in-game, or use gamemodels3d or Blitzstars (note that Blitzstars mounts the stock tracks automatically, which makes mobility look worse than it is).
Important:
-Only the top turret improves turret armour, all the stock and intermediate turrets have the same armour.
-Stock and top turrets/guns have the same gun depression.
–Gun handling does not upgrade with the gun, turret, or tracks.
-The hull doesn’t upgrade, the armour is the same throughout.
Gun:
The reload time is very long (9.1s), for a very low 240 alpha, giving it below 1600 DPM. This is not even acceptable in tier 6, let alone tier 8. Along with this, accuracy is terrible, and penetration is low (tier 7 level of penetration).
Aim time is the only decent stat on the stock gun(s).
Out of all the stock modules on this tank, the gun is really the only one that’s “bad”.
Turret:
The stock turret actually has pretty good armour, its only 10mm weaker than the top turret, you can see this below. This is quite good news, as you can get a fair few bounces, and even more if you move the tank so its harder for enemies to aim in.
Unfortunately, unlike the top turret, the stock turret has correct armour highlighting, so the weakpoint at the center of the mantlet shows up properly (on the top turret its hidden by “fake red” armour highlighting).
Engine:
When the tank is equipped and has provisions on, the mobility isn’t bad. Its definitely less mobile than the fully upgraded version, but considering the armour, the stock engine (and tracks) still enable this tank to turn very quickly, and though it doesn’t accelerate quickly, its not slow to the point where it makes the tank frustrating to play.
Tracks:
Just as with the other season tanks, the stock tracks of this tank are very bad. They have very poor terrain resistances of 1.3 on medium terrain and 1.5 on hard terrain. Fortunately though, the mobility is still decent thanks to having decent engine power (even the stock T1 engine), and good traverse speed.

vs 225mm AP (left image), 265mm APCR (right image)
Turret cheeks 155-220mm
Gun mantlet 305-355mm
Center of mantlet 190mm
Upgrading:
As said above, upgrading each module improves it slightly. In total there are 4 of each module on this tank. 1 stock module, 2 intermediary modules, and 1 top module for each turret, gun, engine, and tracks.
Each gun upgrade makes it slightly more accurate, higher penetration, quicker reload, and higher alpha.
Each turret upgrade gives better view range, HP, and turn rate.
Each engine upgrade improves traverse speed and acceleration rate.
Each track upgrade improves traverse speed and overall mobility performance.
Eventually you get to the top modules, these are the only modules which change in appearance.
The top turret has the strongest armour, which visually hides the gun mantlet weakpoint.
The top gun steps up in DPM, alpha, and penetration, but loses a bit of reload (still better than the T3 gun).
The engines and tracks are also in their best configuration, so also output the best possible mobility for the tank.
