
The Glacier is a tier 9 tank from Season 2 “Constellation”. Its an British-style medium tank based on a Centurion Mark III. It sports one of the best and most consistent guns in terms of accuracy on a medium, and has great DPM and gun depression. Its main feature is the strong turret armour and good hull armour.
Click the table of contents below to access the section you want:
- Armour
- Playing against a Glacier
- Gun
- Mobility
- Special mechanics
- Equipment, provisions, & consumables
- Gameplay advice
- Overall
- Is it worth it?
- Camo cost:
- Stock grind
Armour
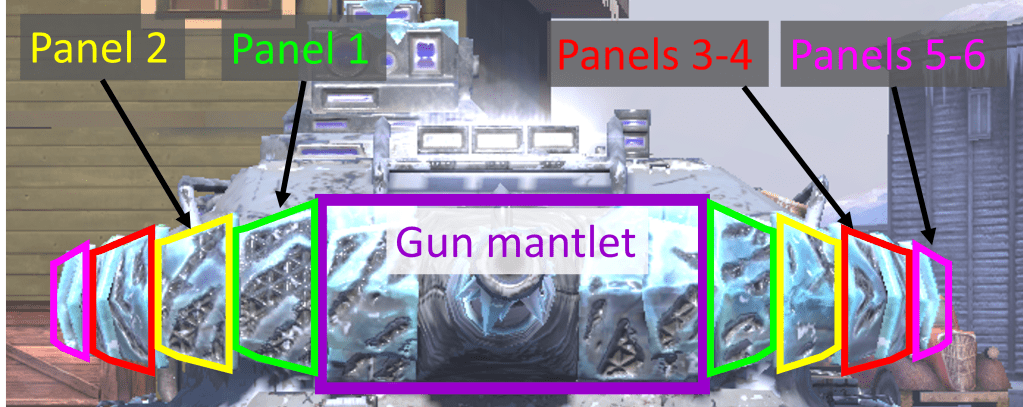
Use this image as a key for the armour sections described below.
The Glacier has many spaced armour plates on the turret, and they all have different armour thicknesses. These are described below.
(The Glacier in the images is using Improved Assembly)
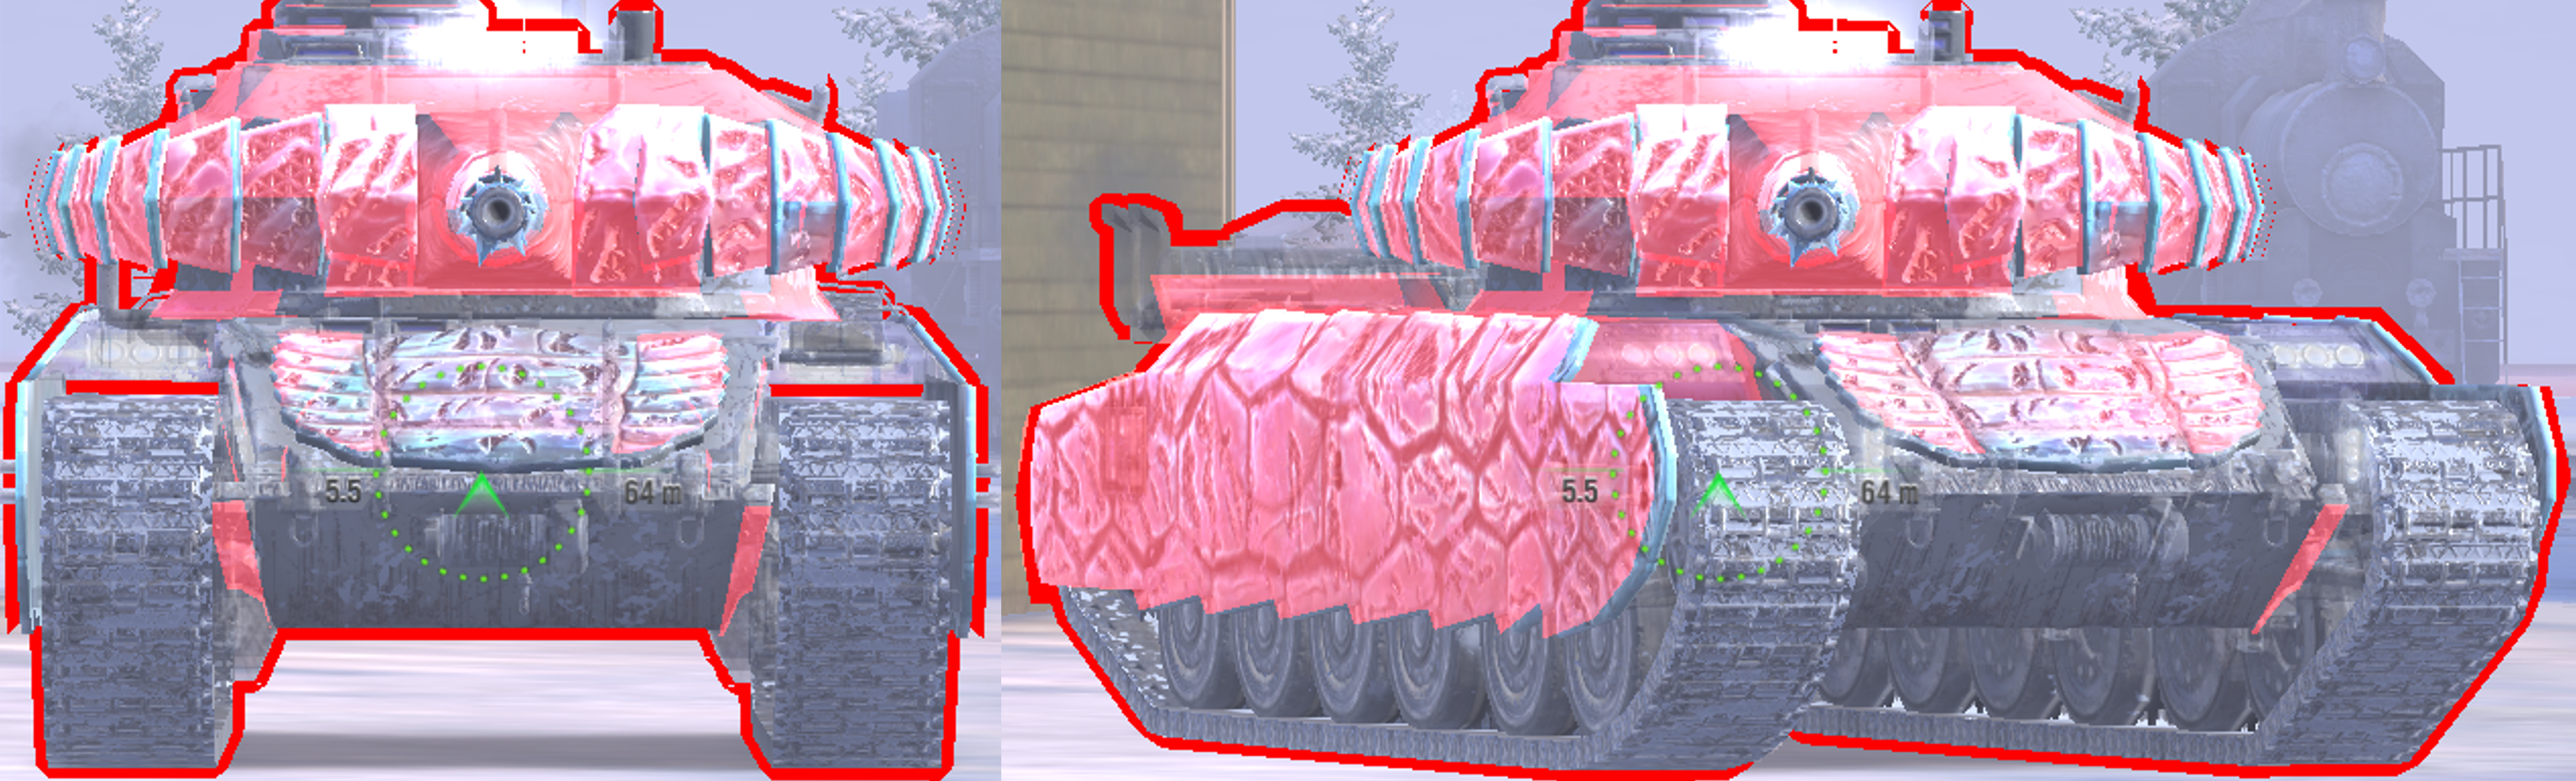

Drag slider right -> to view 240mm AP
Drag slider <- left to view 300mm HEAT
This level of penetration represents tier 9 tanks, and shows off how HEAT can ignore the auto-ricochet turret roof and hull sides.
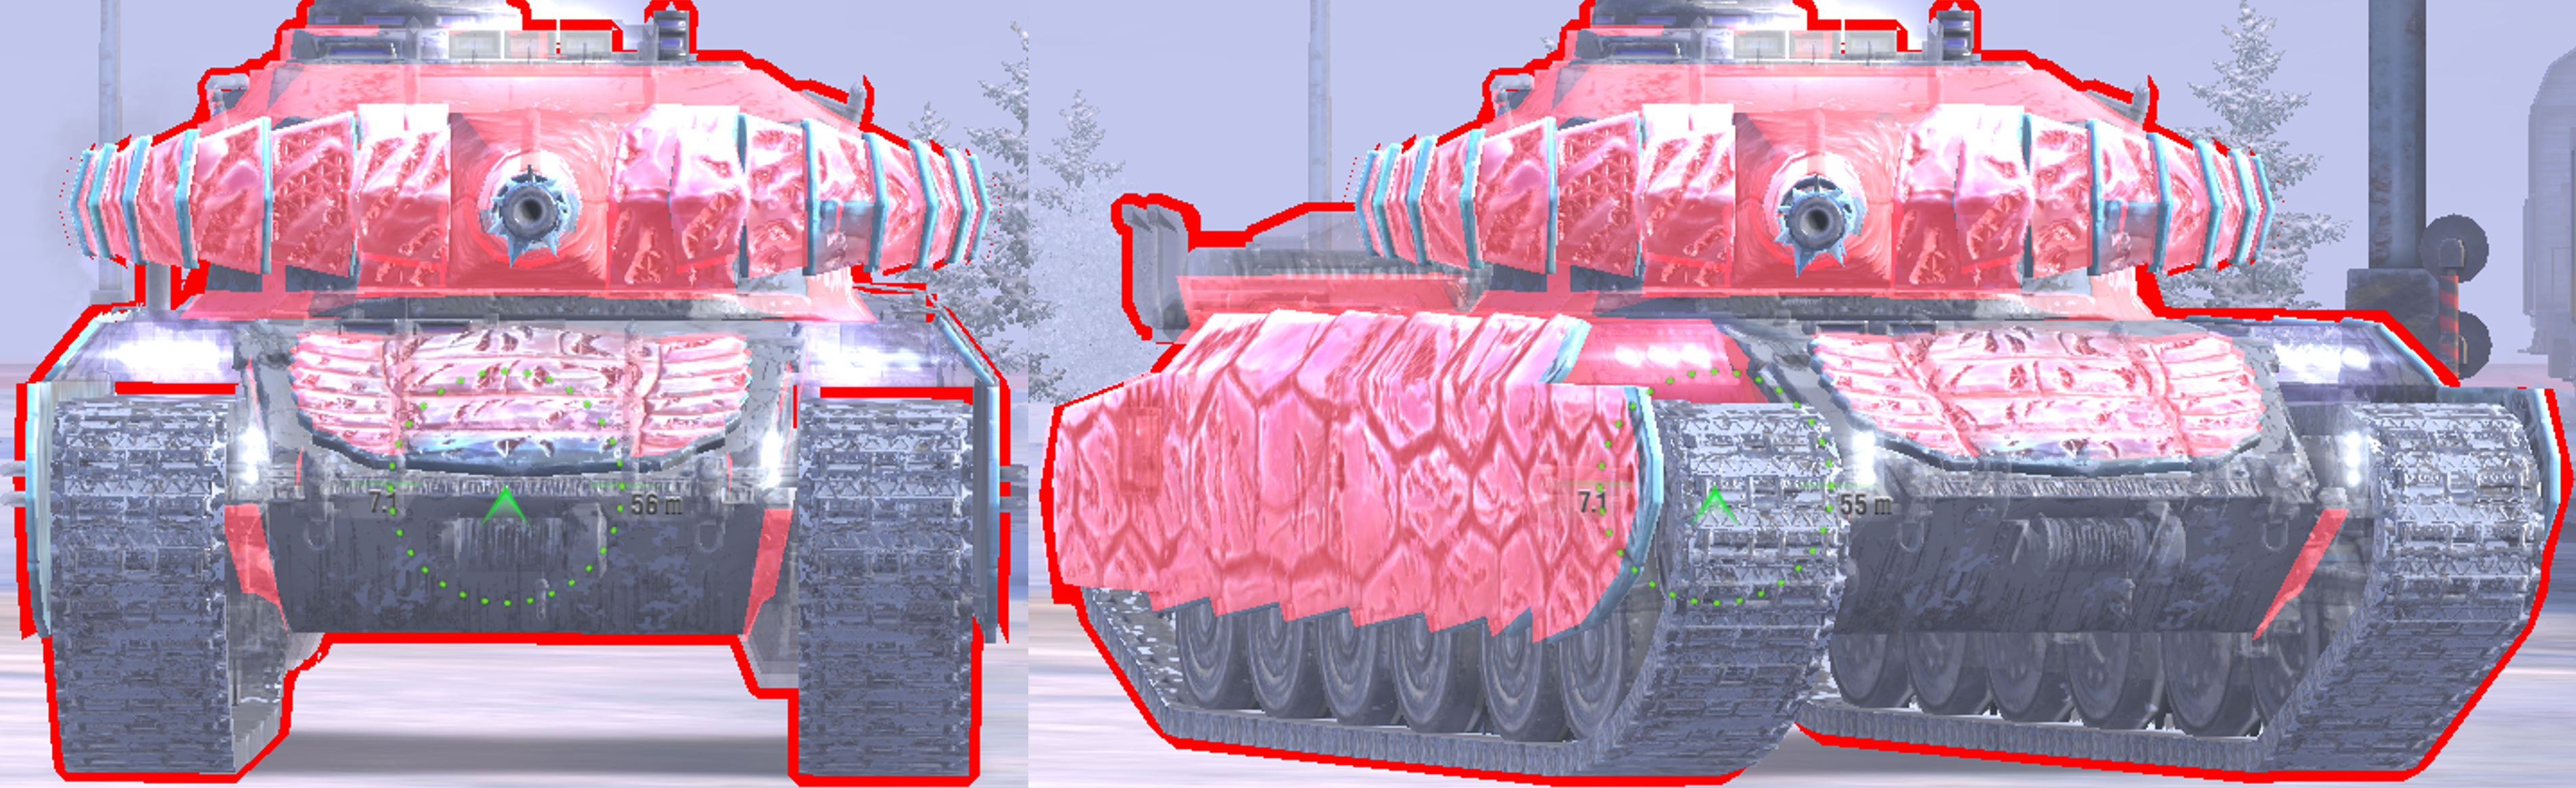

Drag slider right -> to view 227mm AP
Drag slider <- left to view 285mm APCR
This penetration level is closer to tier 8 tanks’ penetration (227mm AP), and shows how against APCR ammo, the turret roof and hull sides are still auto-ricochet points.
285mm APCR is more representative of high penetration tier 9 APCR ammo.
Armour when flat and facing head-on:
Base upper plate 150-160mm
Upper plate + spaced armour 240-250mm
Lower plate 140mm
Turret left panel 1: 225-247mm
Turret left panel 2: 260-265mm
Turret left panels 3-4: 310-330mm+
Turret right panel 1 270mm
Turret right panel 2: 265-270mm
Turret right panels 3-4: 330-370mm+
Gun mantlet 370-440mm
Turret roof 170mm auto-ricochet, but overmatchable to 150.1mm guns or larger.
Cupola 50-60mm
Side armour:
The hull sides of this tank are 45mm thick, they are slightly angled inwards (like all Centurion tanks), so it produces a slightly better angle.
The sides also have large spaced armour plates, these are actually quite thick, at 50mm. The total armour of the sides is 45+50+20=105mm, with the 20mm being module armour of the tracks.
HE/HESH protection:
The HE/HESH protection of this tank is incredibly good.
The upper plate is largely covered by a 50mm spaced plate, so only the edges of the upper plate can be HESH penetrated. The lower plate is weak to HESH, with no spaced armour.
The sides are basically completely covered by a 50mm spaced plate, only the rear engine deck is not covered by this, and is only 47mm thick when not angled.
The hull rear is flat and large, and penetrable to all HE shells shot at it. It has no spaced armour.
The turret is only penetrable on 3 areas to HESH, these are the cupola, the upper or lower side armour (not the middle), or the back area of the turret side bins.
All other areas are protected by spaced armour: the turret front, the turret rear, the middle sides of the turret, and of course the gun mantlet.
Cupola:
The images above have been cropped to show the true size of the cupola. This is because there is a large rotating optic on top of it (you can see this in other images), when you shoot it, no damage is done, and it will either show “armour not pierced” or “observation device broken”.
Don’t be baited into shooting this optic, since it doesn’t count as actual armour.
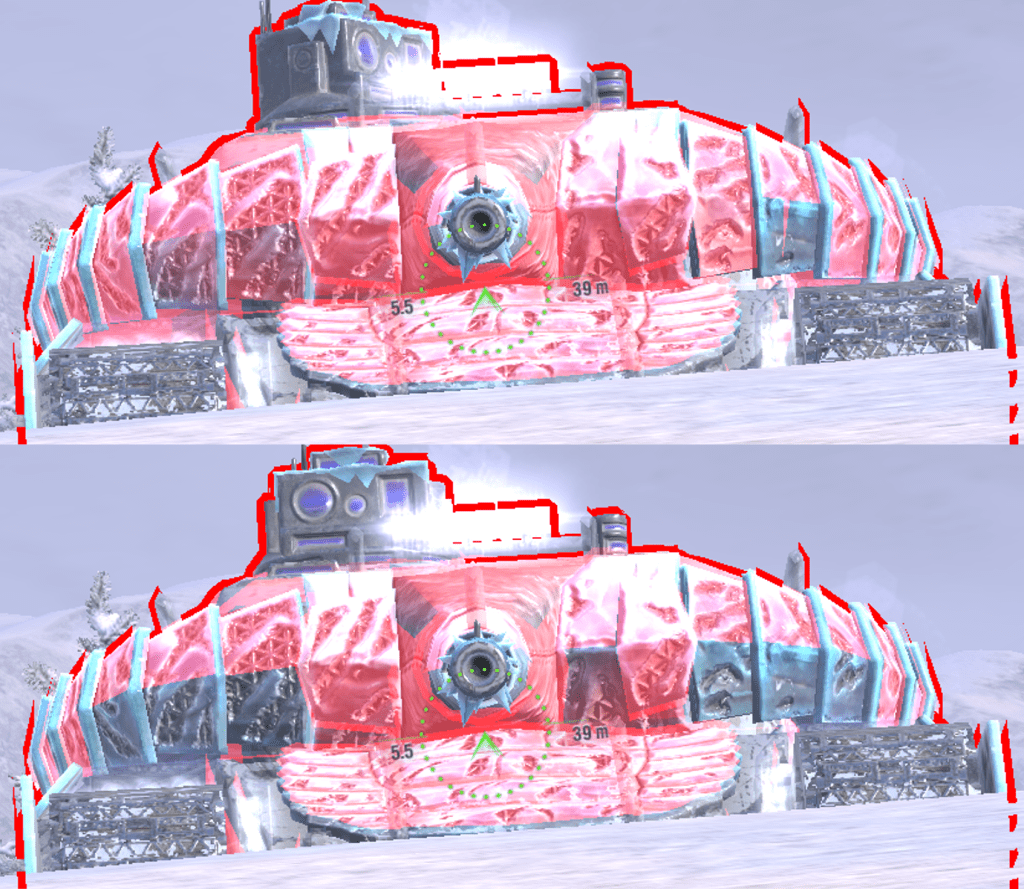
vs 240mm AP (top image) 300mm HEAT (bottom image)
Using -9 gun depression:
Base upper plate 215-225mm
Upper plate + spaced armour 290-330mm
Left turret panels 1-2: 250-260mm
Right turret panels 1-2: 265-270mm
Gun mantlet 370-440mm
Cupola 52-63mm
Note that the turret panels are angled like > over the turret armour. This means that when using gun depression, the bottom half of the panel’s angling gets worse, and the top half’s angling get better.
When shooting at this tank while it uses gun depression, try to always hit the bottom part of these panels.
Armour vs tier 8 enemies:
Facing tier 8 enemies, the Glacier has very strong armour. For most tanks, the upper plate spaced armour will be difficult to penetrate. Tanks with 230-250mm AP penetration will struggle less against the upper plate, but it can be angled to bounce these enemies.
The turret is very strong, and the only viable weakpoint for tier 8 tanks to shoot is the cupola, which is deceptively small.
The lower plate is weak to all enemies.
Armour vs tier 9 enemies:
Against tier 9 tanks, the armour is between troll and effective.
Only the lowest penetration tanks will struggle against the upper plate on flat ground, these being tanks with less than 230mm AP penetration.
Most medium and light tanks will struggle against the turret on both flat ground, and when using gun depression, but can use premium ammo to penetrate the spaced armour panels.
Higher penetration tier 9 tanks (Leopard PTA, Centurion 7/1, or heavy tanks), will have a higher chance of penetrating the turret cheeks with standard ammo, but may still bounce off if the shot misses the small weakpoints on the cheeks.
Armour vs tier 10 enemies:
Tier 10 enemies also have a higher chance of penetrating the turret cheeks, but still have to aim for the weakest points (panels 1-2 on the left side of the turret). If not hitting this weakest area, then even most tier 10 tanks can’t penetrate the turret front.
The hull is fairly weak against tier 10 enemies, you can angle it slightly to increase the upper plate thickness, but most tanks will still easily penetrate.
Overall the armour of the Glacier is effective. The turret front spaced armour makes it hard for enemies to know exactly where to shoot, and because its spaced it can sometimes block damage when you don’t expect it to.
The hull front is also strong for a medium, especially when angled slightly, but its best to not rely on it as there are still weakpoints around the spaced plate.
Playing against a Glacier
Check HP:
If the enemy Glacier doesn’t have 1650 HP or 1749HP, then they have one of the stock turrets, meaning their armour is weaker.
If they have the stock turrets, then it means you can penetrate the gun mantlet using premium ammo (bottom right of the gun), and you can go through the turret cheeks much easier with standard ammo.
The stock turrets also have a shorter cupola, so try aim for the bottom of it.
Turret armour baits:
Both on the stock and top turrets, there are some baits.
The turret cheek panel 3 on each side looks penetrable to premium ammo when the tank uses gun depression, but if you shoot there, the shot won’t penetrate.
Shooting the cupola when the tank uses gun depression is also a bait. The cupola’s profile becomes so small that its practically impossible to hit, especially if the Glacier is moving slightly. Its far more reliable to just try and penetrate the turret cheeks.
Turret left side is weaker:
Just like with all centurion turrets, the area on the left side of the gun mantlet is weaker than the area on the right side. Try to shoot the left side and not the right side, since its easier to penetrate with any type of ammo.
Avoid shooting overlapping armour panels:
To the left and right of the gun mantlet are the spaced armour panels, these are the weakest parts of the turret, so often you’ll shoot here to penetrate the tank.
Try to hit the very center area of each pannel, since they slightly overlap on the edges, creating areas of 305mm, 320-350mm in thickness.
Weakpoints on flat ground:
If the tank isn’t using gun depression, there are multiple weakpoints.
AP/APCR can penetrate the turret ring, the edges of the upper plate, or the cupola.
HEAT/HESH can penetrate the weak but angled turret roof.
Weakpoints when using gun depression:
If the upper plate is exposed, then any ammo can penetrate the edges where there’s no spaced armour.
If your tank has AP/APCR for premium ammo, then you can easily penetrate turret panels 1 and 2 on each side.
If your tank has HEAT as premium ammo, try aim for turret panel 1 on each side of the turret, its more reliable for penetrating than panel 2.
Upper plate bait:
To many tier 8-9 tanks, the upper plate looks easily penetrable, since its effective thickness is just below the penetration level of most tier 9 tanks’ standard ammo (and some tier 8 or 10 tanks). This means if the hull turns, then it becomes red quite quickly, you can see this with the 227mm AP images.
If you have the opportunity, and the upper plate looks penetrable, its still best to shoot the lower plate, or at least aim for the upper plate edges, since that spaced armour plate could make it difficult to penetrate.
Gun
The Glacier mounts a 105mm gun in its top configuration.
-Alpha damage is 350 on AP, 300 on HEAT, and 440 on HE
-It has a 7.3s reload, giving it 2867 DPM
-Penetration on AP is 235mm, HEAT is 280mm, and HE is 52mm.
–Estimated aim time is 2.6/2.8s
–Base aim time is 1.9s, but it can get down to 1.55s.
-Dispersion is 0.326/0.293
–Gun handling is 0.12/0.12/0.08, or 0.1/0.1/0.07 with Vertical Stabilizer.
-Gun depression is -10 degrees
Just like with the Nebulon, this gun is overall just amazing in every statistic. It has good alpha damage, good accuracy, great DPM, amazing aim time and gun handling, and a very nice -10 gun depression. The penetration is decent, but nothing special.
Mobility
-Top speed is 45km/h forwards, and -20km/h in reverse
-Traverse speed is 53.3 deg/s on hard terrain, and 48.5 deg/s on medium terrain.
-In game acceleration rate is shown as 17.2 hp/t, it has strong 863hp engine for its 50 ton weight.
-Actual acceleration rate is 17.2 hp/t on hard terrain, and 15.6 hp/t on medium terrain.
–Terrain resistances are 1/1.1/1.5
The mobility of the Glacier is quite mediocre. Its by no means bad or slow, especially when you consider this tank’s armour, but the mobility standard for tier 9 is quite high, and the Glacier is one of the least mobile tier 9 mediums.
The acceleration and traverse speeds are both decent, on both medium and hard terrain. Terrain resistances are great, the 0.1 difference means that the tank barely loses any mobility performance by going off road. Top forward speed isn’t high, but it doesn’t feel like the tank is held back by this.
Special mechanics
The Glacier has 2 special mechanics: quick track repair, and tracer shells.
Track repair:
If the Glacier’s tracks get broken, they will repair in roughly 2.5s (with a level 7 repairs crew skill). This can be improved by using protective kit.
This is good, since its easier to get away with only using 1 repair kit quite easily, since you basically won’t need one for repairing the tracks.
Tracer shells:
This mechanic means that whenever you hit an enemy who is spotted, they will be spotted for twice as long (20 seconds instead of the usual 10).
This is useful for knowing where enemies are on the map, even after they retreat into cover. Sometimes enemies won’t be expected to be spotted for so long, and expose their tank, allowing you/your team to put damage into them.
Its nice to have this mechanic, but it doesn’t really have a huge effect on the Glacier’s gameplay.
Equipment, provisions, & consumables
The Glacier doesn’t have any special provisions or consumables.
Gun Rammer:
Though the Glacier doesn’t have high penetration, its still decent enough to work well in tier 9, and will only struggle against strong tier 10 heavies (such as a hulldown E 100 or IS-7).
Generally a gun rammer is the better choice, since the Glacier is a medium, it will fight against mediums. Mediums have higher DPM but less armour, and gun rammer helps to improve the DPM. Calibrated shells isn’t needed, since the tank doesn’t struggle to penetrate most mediums.
Gun rammer would take the reload down from 7.9s to 7.3s, and increase the DPM from 2666 up to 2867.
Improved Modules:
Improved modules are necessary on this tank. Typical of a Centurion hull, the Glacier has a large and weak ammorack right in the front of the hull. This can get damaged quite often if enemies shoot the frontal area of the hull (either the upper plate, lower plate, or front areas of the sides).
Improved modules will improve the ammorack health, so its more durable and has less chance of being damaged.
Improved modules also decreases the damage you take when you ram an enemy, making ramming more effective. The Glacier weighs 50.3 tons, so ramming enemy medium and light tanks is very effective.
Gun Laying Drive/Supercharger:
Since the aim time of the Glacier is so good, you can be flexible with the accuracy-related equipment choices on this tank.
Gun laying drive is generally the better equipment choice, since in most battles, you won’t be using the tank at long distance, and even when you do, the 1100m/s AP velocity is by no means slow or difficult to use. GLD lets you aim your shot in quicker, and its the only equipment piece that actually improves base aim time.
This would improve the base aim time from 1.72s down to 1.55s.
Supercharger is good if you just want to snap shots in without needing to give much lead to your shots, and basically just hit them instantly, even at longer ranges. This equipment works well on the Glacier since the tank just has such amazing gun handling/aim time/dispersion, and it can afford sacrifice a bit of that base aim time.
Supercharger would increase AP velocity from 1100m/s to 1430m/s, and HEAT/HE velocity from 950m/s to 1235m/s.
Improved Assembly/Enhanced Armour:
Either equipment choice can work on this tank, but with the Glacier’s focus on armour, enhanced armour is a better choice for the tank.
Improved assembly is good for taking more hits in battle, and surviving for longer against enemies who can penetrate your tank’s armour. It would increase the HP of the tank from 1650 up to 1749.
Enhanced armour is generally the better choice, since even 1 extra shot bounced is already more beneficial than the 99 HP increase of improved assembly.
Enhanced armour would improve:
Turret front left panel 1: from 247mm up to 257mm.
Turret front left panel 2: from 260mm up to 271mm.
Turret front right panel 1: from 270mm up to 281mm.
Turret front right panel 2: from 265mm up to 275.5mm.
Upper plate + spaced armour: from 240mm up to 251mm.
It also improved the side armour and other areas of the tank, but the effect is less noticeable. The biggest increase is on the turret and upper plate, where the armour goes up by roughly 11mm in effective thickness.
Importantly, enhanced armour increases the turret roof from 50mm to 52mm, which now stops 152mm, 152.4mm, and 155mm guns from overmatching, meaning only the FV183 and Jg. E 100 can overmatch the turret roof.
Vertical Stabilizer/Refined Gun:
Since the Glacier’s gun is good on every aspect of its accuracy, it can be flexible with this equipment choice.
Refined gun is great if you want to have an accurate gun at longer ranges. You’ll have to aim in for slightly longer, but be able to pull off more accurate shots. This and supercharger make for an amazing combination for doing snap-shots against enemies, and due to the great handling and aim time of this tank, it can easily accommodate this setup.
Vertical stabilizer is the better equipment choice in closer range fights. It lets you be very reliable and consistent with your shots, since the gun doesn’t bloom out as much when you move, making it easier to hit shots without aiming much. This is better if you play quite actively in the battle, constantly moving, relocating, flanking, circling enemies, or just being in brawls.
Gameplay advice
The Glacier has a fairly standard medium tank playstyle, but with more emphasis on hulldown and armoured gameplay, rather than fast flanking, supporting, or spotting.
Even though its slightly slower than most tier 9 tanks, and slightly more armoured, you should still play this in a similar way to other gun depression/turret armour mediums. Its still mobile enough to get around or change flanks if it has to.
General gameplay:
Take the Glacier to the MT side of the map. Even though it has reinforced armour compared to most other mediums, its still not good enough to brawl with heavies.
On the MT side of the map, you’ll generally face medium and light tanks, which have far less penetration than heavies, so you’ll have the most effective armour against these enemies.
Your fairly average penetration is also not as noticeable when fighting mediums, as they have less armour than heavy tanks.
Avoid rushing early dominant positions, such as the hill on Mines. The Glacier is just too slow to compete with other medium tanks, and especially light tanks. It will arrive to the frontlines after them, so will have lost the element of surprise (since you’ll be spotted). The large size of the Centurion hull also doesn’t help, and any enemies that are paying attention can just obliterate the sides of your tank.
Once you get to the frontline, try go hulldown or use gun depression whenever possible, its where your armour works best.
Brawl with other mediums quite confidently, your tank has both good DPM and good alpha, it also has good armour and good HP. You can easily out trade or out-reload quite a few tanks, and have quite good DPM.
Use gun depression & hulldown positions:
Since the Glacier’s gameplay relies quite heavily on making its armour work, using gun depression and hulldown positions is essential.
When hulldown, the lower plate is removed as a weakpoint, this is the easiest weakpoint to go for on this tank.
Enemies will have to aim for the upper plate, which is stronger, or the turret which is very strong.
Note that there are weakpoints when hulldown and not using gun depression. The turret roof is penetrable to HEAT or HESH rounds, the cupola is fairly easy to see, the turret base is weak, and the edges of the upper plate are weak.
When using gun depression, the tank is in its strongest state. The cupola is extremely small and hard to hit, the turret roof weakness is gone, the turret base weakness is gone, and you can hide the upper plate weaknesses behind a ridge.
The weakest points are the turret cheek spaced armour panels, which you can make really troll and hard to aim for, by moving the tank back and fourth slightly while hulldown.
Sidescraping:
This tank can be sidescraped around a corner, since the rear area of the hull essentially won’t be penetrable.
Against AP and APCR, it would be an auto-ricochet caused by the 50mm spaced armour plate.
Against HEAT and HESH, the spaced armour’s high thickness and distance to the hull make it essentially impossible to penetrate in a sidescrape angle.

Note how in the right image, the track is exposed. Even though the armour behind it is red, the 240mm AP penetration can go through without any issue.
When sidescraping, you want to do what’s shown in the left image.
Your aim when sidescraping is to bait the enemy shots.
The aim is not for you to bounce shots while being able to shoot the enemy, that’s just not something a medium can do effectively.
Once you’ve baited the enemy into shooting your side, then reverse out and shoot them. Don’t come out if they haven’t shot, since they’ll shoot you, deal damage, track you in place, and then reverse, probably before you can shoot them back.
Using 240mm AP and 300mm HEAT, and hitting the area closest to the front, no shots can penetrate.
The sides only become penetrable when you show that front track wheel, or over-angle.

The only tanks which can really counter your sidescrape are guns that are 150.1mm or larger, which can overmatch that 50mm spaced sideskirt, and the 45mm plate behind it.
Don’t be afraid to take snapshots:
The good combination of shell velocity, aim time, accuracy, and gun handling mean you can very reliably hit shots, and don’t need much time to aim at all.
Don’t do this if you do have time to aim, but if you are in a stressful situation, you can be more confident in hitting shots without aiming.
The Glacier overall has a fairly standard medium playstyle, but with less focus on the speed and agility, and more focus on positioning and using armour.
Overall
Armour – 8/10
Gun – 9.5/10
Mobility – 4.5/10
Speed – 4/10
Overall the Glacier is a great tank.
Armour is strong. The turret is very solid and reliable, and the hull is fairly strong. Side armour is decent. HE/HESH protection is very good. Armour usable in hulldown, angling, and for sidescraping.
Gun has is great in every regard. Great DPM, alpha, gun handling, aim time, -10 gun depression, and good dispersion. Penetration is decent.
Mobility is just slightly worse than average. Acceleration and engine power are decent, traverse speed is ok, and reverse speed is average for a medium. Most other tier 9 MT have more in acceleration/traverse.
Speed below average with 45km/h, most tier 9 MT have at least 50km/h.
Is it worth it?
This tank is only achievable by either spending gold or money to get the season 2 currency Fortium. It cannot be earned for free in any way.
Considering this, is the tank worth it?
Yes, but only for some players. The more reliable armour profile compared to other tier 9 mediums is a refreshingly different type of gameplay, and players who like hulldown tanks, or more heavily armoured mediums will be able to really enjoy this tank.
It also doesn’t only offer armour, since its gun is amazing in every aspect, and it also has decent general mobility and speed; even if slightly below average, its still not a slow tank.
If you don’t really care about medium tanks or hulldown gameplay, then this tank isn’t worth losing your mind over. Its good, but its not the new best tier 9 medium tank. Also don’t get this tank expecting to have HESH, it has regular HE.
The Glacier is worth 13,500 gold. This is a great tank with an amazing gun, a solid and reliable armour profile, and decent mobility. Its a great all-round vehicle which specializes a bit more into its armour than its speed, and has a slightly different MT feel due to it.
Camo cost:

Glacier has a permanent appearance which can’t be adjusted.
Its shown here in the stock configuration.
Glacier has a few animations, the optic on top turns, viewports have “scanners”, and headlights all light up.

Stock grind
As you upgrade modules, the stats of each module improves slightly, improvements are not large, they are very gradual.
This tank starts with a 100mm gun that does 310 damage, this is the same for T2 and T3 versions of the gun, only the T4 gun becomes a 105mm with 350 damage.
If you want to check the stats of each module, you can view the tank in-game, or use gamemodels3d or Blitzstars.
Important:
-Only the top turret improves turret armour, all the stock and intermediate turrets have the same armour.
-Stock and top turrets/guns have the same gun depression.
–Gun handling does upgrade with each track updgrade.
-The hull doesn’t upgrade, the armour is the same throughout.
Gun:
When stock, Glacier starts with low DPM and 310 alpha. The reload time is decent enough, and penetration is barely worse than the top gun. Accuracy isn’t great but its usable, and aim time is decent. Going to the T2 and T3 guns, penetration, accuracy, and DPM all increase very slightly.
The stock guns are fine, since the only really poor stat is the DPM.
The T3 gun is actually a viable alternative to the T4 gun. It has basically the same penetration (2mm less on all shells), with the same accuracy, aim time, etc. It has less alpha and DPM, but its reload is faster by 0.5s. Its not better than the top gun, but its actually still fairly competitive in tier 9.
Turret:
The stock turret is actually not bad. It has good armour, only being 10mm weaker than the top turret, and its cupola is actually smaller than the top turret. You can see this in the image below.
The downsides of the stock turrets are very low HP for a medium (T1 has 1500, increasing by 50 per upgrade), and 10m less view range than the T4 turret.
Engine:
Engine power, traverse speed, and acceleration are all slow when stock. This tank is just barely more mobile than a fast heavy.
This is not only due to the stock engines, but the tracks also have worse terrain resistance, which combines to make a slow tank. Track and engine upgrades on this tank make a very notable difference.
Tracks:
T1-3 tracks are all quite terrible. They all have significantly worse terrain resistances than the amazing 1/1.1/1.5 of the T4 tracks, and much worse gun handling than the amazing 0.12/0.12/0.08 of the T4 tracks.
T1 starts with 1.1/1.3/1.6 on terrain resistances, and 0.16/0.16/0.1 with gun handling, and T2 and T3 both gradually improve on these stats.

Shown against 240mm AP.
The main difference to the top turret is on the turret panels 1 and 2, since these are the main turret weakpoints.
Turret left panel 1: 235-240mm
Turret left panel 2: 230-235mm
Turret right panel 1: 260mm
Turret right panel 2: 250mm
Upgrading:
As said above, upgrading each module improves it slightly. In total there are 4 of each module on this tank. 1 stock module, 2 intermediary modules, and 1 top module for each turret, gun, engine, and tracks.
Each gun upgrade improves dispersion by 0.010, penetration on all shells by 2mm, reload by about 0.5s, and DPM by about 150.
Each turret upgrade gives 50 more HP, better turret turn rate, turret traverse gun handling, and improved reload.
Each engine upgrade improves traverse speed and acceleration rate.
Each track upgrade improves traverse speed, overall mobility performance, and gun handling.
Eventually you get to the top modules, these are the only modules which change in appearance.
-The top gun has the best accuracy and penetration, but also increases in both alpha damage and DPM, but its reload is slightly longer.
-The top turret improves in armour and view range.
-The engines and tracks are also in their best configuration, so also output the best possible mobility for the tank. The tank now feels actually mobile, and doesn’t move like a heavy tank.
