
Kranvagn is the top tier Swedish heavy tank, it features great turret armour, an accurate gun, and the auto-reloader mechanism. It has poor hull armour and unimpressive speed.
Click the table of contents below to access the section you want:
- Armour
- Gun
- Mobility
- Equipment, provisions, & consumables
- Gameplay advice
- Overall
- Is it worth grinding?
- Camo cost:
- Tech tree overview
- Historical note:
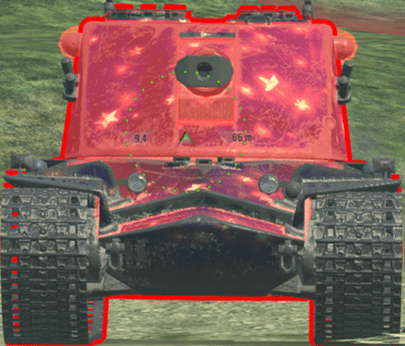
Armour
(The Kranvagn in the images is using Improved Assembly)
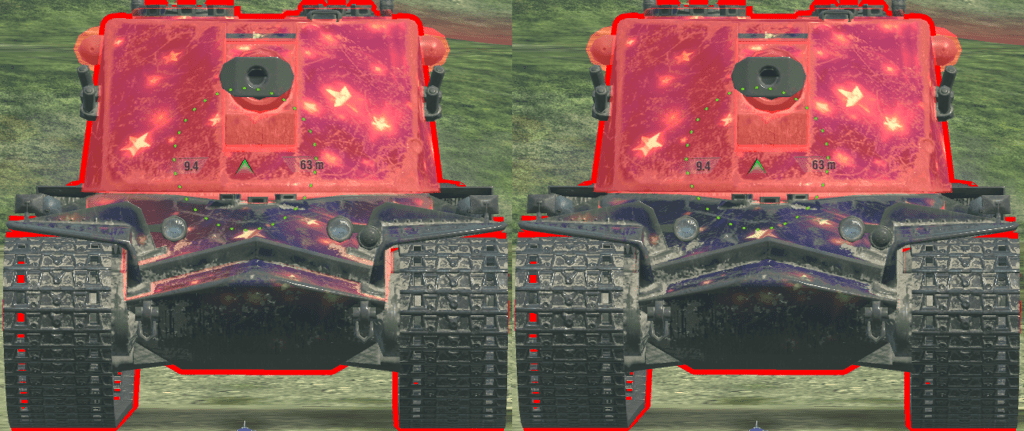
vs 255mm AP (left image), 330mm HEAT (right image)
When flat and facing head-on:
Upper plates 250-270mm
Lower plate 175mm
Turret face 370- 400mm (340mm below gun mount)
Cupolas 80mm
vs 255mm AP, using about 0.5 to 1 degrees of gun depression
As shown here, just using minimal gun depression will cause the upper plates to become troll for enemies to penetrate.

vs 330mm HEAT
Using -9 gun depression
Upper plates 400-450mm auto-ricochet
Turret face 420-535mm
Cupolas 80mm
VS all tier 9-10 tanks:
Against any tier 9 or 10 enemy, the Kranvagn’s armour will perform in roughly the same way, as it has a very black and white armour profile.
The turret is impervious to everything its faced against. On flat ground, only tank destroyers with calibrated shells will even have a chance of penetration, and when using gun depression, nothing can penetrate.
The hull is weak to everything this tank faces. The lower plate can be penetrated by everything, and though the upper plates can sometimes be troll, they are in a pike-nose layout, so angling the armour weakens it.
Gun
The Kranvagn mounts a 120mm regular auto-reloader gun. Its best DPM is when its magazine is full, the more you shoot, the longer the reload times of each shell get.
All auto-reloaders have 3 firing modes (you won’t notice in battle, but it helps to understand the gun better).
Single shot mode:
(Where you shoot one shell, reload, shoot….)
-The best DPM in “single shot mode” is on shell 3
-Shell 3 has an 9.21s reload, giving the tank 2671 DPM in this mode.
Autoloader mode:
(Where you just unload 3 shells then reload back to full)
-Reload time from having 0 shells in the clip to having 3 shells in the clip takes 28.7s.
-Intra clip is 2.73s with 3 x 400, giving the tank 2160 DPM if it shoots like an autoloader would (as in: fires 3 shells, reloads fully, then fires 3 shells, etc).
Auto-reloader mode:
(A combination of the first two. Only shooting until you need, and then reloading one-by-one.)
-Reload time for each shell is:
Shell 1 – 12.96s = 12.96s
Shell 2 – 9.26s (+ 2.73s) = 11.99s
Shell 3 – 6.48s (+2.73s) = 9.21s
Gun stats:
-Alpha damage is 410 on APCR, 350 on HEAT, and 530 on HE
-Intra-clip reload is 2.73s, so in 5.46s it can deal 1230 damage.
-Penetration on APCR is 250mm, HEAT is 310mm, and HE is 60mm.
–Estimated aim time is 3.7/4.1s
–Base aim time is 2.4s, but it can get down to 1.96s.
-Dispersion is 0.326/0.293
–Gun handling is 0.18/0.18/0.1, or 0.16/0.16/0.09 with Vertical Stabilizer.
-Gun depression is -9 degrees
Other than the DPM and reload time, this is a great gun. The handling and accuracy are both great, and you can really feel it when playing the tank, as the gun is just consistently accurate and easily able to hit shots. Gun depression is good, penetration is good (but slightly below average on standard ammo), and intra-clip reload is good.
The aim time is fairly mediocre, so at longer ranges you’ll have to take a bit more time to make sure the shot is accurate, but generally the good handling and accuracy help to compensate for this.
The gun overall just has very poor penetration, with APCR as standard ammo (only 2° of normalization), low overall penetration on APCR & HEAT shells, & bad penetration loss over distance (meaning past 100m your penetration drops off significantly on APCR).
Mobility
-Top speed is 34km/h forwards, and -18km/h in reverse.
-Traverse speed is 40.1 deg/s on hard terrain, and 28.6 deg/s on medium terrain.
-In game acceleration rate is shown as 15.7 hp/t, it has good 702hp engine for its 45 ton weight.
-Actual acceleration rate is 15.7 hp/t on hard terrain, and 11.2 hp/t on medium terrain.
–Terrain resistances are 1/1.4/2
Overall the Kranvagn’s mobility is good. It has a decent top speed with very nice reverse speed, and quite good acceleration to be able to reach it on both medium and hard terrain. The traverse speed on hard terrain is quick, but on medium its not so impressive.
Equipment, provisions, & consumables
The Kranvagn tech tree (tiers 8-10) gets sandbag armour, reticle calibration, and improved speed boost for special consumables and provisions.
Kranvagn should use these consumables:
Reticle Calibration – For when needing to make a game-winning shot, or just be even more precise.
Large repair kit – For tank maintenance in battle.
Improved engine power boost – Essential to winning battles in the Kranvagn, needed to reach positions, relocate, support allies, etc
And these provisions:
10% food – Essential for all important stats on your tank, DPM, reload, traverse speed, view range, etc.
10% fuel – Greatly improves the mobility of the tank and is completely necessary to the tank’s gameplay.
6% sandbag armour – This is just a free 141 HP for your tank, you can stack it with improved assembly for 2632 total HP, or even 2703 (but that’s not recommended).
Improved Ventilation/Calibrated Shells :
Either can work well on the Kranvagn, as it doesn’t lack much, and neither vents nor calibrated shells are necessary for this tank to perform well.
Use vents if you value the tank’s accuracy, reload time, and mobility over penetration. On Kranvagn, the biggest difference that you will notice from vents is 0.16s faster reload on shell 1, 0.17s faster on shell 2, and 0.24s faster reload on shell 3.
Use calibrated shells if you want to improve the penetration of the tank. The Kranvagn has good penetration, but as it can’t use a gun rammer, using calibrated shells doesn’t really cause it to lose a big DPM advantage. Calibrated shells sacrifices that 5% crew skill of vents in exchange for increased penetration, 266mm on APCR, 363mm on HEAT, and 66mm HE.
Improved Assembly:
Since the armour of the Kranvagn is very black & white (turret impenetrable, hull easily penetrable), it doesn’t benefit from enhanced armour.
Its far better to use improved assembly, especially as you can stack it with sandbag armour. Improved assembly brings the Kranvagn’s HP up from a decent 2350 HP to 2491 HP; however with sandbag armour it can reach 2632 or 2703 HP.
Vertical Stabilizer:
As the Kranvagn is not a sniper, and it already has good accuracy, it doesn’t need to use refined gun, and benefits much more from the vertical stabilizer.
The stabilizer will help the Kranvagn be more accurate when its moving and after its stopped moving, but also lessens the bloom-after-shot, which is very helpful when the tank is unloading a magazine.
Consumable Delivery System (CDS):
With the Kranvagn, its improved speed boost consumable is essential to it doing well in battle, but this consumable has an extremely long base cooldown time of 1m 30s.
This consumable is essential to the tank at any point of the battle when it needs to relocate, change flanks, make a push, or drive across an open area. The Kranvagn’s 30km top speed is very limiting, and this consumable is extremely important for the tank to do well.
Its better to use CDS, as it will increase the amount of times that you can use the speed boost during a battle. In most battle situations, you aren’t needing a long duration with that higher speed. However, since its so useful in so many situations, its a lot more useful to be able to activate it more often in the battle; hence why CDS should be used instead of the alternative equipment choice.
Gameplay advice
The Kranvagn is a support heavy tank. Its relatively low DPM/alpha ratio make it hard to brawl or damage trade easily, but the auto-reloader makes it very flexible in a supporting role.
The Kranvagn is effective as a more passive tank, rather than making pushes, its more adept at, supporting allies with covering fire or dumping the magazine when needed.
On the frontline, just holding down a position and keeping enemies back with its turret armour and an occasional shot also works well.
General gameplay:
Kranvagn should start the battle by pushing to the heavy tank side of the map.
Sometimes using the improved engine power boost will help you get to position safely, such as on Naval Frontier. However, this is different for each map, and you shouldn’t waste this consumable at the start of the battle if its not needed.
Also note that if you get into a position too early, your tank may not even be fully reloaded, as it can take between 28-31s for the Kranvagn to reload from empty.
Positioning:
Once at the heavy tank side of the map, take up a position where you can be hulldown; if there are no hulldown positions, then take a 2nd line position with some cover so that you can support allies, but still safely reload.
Use the hulldown position to grind down the enemies’ HP. Whether you burst multiple shots from the magazine will depend on the situation, and your judgement as a player; however the hulldown position ensures that your hull is hidden and you can safely reload you shells without being damaged.
If using a 2nd line position, just poke out and take opportunistic shots, such as if enemies have their turrets turned away from you or are focussing on your allied tanks. Being on the 2nd line gives you a safe position where you have cover and can reload while away from enemy guns, but simultaneously you aren’t too far from the frontline, and can push up to help allies if needed.
Hold positions:
The Kranvagn is very good at holding positions due to its strong turret and auto-reloader.
Though the Kranvagn itself cannot push enemies, enemies will also not want to push you. The auto-reloader allows you to safely reload after shooting a shell, as enemies generally won’t want to push, knowing you may have 2 more shells in the magazine.
If there are defensive positions, always take these. Aggressive positions won’t favour the Kranvagn, as you face against aggressive tanks, defensive positions are where the Kranvagn will do well.
Facehugging:
Kranvagn can facehug many enemies, as its hull is very low profile, and its turret is extremely strong. Just be aware that the Kranvagn’s low DPM means that it can take quite a while to get out of the facehug situation.
Also be aware of low profile tanks with good gun depression, as these enemies may be able to hit the hull.
Making a push:
Eventually you may have to push an enemy in a battle. Its not what the Kranvagn is good at, so you have to play it perfectly.
If the enemy has more than 1200 HP, only shoot 1 shell at a time, DON’T fully unload the magazine. Kranvagn has the best DPM when fully loaded (3 shells in the magazine), so when taking on an enemy, hold back from shooting all 3 shells. Just shoot that first shell, then reload, repeat this until the enemy has 1200 HP or less, then you can unload all shells in the magazine and destroy the enemy.
Use facehugging, and your consumables. All enemies have higher DPM, so you have to try reduce the amount of damage you take, and maximise the damage you can cause the enemy.
Kranvagn is a somewhat passive support heavy tank, its strengths are in holding positions and slowly grinding down the enemies’ HP, but it struggles with brawls and facing enemies head-on and alone.
Overall
Overall the Kranvagn is a unique and enjoyable tank. In tier 10 its also quite a good tank, as it provides that flexible auto-reloader mechanism, while still able to have high HP and great turret armour.
The Kranvagn is not easy to play even though its an auto-reloader heavy tank, as its DPM is just so low, less skilled players will find it hard to know when to hold the shell, when to unload, or how to make time to reload.
Is it worth grinding?
The Kranvagn is worth grinding, but only if you are certain its a tank you will like. Note that this tank is not worth grinding as a starter line, as its hard to play, though it can help newer players learn autoloader and auto-reloader gameplay.
Kranvagn actually has a lot to hate about it, having unimpressive speed, weak hull armour, slow reloads, and one of lowest DPMs in tier 10 (especially for a heavy tank.
Other than a unique and flexible playstyle, the Kranvagn doesn’t actually offer much statistically. This doesn’t mean the tank is bad or un-enjoyable though, as it does perform well and overall combines a lot of nice features for its gameplay style.
This should be a line that you grind after getting the hang of the game (and of tier 10), and wanting some new flavour of gameplay. Kranvagn is a good tank, but its hard to play, and there are things which many players may not like about it.
Camo cost:
“Nord” camo: 2D, costs 2,550 gold

“Nidhögg” camo: 3D, costs 2,550 gold
Tech tree overview
To get to the Kranvagn, you need to grind through the European nation low tier medium and light tanks, at tier 6 switching to the Swedish medium/heavy line.
Most of the tanks in this line have ok stock grinds, though the stock Emil 1 & Emil II are pretty much unplayable when stock, so its best to save some free XP to immediately get top modules (namely the engine or tracks).
-Tiers 1-5 are fairly generic tanks, all mediums or lights with little armour and average guns. Other than the Strv m/42, all are also easy stock grinds.
-Tier 6 is the Stridsvagn 74, an average tank with good gun depression, gun, and decent turret armour.
The stock grind is not the worst, but the tank is very slow when stock.
-Tier 7 is the Leo, a good tank with good gun depression, DPM, and high alpha damage. Its hull armour is decent but shouldn’t be relied on. Its also very mobile but top speed is limited.
The stock grind of this tank is pretty ok, the gun is quite good, but has low alpha, the mobility isn’t quick for a medium but its also not super slow, and the stock turret isn’t any worse than the top turret.
-Tier 8 is the Emil 1, a good heavy tank with very strong frontal armour, great gun depression, but quite a bad gun and very poor mobility. The tank isn’t accurate, has terrible penetration, and has mobility like a superheavy; luckily it gets some consumables to improve accuracy and mobility.
The stock grind of the Emil I is unusable. Playing this tank without full equipment, with the stock engine, and stock tracks is just not doable. The tank basically doesn’t move, that’s how slow it is; and the gun is also even less accurate when stock, with even worse penetration.
If you grind the stock Emil I, its seriously advisable to save a lot of free XP, so you can immediately get the top engine and tracks, the stock gun is usable when you have those. The top gun is not what you should unlock first, as its actually heavier than the stock gun, and other than penetration, its not that much better than the stock gun.
Get the tracks, they improve acceleration, traverse, and gun handling; also get the engine, also improving acceleration and traverse.
Alternatively, grind the stock Emil during a fun mode where you can get boosted mobility, such as Burning Games, Gravity Force, Uprising, or Big Boss modes.
-Tier 9 is Emil II, a good heavy tank which is basically a Kranvagn at tier 9. It has a strong turret, a good gun with an inverse auto-reloader (DPM gets better the more you shoot), and better mobility than the Kranvagn.
Just like the Emil 1 the stock grind of the Emil II is pretty much unplayable. Mobility is terrible, the gun is the same as on the Emil 1, so it has very low penetration, but at least its pretty accurate with decent DPM. There is no stock turret, so its only the mobility and penetration that are really issues.
With Emil II, its advisable to grind the engine first, then the gun, and then the tracks. The engine gives the tank much improved mobility; the gun gives much needed penetration, so it can deal with tier 10 enemies; and the tracks improve both gun handling and mobility.
-Tier 10 is the Kranvagn, its pretty much identical in playstyle to the Emil II, but instead of an inverse auto-reloader, the Kranvagn has a regular auto-reloader (so DPM gets worse the more you shoot).
Compared to the other 2 heavies in the line, the Kranvagn has by far the best turret armour, but it also has the weakest hull for its tier. The mobility is intermediate, its worse than the Emil II, but much better than the Emil 1, and its gun is by far the best, having good stats all-round.
Kranvagn is a slow, hulldown support tank. Its main attribute is in its gun’s flexibility, but it plays rather passively and in a supporting role due to its very low DPM and weak hull armour.
Historical note:
The Kranvagn was a real tank. It was also called KRV, Emil III, or Stridsvagn KRV. Its name means “crane” or “mobile crane”, and was named as such to keep secrecy over the project (much like how the word “tank” refers to a water tank, and was named as such to keep secrecy in its development back in WW1).
Kranvagn was the 3rd version of the Emil heavy tank project after the Emil 1 (1951) and Emil II (1952). It had a mock-up model, and its hull was built, but the turret was never constructed.
