
Page last updated 23 June, 2026.

The Lion is a tier 10 Italian medium tank. It features a 3 shell 105mm auto-reloader gun with 340 alpha, decent turret armour, though quite mediocre mobility and gun mantlet armour. It also has access to the tungsten shells consumable.
- Armour
- Gun
- Mobility
- Consumable loadout
- Equipment loadout
- Using the Auto-Reloader
- Gameplay Advice
- Overall
- Is it worth getting?
- Price Guide:
- Camo cost:
Armour
(The Lion in the images is using Improved Assembly)
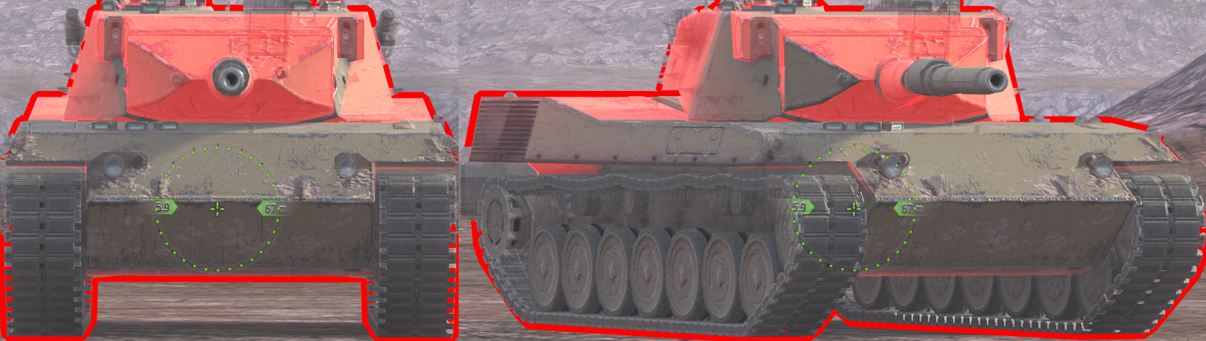

Drag slider right -> to view 245mm AP
Drag slider <- left to view 300mm HEAT
Armour when flat and facing head-on:
Upper plate 230-240mm
Lower plate 115mm
Turret cheeks 290-350mm auto-ricochet
Gun mantlet center 260mm
Gun mantlet edges 360mm+
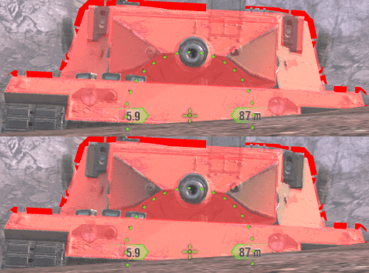
vs 245mm AP (top image), 300mm HEAT (bottom image)
Using -8 gun depression:
Upper plate 300-310mm+
Turret cheeks 320-390mm
Gun mantlet center 270mm
Side armour:
The Lion’s side armour is 50mm behind the tracks and 52mm above the tracks, the tracks themselves are 20mm, there is no side spaced armour.
Just like a Leopard 1, the side armour is very easy to HE & penetrate, so try to avoid showing it much.
Armour Performance:
Strong areas:
-The turret front & gun mantlet are very reliable against most ammo, especially when using gun depression.
-When using gun depression, the upper plate is very against most enemy MT.
Main weakpoints:
-The upper & lower plates are both weak on flat ground, and the lower plate is penetrable to HESH ammo.
Gun
The Lion mounts a 105mm auto-reloader gun.
Firepower:
-Ammo: AP/HEAT/HE.
-Penetration: 242/300/61mm.
-Alpha damage: 340/290/430
Reload times:
– Shell 1 – 14.49s = 14.49s
– Shell 2 – 3.51s (+3.33s) = 6.84s
– Shell 3 – 4.48s (+3.33s) = 7.81s
-Intra-clip reload: 3.33s
Best DPM:
-Shell 2
-Reload: 3.51 (+3.33)= 6.84s
-DPM: 2982
Handling:
–Estimated aim time is 3.0/3.2s
–Base aim time is 2s
-Dispersion is 0.317/0.269
–Gun handling is 0.14/0.11/0.1, or 0.12/0.1/0.09 with Vertical Stabilizer.
Usability:
-Shell velocities are 880/800/700 m/s
-Gun depression is -8 degrees.
Overall this is a good gun. For an auto-reloader it has good reload time on its max DPM shell, with good gun handling & accuracy. Aim time is slightly below average, and AP penetration is on the lower end for mediums. The reserve shell reload time is much better than other tanks with this “mechanic”, which allows the Lion to use it more in battle.
By far the best aspect of this gun is its ability to unload 2 shots and have its best DPM shell. This gives it a huge advantage in damage trading scenarios (as you can shoot 2×340, then continue with almost 2.9k DPM), and its a very flexible gun due to this, as it can be both a DPM gun and a 2-shot burst. Both the Carro 45t and Progetto 65 lose DPM by using more shells, the Lion doesn’t.
Mobility
Raw stats:
-Forward speed is 52km/h.
-Reverse speed is -21km/h.
-Raw acceleration rate is 22.5 hp/t.
-Engine power is 986hp for its 44 ton weight.
–Terrain resistances are 1/1.3/1.5
Hard terrain mobility:
-Actual acceleration is 22.5 hp/t.
-Traverse speed is 62.0 deg/s.
Medium terrain mobility:
-Actual acceleration is 17.3 hp/t.
-Traverse speed is 47.7 deg/s.
Mobility of the Lion is bad, compared to other tier 10 medium tanks. As a medium overall, the mobility is decent, it accelerates & turns pretty quickly on hard terrain, but loses a noticeable amount of mobility when going off road, though its still not “slow”.
Tier 10 mediums generally have extremely high effective acceleration and very good terrain resistances, hence why the Lion is so far below average (in fact the slowest/least mobile tier 10 medium).
Consumable loadout
Consumables:
– Use tungsten shells this increasee the alpha damage of your shells, on average adding 51 damage to AP, 44 damage to HEAT, & 65 damage to HE.
Combine this with the fact the Lion can easily use multiple shells during the duration of Tungsten Shells, it makes a noticeable difference in battle.
– Use the multi-purpose-restoration pack, this is needed for any tank repairs in battle.
– The last consumable can either be engine power boost or the small repair kit, depending on how often you feel the tank’s modules get damaged in battle. As the tank is the slowest tier 10 medium, first try it with the engine booster. If your modules get damaged a lot, then drop the engine boost for the repair kit.
Equipment loadout
Calibrated Shells:
Due to the Lion being an auto-reloader, it benefits a lot from having higher penetration. This tank already trades DPM to have an auto-reloading system, which lets it put out damage in bursts. Having higher penetration is very important for making sure those bursts of damage connect and actually deal damage.
The Lion also has low standard penetration, and due to already having less DPM than most mediums, if you can reduce how much you use premium ammo (by increasing AP penetration), then your effective DPM will be better.
Calibrated shells would increase penetration on AP from 242mm to 261mm, on HEAT from 300mm to 339mm, and on HE from 61mm to 66mm.
Improved Assembly/Enhanced Armour:
Both of these can work.
Improved assembly adds extra HP to the tank, bringing it from a good 1840 up to 1914. This will let you survive a few high rolls and generally just let you soak a bit more damage.
The main use of enhanced armour will be to make the upper plate stronger, this is more likely to force enemies to use premium ammo, and will be most noticeable in situations where the hull is slightly angled, or you are using some (not all) gun depression. It won’t be noticeable when you play it, but the improved upper plate armour will show up as red in some situations where it otherwise wouldn’t (if you had been using improved assembly), and this can cause enemies to bounce, or at least do reduced damage by using premium ammo.
Vertical Stabilizer/Refined Gun:
Either of these is a good choice.
Consumable Delivery System/High-End Consumables:
Again, both are good choices. CDS will give you a noticeably quicker cooldown, even with the base duration of 15s on tungsten shells, you can still easily put out 3 shots. With CDS giving a cooldown of 62s, you’ll be able to use tungsten shells in more fights/engagements during the battle. CDS is most effective to pair with a cooldown booster, as it gives an extremely short 49s cooldown.
HEC is useful as it increases the duration of tungsten shells to 19.95s, which would let you put in 4 shots while using the consumable (Shells 2 & 3 burst, then continue shooting shell 2 for two more shots). This helps to increase damage in general, but in a 1v1 fight it will very noticeably help decrease your DPM disadvantage.
This also works very well with cooldown boosters
Using the Auto-Reloader
The Lion’s auto-reloader is extremely unique, since it can be used so flexibly, even more so than other auto-reloader guns.
The reason for this is that the highest DPM shell is in the middle of the magazine, which lets you do a 2-shot burst, have the best DPM shell for as long as you need, while still always having 2 shells left in the magazine (due to the reserve shell).
On top of this, the reserve shell reload is significantly shorter than any other auto-reloader, which lets you use it much more during battle.
Single shot mode:
You need to be on shell 2 to use the Lion as a cyclic gun tank, so you must fire 2 shots from the magazine (from the time when its fully loaded) to have the DPM of shell 2, which is 2982.
Don’t play it like the Progetto 65, Carro 45t, Kranvagn, or Minotauro, where you have to always stay on a fully magazine to have the best DPM.
If you do this in the Lion, your reload will be 8.01s, giving you 2612 DPM, its far more effective to just shoot both shells out, then continue to use the 2nd shell with 2982 DPM.
The best way to use the DPM mode is against higher damage enemies which have a reload longer than 8s.
2-shot autoloader mode:
This is essentially the same as above, except you don’t continue using the DPM on shell 2, you let the gun fully reload back to having a full magazine.
The reason for this is to let you have the trading capacity against single-shot enemies which reload faster than you. You can’t compete with them on DPM, so using a 2 shot damage burst to deal 680 alpha will allow you to always out-trade them, given that you can avoid their shots and don’t let them pull into cover.
As a 2-shot autoloader, you have 3.33s intra-clip, 680 damage burst, and a total of 11.32s reload (to go from 1 shell in the mag, to 3 shells in the mag). This gives you 2784 DPM.
The best way to use it as a 2-shot autoloader is against tanks with a reload time shorter than 7s. Pressure the enemy during your 3.33s intra clip to ensure you can put in both shots, do 680 damage, then pull into cover until you get at least your 2nd shell back.
3-shot autoloader mode:
Due to a faster reserve shell reload, the Lion can be a 3 shot autoloader, it just needs to time it right.
As a 3-shot autoloader, you have 6.66s unload time, total 1020 damage burst, and a total of 22.48s reload back to full. This gives you 2100 DPM.
Reloading after using the reserve shell:
This is a really special trait of the tank, the fast reserve shell reload, combined with the fast single shell reload, combined with the fact your best DPM is on shell 2, not shell 3.
To reload from empty back to having 2 shells, only takes 18.0s. At this point you have shell 2 loaded and can use the tank as a single-shot with 3k DPM.
Note that 18.0s is as fast as the Carro 45t loading its reserve shell only, for Carro to have its best DPM shell, it will take another 16s on top of this.
To reload from empty back to having 3 shells, only takes 22.48s. At this point you can use the tank as a 2-shot burst, and then use the 3k DPM on shell 2.
Gameplay Advice
The Lion plays a fairly similar role to other auto-reloading medium tanks. However, you need to account for the slow intra-clip reload and unimpressive mobility in the tank’s gameplay.
General gameplay:
The Lion should play similarly to other mediums in terms of positioning. Use it on the medium flank and try to make use of its -8 degrees of gun depression, despite unimpressive armour, its still enough to get some bounces and troll some enemies when used with gun depression. Don’t expose the tank longer than needed, as the gun mantlet is weak to any enemy.
Avoid DPM fights, since your DPM output is low. If it comes down to a one-on-one, keep calm and only use the 2nd shell, when the enemy is a guaranteed one-shot, use the reserve shell. Always take advantage of Tungsten shells as it also helps greatly to boost damage and DPM.
You are team reliant, the Lion can’t hold its own well without allied support due to its low raw DPM, unimpressive armour, and unimpressive mobility. Keep around allies, since they can cover you or stop enemies from rushing you, which gives you a chance to reload your magazine.
Do use the reserve shell:
Don’t just waste this shell and use it whenever, since its reload is still much longer and worse than both of your other shells.
However, the reserve shell reloads much faster than other tanks with reserve shells, so you can use it a lot more often and easily in battle.
The Lion only takes 14.5s to reload its reserves shell, another 3.5s later, it has reloaded shell 2, the best DPM shell. This means that it only takes 18s for you to be back to a fighting capacity with your best DPM shell, much quicker than other reserve shell tanks,
If you want to reload back to full, it takes 22.5s, this lets you use both the 2-shot burst mode, and then use the 3k single shot DPM.
Trading damage:
The best way to trade damage in the Lion is to use it like a 2 shot autoloader. If an enemy shoots you once, shoot them back, then keep pressuring them until you can shoot the next shell in the magazine.
This way, you can deal 680 (782 with tungsten) damage to your enemy, and most single-shot tier 10 guns will do less damage than 680.
Against big caliber guns, try to use a combination of burst damage and DPM. A 2-shot burst takes 3.33s to unload, shell 2 takes 6.8s to reload, so against tanks with more than 11s reload, you can put in 3 shells for their 1 fairly easily.
Use Tungsten Shells:
Using this consumable is very important to help improve your damage score in battle, and in some cases to guarantee kills.
Using Tungsten Shells increases your alpha damage by 15% up to the maximum damage roll, taking AP from 340 up to 391 alpha, HEAT from 290 to 334 alpha, and HE from 430 to 495 alpha.
Using it optimally, you can shoot 3 shots within 15s duration, without needing to use the reserve shell (shoot 2 shells of the magazine, then fully reload shell 2, and shoot again).
Stay on hard terrain:
Thanks to poor terrain resistances (compared to the very high standards of tier 10) of 1 on hard terrain, and 1.3 on medium, the Lion is quite a sluggish tank compared to other mediums.
Staying on hard terrain will help the tank retain its best level of mobility, which is a 22.5 hp/t acceleration rate with 62 degrees traverse. Hard terrain are roads/paths and any concrete or paved areas.
On medium terrain, which is any off-road area, the tank slows down noticeably, losing roughly 23% of its effectiveness compared to on hard terrain, and it makes it the slowest tier 10 medium.
Overall the Lion is somewhat similar to the other auto-reloader mediums, though it needs to account for worse mobility, and unimpressive armour. The gameplay needs to revolve around getting the gun to work, both as a DPM single-shot, and as a 2-shot autoloader, as this is the tank’s main advantage.
Overall
Armour – 5/10
Gun – 8/10
Mobility – 4/10
Speed – 4.5/10
Lion is overall a decent tank.
Armour is unimpressive. Frontal hull has decent protection, and turret is troll. Gun mantlet is weak & hull sides are prone to HE. HESH protection is poor.
Gun is very unique and extremely flexible with how its used. It also has good accuracy, gun handling, decent aim time, with good HE ammo. Penetration on AP is low, HEAT is good, gun depression is a decent -8.
Mobility is mediocre. On hard terrain its pretty good, but due to terrain resistances its far below tier 10 average on medium terrain.. Reverse speed is good at -21km/h.
Speed is a bit below average, with 52km/h.
Is it worth getting?
While this tank looks like nothing special, its DPM isn’t too great, its alpha damage is low, mobility is very below standard, and armour is certainly not impressive; it does have a place in tier 10.
This tank’s niche is its gun, mainly the fact that the best DPM shell is in the middle of the magazine. This makes it the only tank in game with the ability to do a 2-shot burst (increasing its damage advantage), have the best DPM with almost 2.9k, then when it needs to, do another 2-shot burst which empties the magazine. All the while you have the ability to use tungsten shells, and have much faster reserve shell reload than any other tank.
The above is what makes the Lion a very unique type of damage dealer which doesn’t exist in the game, able to use its gun as so many different types. Despite this, the tank still has very mediocre mobility and armour, so its only worth getting if you just want to have this different type of auto-reloader gun.
The Lion is worth 19,000 gold. Its a situationally very good tank, but equally a situationally bad tank. If you can play it right and you have some support from the team, the gun of the Lion allows it to work well in any type of fight. If your team falls apart or you don’t have support, then the DPM is too low & armour/mobility are too mediocre to be able to hold up well.
Price Guide:
Prices you can expect the tank to be sold for, based on previous sales in store.
25,000 gold – Camo + equipment + tank.
22,500 gold – Tank only
Camo cost:

The Lion currently does not have any special camouflages.

