Last updated on 29 November, 2025.

The AE Phase I is a USA tier 9 heavy tank. It has great hull and turret armour, very good mobility, and gun with good penetration and DPM. Its quite a generic vehicle, but its a good one at that.
- Armour
- Playing against an AE Phase I
- Gun
- Mobility
- Equipment, provisions, & consumables
- Gameplay advice
- Tank gameplay:
- Overall
- Is it worth getting?
- Most recently sold for:
- Camo cost:
Armour
(The AE Phase I in the images is using Improved Assembly)


Drag slider right -> to view 252mm AP
Drag slider <- left to view 330mm HEAT
Armour when flat and facing head-on:
Upper plate 425-1000mm+
Lower plate 105mm
Turret mostly 290-400mm (weakest point 230mm)
Cupola 115mm
Note that both these types of ammo are premium rounds.

vs 240mm AP (top image), 330mm HEAT (bottom image)
Using-10 gun depression:
Upper plate 690-715mm+
Turret mostly 350-480mm (weakest point 225mm)
Cupola 250mm+
Armour vs tier 8 enemies:
Tier 8 tanks will have no issues penetrating the lower plate of this tank, however the upper plate and turret are impossible for most tanks to penetrate with standard ammunition.
The cupola is a weakpoint to all standard ammo on flat ground, but when using gun depression, tier 8 tanks will need premium ammunition to penetrate it.
The lower part of the turret cheeks are also a weakpoint for high penetration premium rounds, but they won’t be the easiest to hit. Keep the tank moving and yous should easily bounce off the turret cheeks.
Armour vs tiers 9-10 enemies:
Tier 9 and 10 enemies will similarly be able to penetrate the cupola and the lower plate on flat ground. To penetrate the turret, enemies will need good premium penetration and good accuracy to hit the lower part of the turret cheeks.
When using gun depression, the cupola can be penetrated with standard ammo, but it will be very hard to hit as its quite far back on the turret.
The turret cheeks can also be penetrated, but again, enemies need good premium penetration and marksmanship to be able to reliably penetrate the turret cheeks.
Standard ammunition can penetrate the lower turret cheeks, but the weakpoint is even smaller when you don’t use premium ammunition, so it will require even better accuracy from the enemy gun.
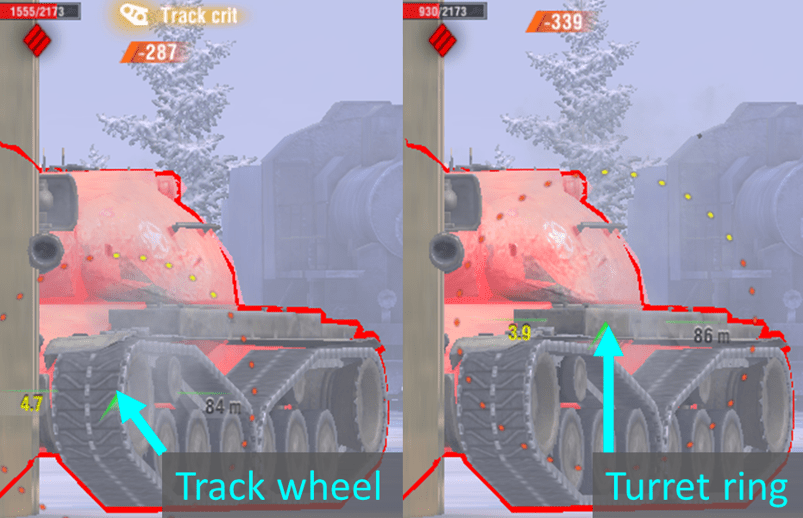
Side armour:
AE Phase I’s side armour is 65mm thick. It cannot sidescrape well due to having a weak track wheel, but also due to a large and obvious outcrop for the turret ring, which enemies can easily aim for this area when you sidescrape.
Playing against an AE Phase I
Sidescraping:
AE Phase I cannot sidescrape. Even though its sides are an ok 65mm thick, there’s a large and obvious outcrop for the turret ring, and enemies can easily aim for this area when you sidescrape.
If you see an enemy AE Phase I sidescraping, shoot them on the hull right under the turret.
Facehugging:
In a facehug, you can bait the AE Phase I player. You can try to aim up at their cupola, if the AE Phase I turns their turret or moves their gun to try block your shot, quickly aim your gun back down again, and shoot premium ammunition into the turret cheek which they turned to hide the hatch.
-Alternatively, if you know exactly where the cupola is (and its hidden behind the light on the gun), just take the shot. That light is only a visual element, its worth 0mm of armour thickness, it will not block your shell, only block your vision on the cupola.
Hulldown/using gun depression:
If the AE Phase I is only exposing the turret, try to shoot as low down on it as possible. The weakest effective armour of the AE Phase I’s turret is on the lower part of the cheeks, to the left and right of the gun.
Of course, if the cupola is exposed, also shoot this, its quite a large cupola so its not too hard to hit. its also very weak, on flat ground, every tank from tier 8-10 can penetrate it.
Sidescraping:
If the AE Phase I is sidescraping, shoot it on the hull area directly under the turret, there is a large bulbous protrusion which accommodates the turret. This area is only 150-260mm thick (140-205mm with AP normalization). Its quite easy to hit because it is so large.
Its hidden behind some stowage boxes on the hull fenders, so you have to use the turret’s position to judge where to shoot.
– Alternatively, shoot HEAT above the tracks. Even at the 70 degree auto-ricochet angle, the effective thickness of side armour is only 190mm, meaning even the lowest penetration HEAT ammunition from a stock tier 8 tank will be able to penetrate, as HEAT ignores the 70 degree auto-ricochet angle.
AE Phase I in a sidescraping position.
Gun
The AE Phase I mounts a 120mm gun
Firepower:
-Ammo: AP/HEAT/HE
-Penetration: 250/330/60mm.
-Alpha damage: 400/340/515
-Reload time is 9.7s for 2426 DPM.
Handling:
–Estimated aim time is 4.1/4.4s
–Base aim time is 2.6s, but it can get down to 2s.
-Dispersion is 0.335/0.285
–Gun handling is 0.2/0.2/12, or 0.18/0.18/0.1 with Vertical Stabilizer.
Usability:
-Shell velocities are 1067/1067/1067 m/s.
-Gun depression is -10 degrees around the entire tank.
Overall this gun is nothing too special, but its a good gun. It has decent DPM, good penetration, and decent accuracy and gun handling. The aim time is quite long, but its not too terrible.
Mobility
Raw stats:
-Forward speed is 40km/h.
-Reverse speed is -20km/h.
-Raw acceleration rate is 17.3 hp/t.
-Engine power is 978hp for its 57 ton weight.
Hard terrain mobility:
-Actual acceleration is 14.4 hp/t.
-Traverse speed is 38 deg/s.
Medium terrain mobility:
-Actual acceleration is 13.3 hp/t.
-Traverse speed is 35 deg/s.
Terrain resistance stats:
–Terrain resistances are 1.2/1.3/1.9
This is overall extremely good mobility for a heavy tank, especially one with as strong armour as the AE Phase I. It has very high acceleration rate, good top speed and reverse speed, and it has great traverse speed. Overall it just feels like a very responsive and agile heavy tank.
Equipment, provisions, & consumables
The AE Phase I does not have any special provisions or consumables.
Gun Rammer:
The AE Phase I has good penetration, especially on its premium ammunition. 250mm on AP and 330mm on HEAT are more than enough to even deal with tier 10 enemies, so don’t use calibrated shells, its completely unnecessary.
Its far more useful to improve the DPM of the AE phase I, as it doesn’t really have special alpha or accuracy to compensate for it. Use gun rammer, it gives the tank a 9.8s reload with 400 alpha, giving it 2479 DPM.
Enhanced Gun Laying Drive:
The AE Phase I has quite a poor base aim time of 2.6s, with food provisions it can be improved to 2.35s. This aim time is still not great, especially for 400 alpha. The tank definitely needs the GLD to improve its base aim time even more, as otherwise it just feels like the aim circle takes quite a long time to start getting smaller.
GLD would improve the base aim time down to 2.00s, which is decent. The estimated aim time would also decrease from 4.7s (if you choose to use supercharger) to 4.4s. The AE Phase I doesn’t at all need supercharger as it already has good shell velocity and does not have poor penetration drop-off.
Enhanced Armour/Improved Assembly:
Both of these are viable options on the AE Phase I. You may want to take enhanced armour to improve the turret cheek weakpoints on this tank. Or, you may want to use improved assembly for that very reason: that it only makes a difference on the turret cheeks and nowhere else.
Though enhanced armour will improve the upper plate and other areas of the turret, they are less relevant, as the upper plate is already strong enough to bounce every shell in game, and other than the cheeks, the turret armour is already very reliable. The lower plate and cupola are far too weak to enhance.
Enhanced armour will add 7.2mm of base armour to the turret, taking its effective armour up by about 12-20mm depending on what part of the turret you are aiming for.
Improved assembly would take this tank’s decent 2050 HP up to 2173 HP.
Vertical Stabilizer:
Due to already having quite good accuracy of 0.335, the AE Phase I doesn’t benefit from using refined gun. Its also a frontline heavy tank, so its more useful for it to use the vertical stabilizer.
The vertical stabilizer will allow the AE Phase I to be more accurate in close quarters combat engagements. The stabilizer means that the tank’s dispersion won’t bloom out as much when it is moving forward/backward, turning, or moving the gun. For an active playstyle, the vertical stabilizer is just far better than refined gun.
Gameplay advice
AE Phase I is quite a generic heavy tank made from the typical “gun depression heavy” recipe. It has good hull and turret armour, but a weak lower plate. It has a good gun but nothing amazing, and it has good mobility. It just plays like quite a generic heavy tank, a bit like a tier 9 Super Conqueror, or the T110E5 (just with a derpier gun).
General gameplay:
Play the tank like a generic heavy tank with gun depression. Go to the heavy side (or the medium side, this tank is mobile enough to play like a heavium), find a gun depression position, and just use the gun to grind through the enemies’ HP.
If you see the flank falling or allies on the other flank need support, the mobility is good enough to allow the AE Phase I to relocate fairly quickly.
Try to avoid sidescraping, as the turret ring bulges out. In a situation where you have no HP left to take a shot, then sidescrape as a last resort. The AE Phase I is so rare that there’s a chance the enemy won’t know about the turret ring portion.
Use gun depression:
With -10 gun depression, the AE Phase I is an extremely comfortable tank to use on a ridgeline or in hulldown positions.
Due to its extremely weak lower plate, and its inability to sidescrape, the best ways to use the armour of the AE Phase I is by either going hulldown, or using gun depression. The turret armour becomes far stronger when using gun depression, but note that there are still weakpoints that enemies can hit.
Don’t just sit still when hulldown or using gun depression. Your turret does have weakpoints, but they are fairly small. Just small movements back and fourth can be enough to throw off the enemies’ aim and cause them to miss the weakpoints.
Pull back after each shot:
Even though your tank has good turret armour, it doesn’t mean you are invulnerable. Staying exposed gives enemies a chance to shoot your turret cheek weakpoints or the hatch on your roof. The reload time of this tank is still almost 10s, so there is no need to stay out and expose your armour.
Also try to avoid taking too long to aim at an enemy. It is important to make sure your shot is accurate and will hit, however if the enemy is aiming at you, its best to only expose your tank for the least amount of time possible.
Facehug enemies:
Due to the extremely strong and well angled upper plate, the AE Phase I is a great tank to facehug enemies with.
Try to avoid turning the turret when you facehug the enemy, as the armour of the turret is not actually that thick (180mm base, 187.08mm with enhanced armour) due to it relying on the rounded shape to increase its effective armour. By turning the turret, you are lessening the angle. Even the smallest amount of turning makes the cheeks of the turret much weaker to premium rounds.
If you see an enemy aiming up at your hatch, you can slightly turn the turret to try and you your gun (and light) to block their shot. However is you see them aim back down at your turret, quickly turn your turret to directly face their gun, if you don’t do this, the enemy can just penetrate the turret cheek.
You don’t have to be too worried about enemies penetrating the upper plate in a facehug. For an enemy to do this, they have to be a very particular tank: have a low-mounted gun (ie, not a tall profile), have great gun depression (at least -10), and have great premium penetration (depends on the height and gun depression of the tank).
If you do find yourself facing an enemy which can penetrate your tank in a facehug, just turn the hull to increase its angling and thickness, but be careful to not over-turn and let them catch your sides.
Essentially, just apply what you know about gun depression heavies to this tank’s gameplay, and you will do very well in it. Do be aware of the differences to some tanks though, this one can’t sidescrape, but is significantly more mobile than most other heavies.
Tank gameplay:
Overall
Armour – 6/10
Gun – 5/10
Mobility – 9/10
Speed – 7.5/10
AE Phase I is overall a great tank.
Armour is very strong on both the upper plate and turret, and the lower plate is narrow; though the hull sides and lower plate are both weak. HE/HESH protection is poor.
Gun is average, hence 5/10. Its got good DPM and penetration, with decent accuracy. Gun handling is average, but aim time is poor. Gun depression is an amazing -10 degrees.
Mobility is good, the engine is very strong, acceleration is good, traverse speed is good, and reverse speed is amazing at -20km/h.
Speed is great for tier 9, 40km/h.
Is it worth getting?
Is it worth trying to get? No, due to the method of getting this tank being so expensive, it is not worth trying to get.
This tank will suit any player who likes standard heavy tank gameplay, or hulldown gameplay. Alternatively, players who like the Super Conqueror or the T110E5 will also enjoy this tank, as its basically the same kind of gameplay and characteristics, but in tier 9.
The AE Phase I is worth 13,500 gold. Its a great tank due to its good all-round statistics in its armour & mobility, combined with a decent gun. The issue is that the tank is just not the most interesting or exciting, as its a fairly generic heavy tank. This means you can get quite similar gameplay from quite a few other heavy tanks, as its just not the most unique in its statistics or its gameplay.
The AE Phase I is a very good generic heavy tank for what it is, but its still generic nonetheless.
Most recently sold for:
The AE Phase I was first introduced in August 2021.
It has never been sold, been in its own dedicated crates, event, or anything of the sort.
AE Phase I is one of the possible reward tanks (not blueprints) you can get from the crate at the end of a battlepass.
To access this crate, you have to first complete all 60 stages of the battlepass, you then have to accumulate an additional 7 mission completions to open 1 crate.
Alternatively, you can buy battlepass stages to open the crate.
The drop chance of the AE Phase I in these crates is 0.05%, or 1 in 2000.
Camo cost:

AE Phase I currently has no special camouflages.
