
The Fänrik is a tier 9 tank from Season 3 “Resistance”. Its an Swedish-style heavy tank based on the Emil I. It has a 2 shot 120mm autoloader with great penetration, its also well-armoured, but quite slow.
Click the table of contents below to access the section you want:
- Armour
- Playing against a Fänrik
- Gun
- Mobility
- Equipment, provisions, & consumables
- Gameplay advice
- Tank gameplay:
- Overall
- Is it worth it?
- Camo cost:
- Stock grind
Armour
(The Fänrik in the images is using Enhanced Armour)

Drag slider right -> to view 246mm AP
Drag slider <- left to view 320mm HEAT
When flat and facing head-on:
Upper plate 315-320mm
Lower plate 125mm
Turret face 280mm
Angled turret cheeks 285mm
Gun mount 265mm
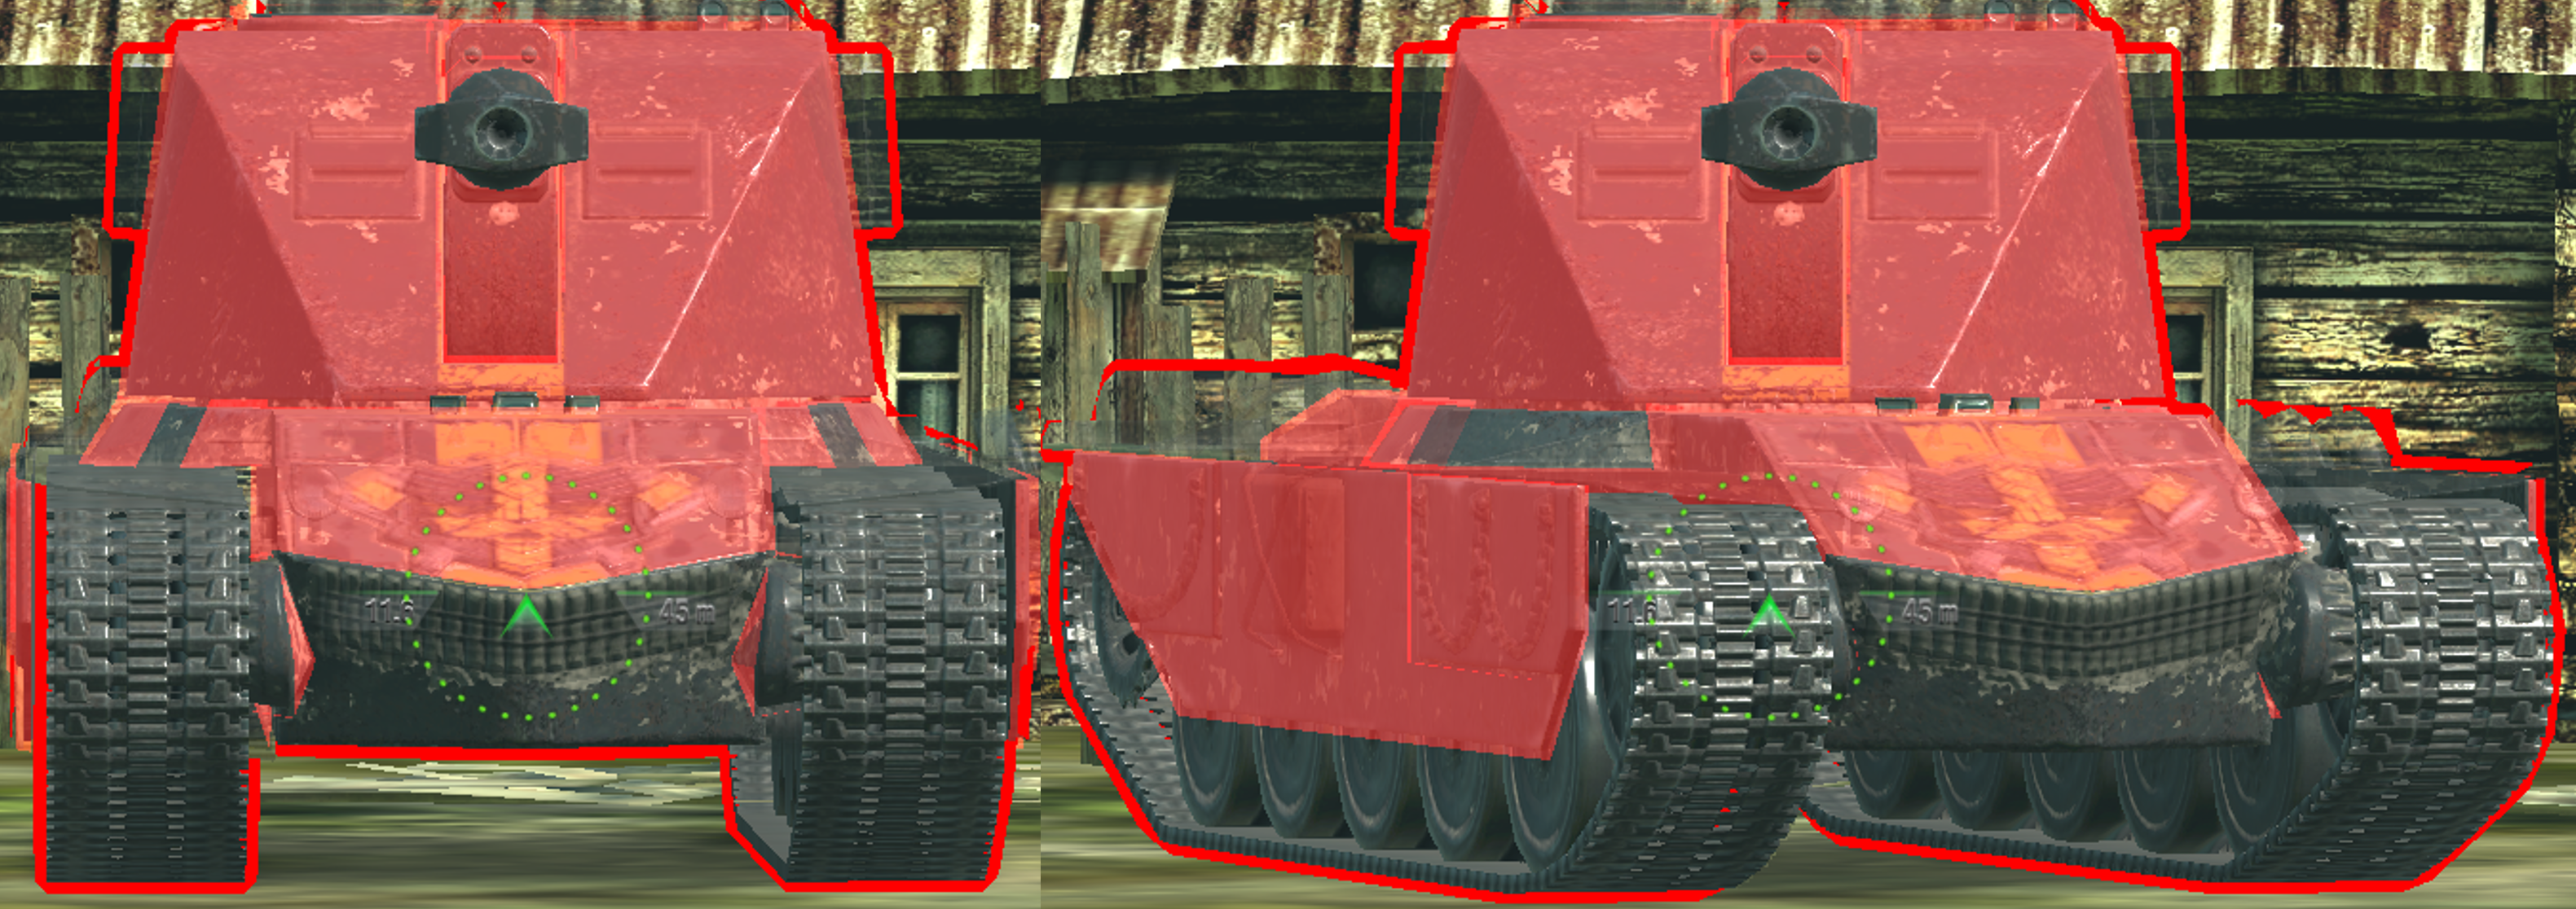
Side armour:
The hull sides of this tank are 94mm thick, with a turret ring bulge weakpoint in the center. The majority of the sides are also covered by a 12mm spaced sideskirt.
Overall this is effective side armour, it can sidescrape well, but does have weakpoints, with the turret ring being the most obvious.
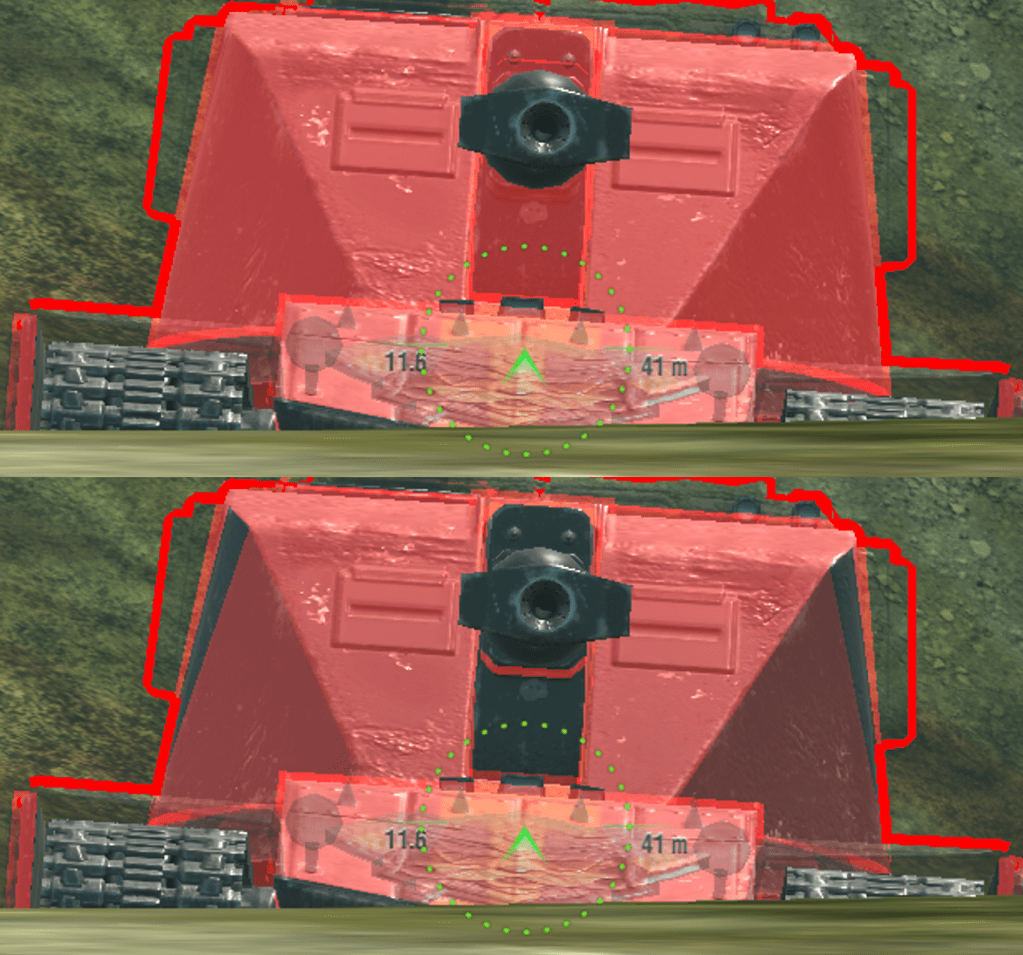
vs 246mm AP (top image) 320mm HEAT (bottom image)
Using -7 gun depression:
Upper plate 435-440mm
Turret face 320-325mm
Angled turret cheeks 310mm
Gun mount 265mm
Armour vs tier 8 enemies:
Against tier 8 enemies, the Fänrik has amazing armour. It upper plate is impenetrable, and turret is essentially impenetrable to most tier 8 premium ammo. It has strong side armour to sidescrape with, and enemies can’t easily HE it even on the weakest plates.
The only weakpoints are the lower plate, which is so weak that it can be HESH penetrated.
The gun mount is the weakest part of the turret, being only 265mm thick, many heavy tanks will be able to penetrate with premium ammo.
The turret face is only weak to the highest of penetration enemies, since its 280mm effective armour.
Armour vs tier -10 enemies:
Facing tier 9-10 enemies, the Fänrik’s armour is much less impressive. It can still easily stand up to all standard ammo on both its turret and upper plate, but many enemies have enough penetration to easily cut through the turret with premium ammo on flat ground.
If using the full-7 gun depression and with enhanced armour equipped, you can reliably bounce up to around 320mm of penetration, this will be effective against many tier 9 heavies, however there are more in tier 10 with over 320mm of penetration.
Note that if the turret turns even slightly (just by 1-2 degrees), then the angled part of the turret cheek becomes immediately weak and easy to penetrate.
Playing against a Fänrik
Armour:
Just shoot premium ammo at the Fänrik’s turret when its on flat ground. The only enemies which will struggle with this are tier 8 tanks, which generally don’t have enough penetration to go through the turret.
Nearly all tier 9 and tier 10 tanks have enough penetration to penetrate the Fänrik’s turret on flat ground.
Using gun depression:
If the Fänrik is using gun depression, then its turret can be very strong, between 300-325mm depending on which turret and equipment the player is using.
If the turret face is not penetrable to premium ammo, then aim for the gun mount, this area is always at a flat angle, and is easy to penetrate even for many tier 8 tanks.
HE/HESH weakpoints:
Fänrik is fairly well protected from HE due to its good thicknesses all-round, so many lower caliber HE shells can’t penetrate it anywhere.
-The weakest armour plate is 56mm, on the hull rear. This means its penetrable to only 120mm gun HE or higher (or some lower caliber guns with increased HE penetration).
-The turret rear is 62mm, so is only penetrable to 130mm gun HE or higher.
-Hull sides are 94mm, so are not penetrable to HE, only to HESH or premium HE shells.
-Lower plate is 115-125mm effective, so many HESH & premium HE shells can easily penetrate there.
Sidescraping:
If the Fänrik is sidescraping, there are a few weakpoints you can aim for.
The most obvious one is the turret ring bulge on the hull, this is very weak and an easy penetration for all enemies.
A less obvious weakpoint is the drive wheel mount, this is on each side of the hull and is right behind the drive wheel. Its only around 100mm in armour so is a very easy penetration. TO hit this, you have to try shoot as close to the base armour as possible (shooting the inner part of the track and not the outer part).
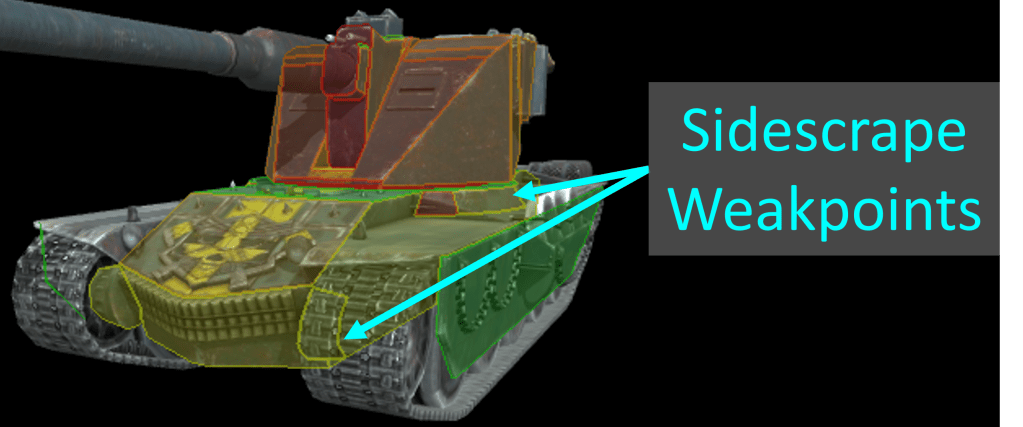
Turret ring and driver wheel mount are the most obvious sidescrape weakpoints.
You can also shoot the Fänrik’s turret when it reverses out in a sidescrape, but it won’t be penetrable to most standard ammo.
(Shooting the turret ring or turret front is the most reliable when the Fänrik is sidescraping. The drive wheel mount is a small weakpoint, and you can’t even see it visually. If you miss, you hit the strong base side armour, which won’t be penetrable.)
Gun
The Fänrik mounts a 120mm gun in its top configuration.
-Alpha damage is 410 on AP, 350 on HEAT, and 520 on HE
-It has 2 shells in the magazine, with a 3.75s intra-clip reload, so in 3.75s it can burst out 820 damage.
-Reload time is 18.1s, giving it 2251 DPM
-Penetration on AP is 247mm, HEAT is 330mm, and HE is 65mm.
–Estimated aim time is 3.8/4.2s
–Base aim time is 2.35s, but it can get down to 1.92s.
-Dispersion is 0.353/0.318
–Gun handling is 0.2/0.2/0.16, or 0.17/0.17/0.05 with Vertical Stabilizer.
-Gun depression is -7 degrees
Overall this is a good gun. Its not accurate, and its not high-DPM, but it does perform well since its a 2-shot burst with high alpha.
Gun handling is average, accuracy is mediocre, & aim time is decent. Penetration is very impressive for a tier 9 tank, and the gun has comfortable alpha with a decent magazine reload time. Intra-clip reload is long, but decent for a gun with 410 alpha.
Gun depression is not great, -7 is much worse than any other Emil tank in the game, which means this tank won’t work in all the positions you might usually use those other Emils. This gun depression is still decent, especially due to how small of a tank that the Fänrik is.
Mobility
-Top speed is 37km/h forwards, and -14km/h in reverse
-Traverse speed is 38.2 deg/s on hard terrain, and 29.3 deg/s on medium terrain.
-In game acceleration rate is shown as 12 hp/t, it has a decent 608hp engine for its 51 ton weight.
-Actual acceleration rate is 12 hp/t on hard terrain, and 9.2 hp/t on medium terrain.
–Terrain resistances are 1/1.3/1.5
Overall this is pretty poor mobility. While the tank is quite mobile on hard terrain, with a decent acceleration rate and good traverse speed, the terrain resistance difference causes the medium terrain performance to be much worse.
Medium terrain is the most common terrain type in the game, so mobility on medium terrain is what matters most. The Fänrik accelerates very slowly, and has fairly mediocre hull traverse speed on medium terrain. It really struggles to even reach 34km, let alone its 37km top speed.
When the tank can reach it, the 37km top speed is pretty good, and its 14km reverse speed is just average for a heavy.
Equipment, provisions, & consumables
The Fänrik doesn’t have any special provisions or consumables.
Calibrated Shells:
Fänrikcan get away with using vents just fine, since it has good penetration on all 3 of its shells already. Vents would slightly improve DPM, aim time, accuracy, view range, and both hull & turret traverse speed.
However the best choice here is calibrated shells, since the Fänrik has quite a focus on effectively dealing its 2 shot damage burst, calibrated shells allows it to be more effective against heavier armoured tanks, and against lighter armoured ones with its good HE.
Calibrated shells would increase penetration on AP from 247mm up to 259mm, HEAT from 330mm to 363mm, and HE from 65mm to 72mm.
Enhanced Armour:
Enhanced armour is very beneficial to the Fänrik due to its well angled and thick armour plates. Its also an armour-reliant tank in gameplay, since it can’t rely on its mobility so much in battle. Improved assembly is not worth using, since even 1 extra bounced shot is worth more HP than what improved assembly gives.
Enhanced armour would improve:
Upper plate from 315mm up to 327mm.
Turret face from 280mm up to 291mm.
Angled turret cheeks from 285mm up to 297mm
Gun mount from 265mm up to 276mm
Vertical Stabilizer:
Refined gun does not benefit this tank. Though dispersion isn’t great, its still good enough for the alpha this tank has.
Its much better to use vertical stabilizer, since the Fänrik is an autoloader, and really benefits from reducing the after-shot-dispersion (which vertical stabilizer does). Its also a closer range active heavy tank, so is often turning to angle its armour or to reposition and shoot enemies. Vertical stabilizer helps it to retain accuracy while making such movements, allowing it to get aimed in faster when the tank stops.
Gameplay advice
The Fänrik has gameplay similar to the Obj.752, since it uses the gun in a similar way, and has fairly similar gun depression.
Its just a regular heavy tank in terms of mobility and armour, but with a bit of a different gun since its an autoloader. It doesn’t really have many special gameplay points, as its a fairly regular heavy tank, just with a 2 shot autoloader.
General gameplay:
Take the Fänrik to the heavy tank flank. It doesn’t work well in other situations due to its poor mobility and accuracy. It works better on the heavy flank where enemies are larger and slower.
Use hard cover to hide while reloading. 18s isn’t too long, but its still long enough that enemies have time to push you and put in a few shots.
Note the 3.75s intra-clip. This is not a quick burst, and sometimes its not the best idea to just sit out in the open while that 3.75s is counting down. Due to this intra-clip, sometimes it may also be smarter to switch targets rather than only focus on one enemy. In situations where enemies are retreating, or their armour becomes harder to deal with, sometimes shooting a different enemy allows your gun to be more effective (due to either accuracy or different ammo use).
Drive on hard terrain:
Due to the terrain resistance difference, the tank’s mobility performs quite differently depending on the terrain.
On hard terrain, its fairly mobile. The tank has good traverse speed with a decent acceleration rate, it can reach 34-37km fairly easily. Hard terrain are roads and concrete or paved areas.
On medium terrain the tank is pretty slow. It has loses roughly 9 degrees/s traverse speed, and has much slower acceleration, losing about 2.8 effective hp/t. Medium terrain is any area of the map that’s not hard terrain and not water (soft terrain), so its the most common terrain type on most maps.
Sidescraping:
While this tank has strong side armour and it can sidescrape fairly well, this shouldn’t be a go-to strategy in battle. Good enemies will know the turret ring weakpoint of the Emil, and most enemies who use premium ammo can penetrate the turret front with no issue.
Sidescraping should be used in situations where there’s no other practical way to push a corner or an enemy without taking damage. Despite having weakpoints, sidescraping still gives you a more favourable armour profile compared to just driving out sideways and exposing your lower plate and side armour.

Note how the turret ring weakpoint is fairly easy to hit in closer ranges, and how at least half the turret has to be exposed to shoot the enemy when sidescraping.
Use gun depression & hulldown positions:
The only weakpoint on the tank’s front (against standard ammo) is the lower plate. Going hulldown will hide this, giving the tank an impenetrable armour profile against standard ammo. Enemies will need to use premium ammo to penetrate the turret, which lowers their alpha damage.
Using gun depression allows the turret to become impenetrable to even many premium rounds. The -7 gun depression is pretty decent along with the low profile hull, and it significantly increases turret armour effectiveness. The only weakpoint when using gun depression is the gun mount.
Note the image below where the turret is turned just slightly. Avoid doing this in battle since it gives the tank a huge turret weakpoint.

When using gun depression avoid turning the turret at all.
The image shows 320mm HEAT penetration, with the Fänrik using -7 gun depression.
Use the ammo types:
Fänrik has very good ammo choice.
-High penetration standard ammo of AP, with good shell velocity and the ability to overmatch & normalize.
-Very high penetration premium HEAT shells, with as much penetration as some tier 10 TDs (if using calibrated shells)
-Great penetration & good damage HE shells, able to do a total burst damage of 1040 to lighter armoured tanks, or even some heavier armoured tanks (such as the rear of an IS-8)
The Fänrik has fairly standard heavy tank gameplay in terms of positioning and how it uses its mobility. In terms of how it deals damage, the most similar tank is the Obj.752, which the Fänrik feels quite similar to, just a bit less capable due to its overall weaker stats.
Its just a standard hulldown and burst damage autoloader, with great penetration but mediocre accuracy and mobility.
Tank gameplay:
Overall
Armour – 5/10
Gun – 7/10
Mobility – 4/10
Speed – 6/10
Overall the Fänrik is a good tank.
Armour is average for a heavy tank. Upper plate is very strong, lower plate is very weak. Turret is penetrable to premium ammo on flat ground, but strong with gun depression. Decent in sidescraping, great HE protection, decent HESH protection.
Gun is good, mainly for its burst of 2 x 410 in 3.75s. Its magazine reload is pretty good, with great penetration. Gun depression is decent at -7, accuracy & gun handling are average, with decent aim time.
Mobility is mediocre, with a decent engine power and good traverse on medium terrain, but being noticeably slower on medium terrain, turning slower and accelerating much slower.
Speed is pretty decent at 37km/h.
Is it worth it?
This tank cannot be earned for free, and can only be earned by buying bundles in the store during Season 3
While this is a good tank, its basically just a worse Obj. 752, it offers a very similar 2 shot autoloader in an armoured heavy tank package, but has no advantages other than a 2km better reverse speed, 0.25s intra-clip, and some frontal hull armour.
The Obj.752 has much better alpha damage, penetration, DPM, magazine reload, gun depression, turret armour, hull side armour, and mobility.
For what it would cost to fully max out modules on the Fänrik, you could buy multiple Obj.752s.
The Fänrik is worth 12,000 gold. Its a strong tank with good armour, and a nice 2×410 autoloader. Its mainly due to this burst damage that the tank works well, since its mobility isn’t the best, and armour is average.
Camo cost:

Fänrik has a permanent appearance which can’t be adjusted.
Its shown here in the stock configuration.
Stock grind
As you upgrade modules, the stats of each module improves slightly, improvements are not large, they are very gradual.
If you want to check the stats of each module, you can view the tank in-game, or use gamemodels3d or Blitzstars.
Important:
-Only the top turret improves turret armour, all the stock and intermediate turrets have the same armour.
-Stock and top turrets/guns have the same gun depression.
-Tracks only upgrade traverse speed (not terrain resistances or gun handling).
-The hull doesn’t upgrade, the armour is the same throughout.
Gun:
This tank starts with a 110mm gun that does 370 damage, then increases to 380 damage at T2, and 390 damage at T3. At T4 it becomes a 120mm with 410 alpha.
Going to the T2 and T3 guns, penetration, accuracy, alpha damage, and DPM all gradually increase.
The stock guns are quite weak and hard to use due to their abysmal DPM, accuracy, & reload time, and since all 4 guns on this tank have the same 3.75s intra-clip.
Turret:
The stock turret is strong to standard ammo, but not that strong. Its actual thickness is only 4mm more than the tier 8 tech tree Emil 1, so against high penetration tanks it won’t always hold up.
Its decent when using gun depression, able to bounce up to around 315-320mm HEAT if using enhanced armour.
Engine/tracks:
Engine power, traverse speed, and acceleration are all terrible when stock. The tank feels extremely slow, like a superheavy. When stock its even more paramount to stay on hard terrain only, since mobility on medium terrain is hardly usable.
The tank below has enhanced armour equipped.


Drag slider right -> to view 246mm AP
Drag slider <- left to view 320mm APCR
Turret face 260mm
Angled turret cheeks 270mm
Gun mount 258mm

vs 246mm AP (top image), 320mm HEAT (bottom image)
Using -7 gun depression:
Turret face 300mm
Angled turret cheeks 285mm
Gun mount 258mm
Upgrading:
As said above, upgrading each module improves it slightly. In total there are 4 of each module on this tank. 1 stock module, 2 intermediary modules, and 1 top module for each turret, gun, engine, and tracks.
Each gun upgrade makes it slightly more accurate, higher penetration, quicker reload, better alpha.
Each turret upgrade gives better HP and turret turn rate.
Each engine upgrade improves traverse speed and acceleration rate.
Each track upgrade improves traverse speed sonly.
Eventually you get to the top modules, these are the only modules which change in appearance.
-The top gun has by far the best accuracy, penetration, DPM, alpha damage, and reload. This upgrade is so big that it increases the tank’s DPM by almost 300.
-The top turret improves in armour by a noticeable amount, especially when using gun depression.
-The engines and tracks are also in their best configuration, so also output the best possible mobility for the tank.
